Featuring over 350 tried and tested recipes that can be prepared at home. From comfort food to restaurant style. Plus 110+ articles on Kitchen and Cooking Tips, Restaurant Reviews and more.
Showing posts with label Gajar Alu Matar (Curried Carrots and Potatoes with Peas). Show all posts

Monday, 28 August 2017

Gajar Alu Matar (Curried Carrots and Potatoes with Peas)


Photo Courtesy: Dr. Debarshi Chatterji

Julia Child said, “You don’t have to cook Fancy or Complicated Masterpieces, just GOOD FOOD from FRESH INGREDIENTS”.

Today my article is all about this quote. The curry I am going to share with you is a simple homemade comfort food or as some would say, food for the soul. I prepared this curry with the Paneer Alu Pulao but you can also enjoy it with some plain Parathas. Now it may look rich and red in color but believe me this is a very light and healthy curry loaded with delicious vegetables. 

This is an easy and quick curry and a blessing for those who either do not cook much or do not like spending much time in the kitchen. So, without further ado, I present to you, today’s dish - Gajar Alu Matar (Curried Carrots and Potatoes with Peas)


Ingredients:
  • Potatoes – 1 cup (approximately ½ of a big potato), cut into small cubes
  • Carrots – 1 cup, peeled and cut into small pieces
  • Peas – about ¾ cup (I used frozen)
  • Tomatoes – 1 cup, cut into small pieces
  • Meat masala – 1 tablespoon
  • Cumin seeds – ¼ teaspoon
  • Ginger – 1 inch, finely chopped
  • Green chilies – 1-2, finely chopped
  • Garam masala – ¼ teaspoon
  • Salt – to taste (about ½ teaspoon)
  • Oil –2-3 tablespoons


Directions:
  • Heat a wok over high heat.
  • Add the Oil in it.
  • After a couple of seconds, add the Cumin Seeds. 
  • When they start sputtering add the Potatoes (Tip: The potatoes should be well drained and patted dry otherwise they will make the oil jump). Cover with a Splatter Screen if required.
  • When the Potatoes start turning golden, add the Carrots and mix well. 
  • After 2-3 minutes, add the Tomatoes, Peas, Ginger and Green chilies and mix well.
  • Fry for about a minute, you will see the tomatoes turning soft. Now add the Meat masala and Salt and mix well. 
  • Fry for about 15 seconds then add 1 and ½ cups of water (This will depend how much curry you want).
  • Since the wok is hot, the water will instantly start to boil, mix and cover. Reduce the heat to low and allow it to cook for 10 minutes. 
  • Add the Garam Masala, mix well and cover. Allow it to cook for another 10 minutes.
  • Press a piece of Potato under your spatula to check if it has been cooked through. 
  • Turn off the heat and serve hot with Pulao or Paratha.


Tip:
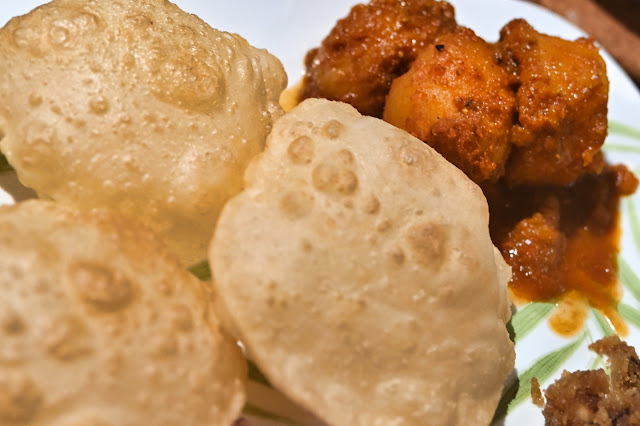
  • Since this curry does not have any Onion or Garlic in it, it makes a very good option for the fasting days. Enjoy it with some Luchi.


Recommended Reading:

Wednesday, 2 August 2017

Paneer Alu Pulao (Rice with Fresh Cheese and Potato)


This Paneer Alu Pulao is my own recipe and one of my absolute favorites. When I was living in Delhi, this used to be my go to dish. This dish is easy to prepare and since the Pulao already has Paneer (fresh cheese) and potatoes, it can be enjoyed with just some raita or chutney. I use a combination of Ghee (clarified butter) and oil with lots of aromatic spices to prepare the Pulao which leaves you craving for some more.

So last Sunday, I decided to prepare this Pulao with a Gajar Alu Matar curry (Curried Carrots and Potatoes with Peas). The idea was to spend less time in the kitchen so that we can watch Game of Thrones without fretting about dinner. I did the preparation before the episode started and once it was over, I quickly fried the Paneer and Alu and the Pulao was ready in just 30 minutes.
Now, if you are preparing the curry as well, I would suggest you to do the preparation beforehand so that you can multi task and prepare both the curry and Pulao at the same time. Believe me it’s possible!

A little tip to you, although you can always make paneer at home, I would suggest you to use store bought paneer. This will save you a lot of time and energy. Since we are not using any onion or garlic in this Pulao, it can also be consumed on the fasting days. 

Bon Appetit!


Ingredients:
  • Basmati rice -1 ½ cup, washed and soaked in water
  • Water - 3 cups (to cook the Pulao, use normal tap water)
  • Paneer cubes – about 2 cups, cut in big cubes
  • Potato – about 1 ¼ cups, peeled, washed and cut into bite size cubes
  • Garam masala – about ¼ teaspoon
  • Salt – about ½ teaspoon (or as per taste)
  • Green Cardamom - 2 to 3 
  • Cumin Seeds – ½ teaspoon 
  • Bay Leaf – 1
  • Cinnamon - 1 inch 
  • Cloves -3-4
  • Black Cardamom – 1 - 2
  • Mace - 1 single strand
  • Oil – 2 tablespoons 
  • Ghee - 2 tablespoons 


Directions:
  • Heat a wok over high heat.
  • Add the Ghee and Oil in it.
  • After a couple of seconds, add the potatoes (Tip: The potatoes should be well drained and patted dry otherwise they will make the oil jump). Cover with a Splatter Screen if required.
  • When the potatoes start turning golden, add all the whole spices (Green Cardamom, Cumin Seeds, Bay Leaf, Cinnamon, Cloves, Black Cardamom and Mace)
  • Fry for about 15 seconds then add the paneer cubes.
  • When the paneer cubes start turning golden, add the drained rice.
  • Fry till the rice turns golden – golden red in color.
  • Add the water, the wok is hot so the water will instantly start to boil, mix and cover. Reduce the heat to low and allow it to cook for 10 minutes. (Tip: Do not take off the cover while the rice is cooking. This will let out the steam and change the cooking time).
  • Add the Garam Masala and Salt, mix well and cover. Allow it to cook for another 10 minutes.
  • Press a grain of rice under your spatula to check if it has been cooked through. (Tip: When properly cooked, each grain of the rice will be firm but tender, and no longer crunchy. Since it has been fried before cooking, it will not stick together. The Pulao should be fluffy so if it isn’t, that means you have overcooked the Pulao but don’t worry it will still taste amazing).
  • Turn off the heat and fluff the rice (move around the rice in the wok carefully) with a spatula. This will make it look dry and not steamed.
  • Serve hot with a raita, chutney or curry of your choice.


Recommended Reading:

Wednesday, 10 May 2017

Luchi – Deep Fried Puffed Bread


Photo features: Luchi and Alu Kumror torkari (Deep fried puffed breads with a Potatoes and Pumpkin stir fry).


The thought of gaining a few hundred calories over brunch is not going to stop me from enjoying a crusty hot Luchi.

Luchi or Puri as we call it in Hindi is one of the most loved and eaten breads in almost every Indian home. Kids love its crusty puff and eat it first to enjoy the crunch. Be it a weekend brunch, fasting day or a special meal for the guests Luchi is always there. The Luchi dough is kneaded with oil or ghee and a little salt which creates that nice crust on it and brings a savory taste in it. Luchi can be enjoyed with any stir fry or curry of your choice.


Now although I have eaten Luchi hundreds of times at my parents’ home, I actually took the recipe from my mother in law while writing down another of her special recipes- Alur dom. Debarshi loves Luchi and Alur Dom and I try to prepare this whenever I can. Since Luchi is deep fried, it’s loaded with calories and I will suggest you to limit this for special occasions only like I do. If you love fried bread, then a good alternative to Luchi is Paratha which is prepared by shallow frying the rolled out dough on a skillet. It is easier to prepare and is comparatively a healthier option.


Now let’s talk about the preparation and techniques. Luchi dough will not have any leavening agent in it like baking powder or soda and hence we will be adding a good amount of oil which we call moen in Bengali. This helps to make the Luchis crisp and puff up while frying. I love adding some carom seeds as well. They not only inculcate a complex aroma in the Luchis but also help prevent any stomach disorders. While kneading the Luchi dough pay special attention, if it starts getting sticky then don’t be afraid, continue kneading so that the dough absorbs all the extra water. I always use lukewarm water to knead the dough and once it turns smooth, I leave it to rest for at least 15 minutes. A Luchi will be smaller than your palm almost the size of a small round bread roll. So you will have to roll a few extra Luchis per head because everyone will be eating a few more. I always transfer the hot Luchis in a colander lined with a paper towel so that it can absorb the extra oil and the steam can escape.


Luchi goes great with any Sabji or curry but I just love it with a Bhaja like Begun Bhaja or Bhindi Bhaja (deep fried Eggplant or Okra with turmeric and salt). Luchis are temperamental so even after doing all the steps correctly it’s possible they won't puff up. Don’t worry they will still taste great. However, do check the correct temperature of the oil by doing the test and do read the frying tips.

So this weekend how about some Luchi Torkari? Try it and let me know.

Bon Appetit!


Photo features: Luchi and Alur Dom (Potatoes with gravy)


Ingredients:
  • All Purpose Flour – 2 cups
  • Whole Wheat Flour – ½ cup
  • Oil – 6 teaspoons (used while kneading the dough) + 2 cups for frying
  • Water – about 8 tablespoons (add more if required), lukewarm
  • Salt – about ½ teaspoon
  • Carom Seeds – about 1 teaspoon (optional)

Directions for Kneading the Dough:
  • Wash your hands, you will be using them a lot. If using stand mixer, attach the Bowl and Hook to your Stand Mixer and connect it.
  • In a large bowl mix the All Purpose Flour, Carom Seeds (if adding) and Salt together. Mix using either your fingers or a whisk or run the mixer on the lowest speed until it's all well mixed.
  • Now add the Oil. Mix with your fingers until you get a sandy texture or run the mixer again for a minute or two.
  • Add water, a little at a time, and knead into a dough. You may need a few extra tablespoons of water if the dough feels tough. We need a tight dough so do not add a lot of water otherwise it will become gooey and too soft. Keep kneading it for another minute or two. 
For stand mixer
  • Start the mixer on lowest speed and slowly add a little water in the flour. I give it time to knead and form the dough. If the sides are sticking with the bowl too much I switch off the mixer and clean the sides using a spatula. I keep it running until the dough begins to come together adding a teaspoon of water at a time. At this stage it will look dry, make sure not to add too much water at this stage. We need a tight dough so do not add too much water. Keep running the mixer. 
  • Now sometimes the dough turns out a bit stickier I usually add a little flour or a tablespoon of oil and keep it kneading until it's smooth and almost non sticky. 
  • When the dough feels smooth, remove the hook and cover the bowl with a kitchen towel or a plastic wrap and let the dough rest for at least 15 minutes. 

Directions to roll the Luchis:
  • Once the dough has rested, re-knead the dough for a few seconds. Then divide the dough into 2 equal parts. Roll each part into a log like a thick breadstick. Divide both the logs into 14 equal pieces. 
  • Now these 14 pieces will make 14 Luchis. Take a piece of dough between your palms and roll it into a ball. Press the ball between your palms lightly to flatten it a little like a disc. Put all the other balls of dough back in the bowl and cover it. This will prevent the dough from drying out.
  • Now let’s roll the Luchi, if we have added the correct amount of oil (moen) while kneading the dough, then the dough will roll smoothly and you will not need any flour for dusting. This will also bring a smoother texture and make the Luchis flaky. However, if you find it difficult to roll, you can always use a little All Purpose Flour.
  • Place the disc on the rolling board and start rolling it. It should be small and round and not too thick. A little unevenness in shape is ok. 
  • Now we are ready to start frying the Luchis. You may want to roll a few extra Luchis before starting the first batch. Make sure you are not putting the rolled out Luchis on top of each other. Keep them on a cookie sheet or a big platter on a single layer and cover them with a kitchen towel.

Directions for frying the Luchi:
  • Heat oil in a deep frying pan or wok over medium- medium high heat.
  • Test the temperature of the oil by dropping a small ball of dough into the oil. If there isn’t any bubbling, then the oil isn’t ready. If it’s furiously bubbling and there is smoke, that’s too hot. If the temperature is perfect the dough ball will take a dip and immediately float to the surface of the oil and start changing color.
  • At this perfect temperature, add one Luchi at a time and do this very carefully. Fry the Luchi by gently pressing it down with the frying spoon at different places.
  • Turn over when puffed up (or after a couple of seconds) and fry the Luchi till golden brown.
  • Transfer the fried Luchi on a paper towel or napkin to absorb the excess oil.
  • Serve the Luchi hot with Alur Dom or any other Torkari or curry.

Tips:
  • Switch on the exhaust fan.
  • I find it ok to multi task for this recipe but if at any point you find it overwhelming you may want to do one step at a time. If you do want to multitask, here is an easy tip: roll out a few Luchis then fry them one by one on medium high heat. This will help you to pay proper attention while frying the Luchis. Then lower the temperature and start rolling out the next batch. When you have rolled out 4-5 Luchis, increase the temperature again and repeat.
  • The perfect frying temperature is very important for making puffy Luchis. So, keep checking the temperature.
  • If you are not able to fry a perfect puffy Luchi, it maybe due to the oil temperature, so, try to maintain an even temperature. Remember, preparing deep fried bread is a difficult task which needs patience and experience.
  • Even if your Luchis do not puff up, they will still taste great so do not throw them out.
  • Make sure not to use a lot of flour while rolling the Luchis, this will leave a lot of burnt flour in the oil and you will not be able to re use this oil for the next batches.
  • I usually line a Colander with two paper towels and keep the fried Luchis in it. The holes of the Colander allow the steam of the hot Luchis to pass through thus maintaining the crispiness.
  • Finally, as I said earlier do not pile the rolled out Luchis on top of each other as the uncooked flour will stick together. Keep them on a single layer.
  • While the dough is resting, use that time to prepare the torkari or set the table.


Recommended Reading:

Monday, 15 August 2016

Plain Paratha (Fried Flat Bread)


Parathas are those crispy fried breads which go very well with any torkari (stir fry) or curry. Now if you have already read my articles on Methi Saag Paratha and French Paratha you have an idea on how the dough is kneaded. While those articles focused on adding extra ingredients like Methi Saag or Alu Chicken Pur in the dough, this article will focus on the Plain Parathas which are not only the most common type of flat breads after Rotis but also the quickest brunch options.


Parathas are prepared by kneading Whole Wheat Flour with All Purpose Flour. While we can very well use a Roti dough for making Parathas, I like to add just a pinch of salt with some Meon (Oil) while kneading the Paratha dough. Since the Parathas are prepared without any leavening (Baking Powder or Soda), Meon makes them crisp and helps them to puff up while frying.


Now since the Parathas contain oil, they are not considered a healthy daily meal option and you may feel tempted to go for Roti which contains only Whole Wheat Flour. However, Rotis are baked on an open flame which helps to get it puffed and charred and this needs a bit of experience, hence for a new cook I always recommend to start their Indian Bread baking understanding with Parathas which are prepared completely on the skillet.


As the Parathas are thicker than Rotis, they make very good brunch or tiffin options. I remember I used to take plain Parathas in my tiffin every other day and enjoy them with a slice of Mango or Chili pickle. The quick preparation of Parathas is sure a life saver on weekend brunches when we get up late and feel super hungry. The leftover Torkaris and Curries go very well with hot crispy Parathas.


Traditionally, plain Parathas are rolled in a triangular shape and Stuffed Parathas are rolled in a circular shape but you can roll them in whatever shape you like best, in fact, feel free to use a Tortilla Maker. Kneading and rolling the dough is a fun activity for the kids as well. Give them a small amount of dough and some cute Cookie Cutters. Even the picky eaters can’t refuse a meal if they have participated in its preparation. You can also surprise them by serving a gingerbread shaped Paratha for their meal.


So this weekend, surprise your family members by serving them a crisp Paratha with a Sabji.


“Happiness is – Hot Paratha from the Skillet”.


Ingredients:
  • Whole Wheat Flour - 1 Cup
  • All Purpose Flour - 1 Cup
  • Oil – 4 Tablespoon Plus more for frying
  • Salt - ½ Teaspoon
  • Water – about 1 cup (preferably Lukewarm)


Others:
  • Frying Spatula
  • Oil Brush or Oil spray

Directions: Kneading the Dough by Hand
  • Wash your hands, you will be using them a lot.
  • In a large bowl mix the Whole Wheat Flour, All Purpose Flour and Salt. Mix using either your fingers or a whisk.
  • Now add 4 tablespoons of Oil in the flour. Mix the oil with your fingers until you get a sandy texture.
  • Add water, a little at a time, and knead into a dough. You may need a few extra tablespoons of water if the dough feels tough. It should be soft and slightly sticky. Keep kneading it for another minute.
  • When the dough feels smooth, cover the bowl with a kitchen towel or plastic wrap and let the dough rest for 15 minutes.

Directions: Kneading the Dough using a Stand Mixer

  • Attach the Bowl and Hook to your Stand Mixer and connect it.
  • In the bowl, add the Whole Wheat Flour, All Purpose Flour and Salt and give it a whir on the lowest speed until its well blended.
  • Add the Oil and give it a whir again for a minute or two.
  • Now we start the kneading, start the mixer on lowest speed and slowly start adding half a cup of water in the flour. I give it time to knead and form the dough. If the sides are sticking with the bowl too much I switch off the mixer and clean the sides using a spatula.
  • I keep it running until the dough begins to come together adding a tablespoon of water at a time.
  • At this stage it will look dry, normally for 2 cups of flour, 1 cup of water will be sufficient so make sure not to add too much water at this stage. Keep running the mixer.
  • Now sometimes the dough turns out a bit stickier, I usually add a little flour and keep kneading it until its smooth and almost non sticky.
  • Remove the hook and cover the bowl. Let the dough rest for 15 minutes.

Directions: How to prepare the Paratha
  • Once the dough has rested, re-knead the dough for a few seconds. Then divide the dough into two equal parts. Roll each part into a log like a thick breadstick. Divide both the logs into 6 equal pieces. 
  • Now these 6 pieces will make 6 Parathas. Take a piece of dough between your palms and roll it into a ball. Press the ball between your palms lightly to flatten it a little like a disc. Put all the other balls of dough back in the bowl and cover it. This will prevent the dough from drying out.
  • Now let’s make the Paratha, dip that disc of dough lightly into the All Purpose Flour. This will give it a smoother texture. Place the disc on the rolling board and start rolling it into a 4-inch round. 
  • Now fold it in half and re-fold it in half. This will make it a small Triangular disc.
  • Dip this disc of dough again into the All Purpose Flour (very lightly) and roll it again.
  • I usually spread a little flour whenever the dough starts to stick on the board and roll it into a Triangle shape with even thickness on all sides. 
  • Take a Plate on which you will keep the fried Parathas and line it with a paper towel.
  • Now let’s fry the Paratha. Heat a big Skillet over medium high heat. Transfer the rolled out Paratha to the pan and do this carefully. Lift the Paratha with both hands and place it on the skillet. If it folds while placing, carefully straighten it using a spatula. 
  • Let it cook until you see bubbles forming. Flip the Paratha over using a spatula. 
  • Use a brush to apply Oil on the Paratha (or Spray it) and let it cook for about a minute. You will see more bubbles forming. If you see a few reddish brown spots beginning to form, it’s ready.
  • Flip the Paratha and apply oil on this side as well and flip it again. This time, press onto the Paratha with your spatula on different places for 5-10 seconds. This will help it puff up.
  • Flip the Paratha back over and press the other side with your spatula for a few seconds.
  • Turn the heat down to medium low.
  • Transfer the cooked Paratha on the plate.
  • Serve the Paratha hot with Alu Shimla Mirch Sabji or any other Torkari.

Tips:

  • A Paratha is always a bit thicker than roti. In fact, it is easier to learn preparing a Paratha as the entire baking is done on the skillet.
  • Traditionally Plain Parathas are always rolled in a triangle shape, if you want to try circle or square shapes then make sure that the Paratha is cooked all the way and is not too thick. Depending on the thickness and shape it may take more or less time to cook. 
  • If you have a Tortilla Press at home, you may want to use it as well. 
  • The flour I use absorbs more water so in case your dough is sticky after following these instructions, just add a little more flour to the dough and keep kneading until its smooth and almost non sticky.
  • If I am using the Stand Mixer to knead the dough, I always follow a 2:1 ratio that means if I am adding two cups of flour, then I will add one cup of water. I do not mix all the water all at once but rather add small quantities of water every few seconds to allow the gluten to develop properly.
  • If at any time the Skillet gets too hot, turn the heat to medium and continue cooking. If it is taking too long to cook, then the skillet is probably on a lower heat than required. If the reddish brown spots are forming within a couple of seconds after you place the Paratha on the skillet, then it is too hot.
  • For a new cook, rolling and frying the Paratha at the same time can be overwhelming and you may want to lower the heat. Remember if the Paratha stays on the skillet for too long then its moisture will get all dried up and it will get hard so if you need time to roll the Parathas make sure to turn the heat to low and then again to high once you place the rolled Paratha on the skillet.
  • Switch on the vent/ exhaust so that the cooking fumes are drawn out.
  • Use an Oil spray to grease the Parathas
  • If the flour is sticky after the kneading, you can also add a little oil and continue kneading for a couple more minutes.

(Photo shows: Plain Paratha with Alu Kumro)


Recommended Reading: