Featuring over 350 tried and tested recipes that can be prepared at home. From comfort food to restaurant style. Plus 110+ articles on Kitchen and Cooking Tips, Restaurant Reviews and more.
Showing posts with label Masala Kachori (Indian Puffed Bread with Spices). Show all posts

Wednesday, 23 May 2018

How to re-use the leftover dough


Photo Courtesy: Dr. Debarshi Chatterji

(Thanks to Ishita di and Joyeeta di for sharing this wonderful idea with me.)

I love making Luchi and Parathas from scratch. I make them on weekends, special occasions, while inviting guests and it often happens that I am left with a lot of dough. This usually leaves me with only one option, use up all the dough by making extra breads (Luchi or Paratha). Once they are ready you can either consume them within the next few days or freeze them. In order to freeze the breads, I cool them completely then pack them up in aluminum foils and zip locks. Then, whenever we feel like eating them, I keep them for a few hours in the fridge or about 20 minutes at room temperature. It is really easy to warm them up on the stove top or in the microwave and then you can enjoy them with any curry or Sabji. While this option works well, it also means that after laboring in the kitchen the whole day and entertaining guests, I have to spend additional time in the kitchen to prepare breads which will be consumed later. Earlier I didn’t know what else to do with the leftover dough, however recently, I came to know that we can just freeze it! I tried this and it worked so well that I thought of sharing this with you.


Suppose you have some leftover dough (now don’t go for this option for small amounts of dough, I follow this only if it is more than a cup), first divide the dough into two or three parts (depends on how much you have left, small portions are best to freeze) then put the dough in a zip lock bag, seal it and place it in the freezer. When ready to use, keep it outside at room temperature for two- three hours so that it gets properly thawed, then roll and fry the Luchis or Parathas. Make sure that your dough fits properly in the zip lock bag and there is no air inside it. Roll the bag and secure the lock so that maximum air is pushed out. You can also use parchment paper to divide the dough into portions or use smaller bags for easy access.


A Luchi/ Paratha dough will usually have a really good amount of moen (oil) in it. You can also use it to prepare some Namkeens. I took the recipe from my mom and prepared a test batch with it. It was a success and the next time I prepare it, I will make sure to click some photos and share the recipe with you.

Tip:
  • It is always good to write on the zip locks exactly what you are freezing, especially when you are doing it in portions. You can write ‘Dough for Paratha, Bag 1 of 3’ and so on.


Recommended Reading:

Tuesday, 5 September 2017

Know more about Joan (Ajwain or Carom Seeds)


Remember those yummy savory Indian cookies called Mathris? Easy to prepare and delicious to eat, Mathris are one of the common snack items in many Indian homes. I just love the crisp texture and taste of the Mathris and can never stop after eating just one. A few weeks back, I shared this cookie with one of my friends, who was very surprised that even though the cookie was deep fried it didn’t create any digestive disorder. This made me think, there must be something special in the ingredients and I got my answer – Joan.

Joan (known as Ajwain in Hindi and Carom Seeds in English) is widely used in Indian cooking. They are used to temper the oil and add more flavor in the bland Dals (lentils) or kneaded in the dough of Luchi or Kachoris. They are also added in the batters of Beguni and Bora (Fritters), used in the preparation of Achars (Pickles), Mathris, Seo, Papri and other Namkeens (different types of savory cookies) and Sabjis (stir fried vegetables). They are highly fragrant and are always added in very small quantities to create a beautiful aroma and flavor in the dishes. I love eating Joan deva Luchi (Deep Fried Puffed Bread prepared with Carom seeds) and I don’t even need any curry with it. It tastes so good on its own.

To buy Joan, just visit a local Indian store. As we do with all our spices, Joan should also be stored in an airtight container in a cool, dry and dark place so that it can stay good for a long time.

Before tasting Joan remember, they have a strong dominant flavor so no more than a few seeds at a time. Chew slowly and then drink some water. My mom always recommends me to eat a few Carom seeds whenever I have a heavy meal. It helps to prevent any indigestion or gastric troubles. 

You can add a pinch of Joan to any vegetarian dish to add more flavor and aroma in it. However, I would recommend to fry them in some oil or ghee before adding them in any dish. This will ensure that its dominant flavor is reduced to a subtler hint in the dish.

I hope you do incorporate this amazing seed in your foods, to help you get started I have a few recipes:


Make a low carb bread with Carom Seeds:

Thursday, 2 February 2017

Alur Dom (Bengali recipe: Potatoes with gravy)


Photo Courtesy: Dr. Debarshi Chatterji

Today I am going to share an authentic Bengali recipe. There are several different versions of it prepared by people all over India. It is also a common Sabji served by many street vendors who serve it with crispy Kachoris. Ah! I cannot forget the smell of hot Kachoris and yummy Alur Dom (or Alu Dam) served on a paper plate along with some onion rings and Dhania chutney, just the memory of it makes me drool!

Coming back to the topic, Luchi ar Alur Dom is an all time favorite dish of Debarshi and although it is not always possible for me to prepare his favorite breakfast every now and then, I always prepare it on special occasions like during Durga Poojo (religious praying days) or on his birthday. I feel that by preparing certain dishes on a particular day, we create a tradition of our own and we crave for that particular dish on that day, like Turkey on Thanksgiving. This dish has also become very favorite amongst my American friends who love to eat this in our get together parties.


This Sabji is a dream come true for all the potato lovers. The big chunks of deep fried potatoes with the tomato ginger gravy truly satisfies all my potato cravings. Now, typically this hot and sweet potato Sabji is served with a crisp, fhulko Luchi (puffed crust deep fried bread) but this also goes very well with Kachori, plain Paratha or even rice and dal and if you are feeling lazy then just toast some breads with butter and make a sandwich with this Sabji. Yum!

To prepare Alur Dom, I would recommend to go for the small round or oval shaped potatoes (mainly for the presentation purposes), you can of course use the good old russet potatoes like I sometimes do. The potatoes are first boiled, cooled and peeled and then deep fried. In the second stage, I prepare a gravy of onion, ginger and tomatoes and slow cook the potatoes in it. The gravy tastes quite simple until I add my homemade Garam Masala in it. Its aromatic and fresh taste adds a complex flavor in the humble potatoes.

So, this weekend, satisfy your Potato cravings with this yummy Sabji.

Bon Appetit!


Debarshi is enjoying his favorite breakfast on his birthday – Luchi with Alur Dom and Chaler Payesh


Ingredients:
  • Potato - a bag of small round or oval shaped potatoes or 2 medium sized russet potatoes, cut into big pieces
  • Tomato - 2, big
  • Ginger -  about 2 inches 
  • Green Chili – 1-2
  • Onion – ½ of a medium onion, minced
  • Turmeric powder -  ¼ teaspoon
  • Salt – ½ teaspoon
  • Garam Masala – ¼ teaspoon
  • Oil – about 3 tablespoons + 2 cups (for frying)


Let’s do a little prep:
  • It’s time to take out the pressure cooker! Yes, wash the potatoes and put them in the pressure cooker with enough water to cover them.
  • Cover the cooker with its lid and attach the rubber and the whistle.
  • Heat the cooker on medium heat and wait for 2-3 whistles.
  • Turn off the heat and let it cool down.
  • Once the pressure drops and the lid opens, remove the potatoes from the cooker and place them in a bowl filled with ice and water.
  • Allow 5-10 minutes then touch cautiously to check if the potatoes are cool enough to handle.
  • Peel the potatoes (carefully certain spots may still be hot).
  • Now take the Tomato, Ginger and Green Chilli and make a paste. You may use Nutri bullet or a food processor to make the paste.


Directions to prepare the Alur Dom: 
  • Heat a wok on medium- high heat.
  • Pour about 2 cups of oil in it.
  • Pat dry the Potatoes.
  • When you see small bubbles on the surface of the oil, drop the Potatoes in it one by one and do this carefully.
  • Fry till the Potatoes are reddish brown in color.
  • Take a different wok or empty this wok draining all the used oil in an oven safe dish. 
  • Heat the wok over medium heat.
  • Take about 3 tablespoons of oil and after about a minute add the onion.
  • Fry till the Onion turns golden brown.
  • Now add the Tomato, Ginger and Green Chilli paste in it and mix well.
  • Keep frying this till the oil begins to separate.
  • Add the Potatoes in it and mix well.
  • Add the Garam Masala and Salt and fry well for a couple of minutes to let the spices blend with the Potatoes and the paste.
  • Add about 1-2 cups of water and stir.
  • Cover and cook over low heat for about 10- 15 minutes so that the Potatoes absorb all the delectable taste and aroma of the gravy and Garam Masala. Make sure the excess water is evaporated so that you get a rich and thick gravy.
  • Serve with Luchi or Paratha.

Tips: 
  • Use petite, red or white potatoes for this recipe. If you are using russet or yellow potatoes cut them into big cubes. Do not use purple or blue potatoes for this recipe.
  • Use a wok with a spider spoon to deep fry the potatoes.
  • If you are not used to eating hot food, you can reduce the quantity of ginger and skip the green chilies.


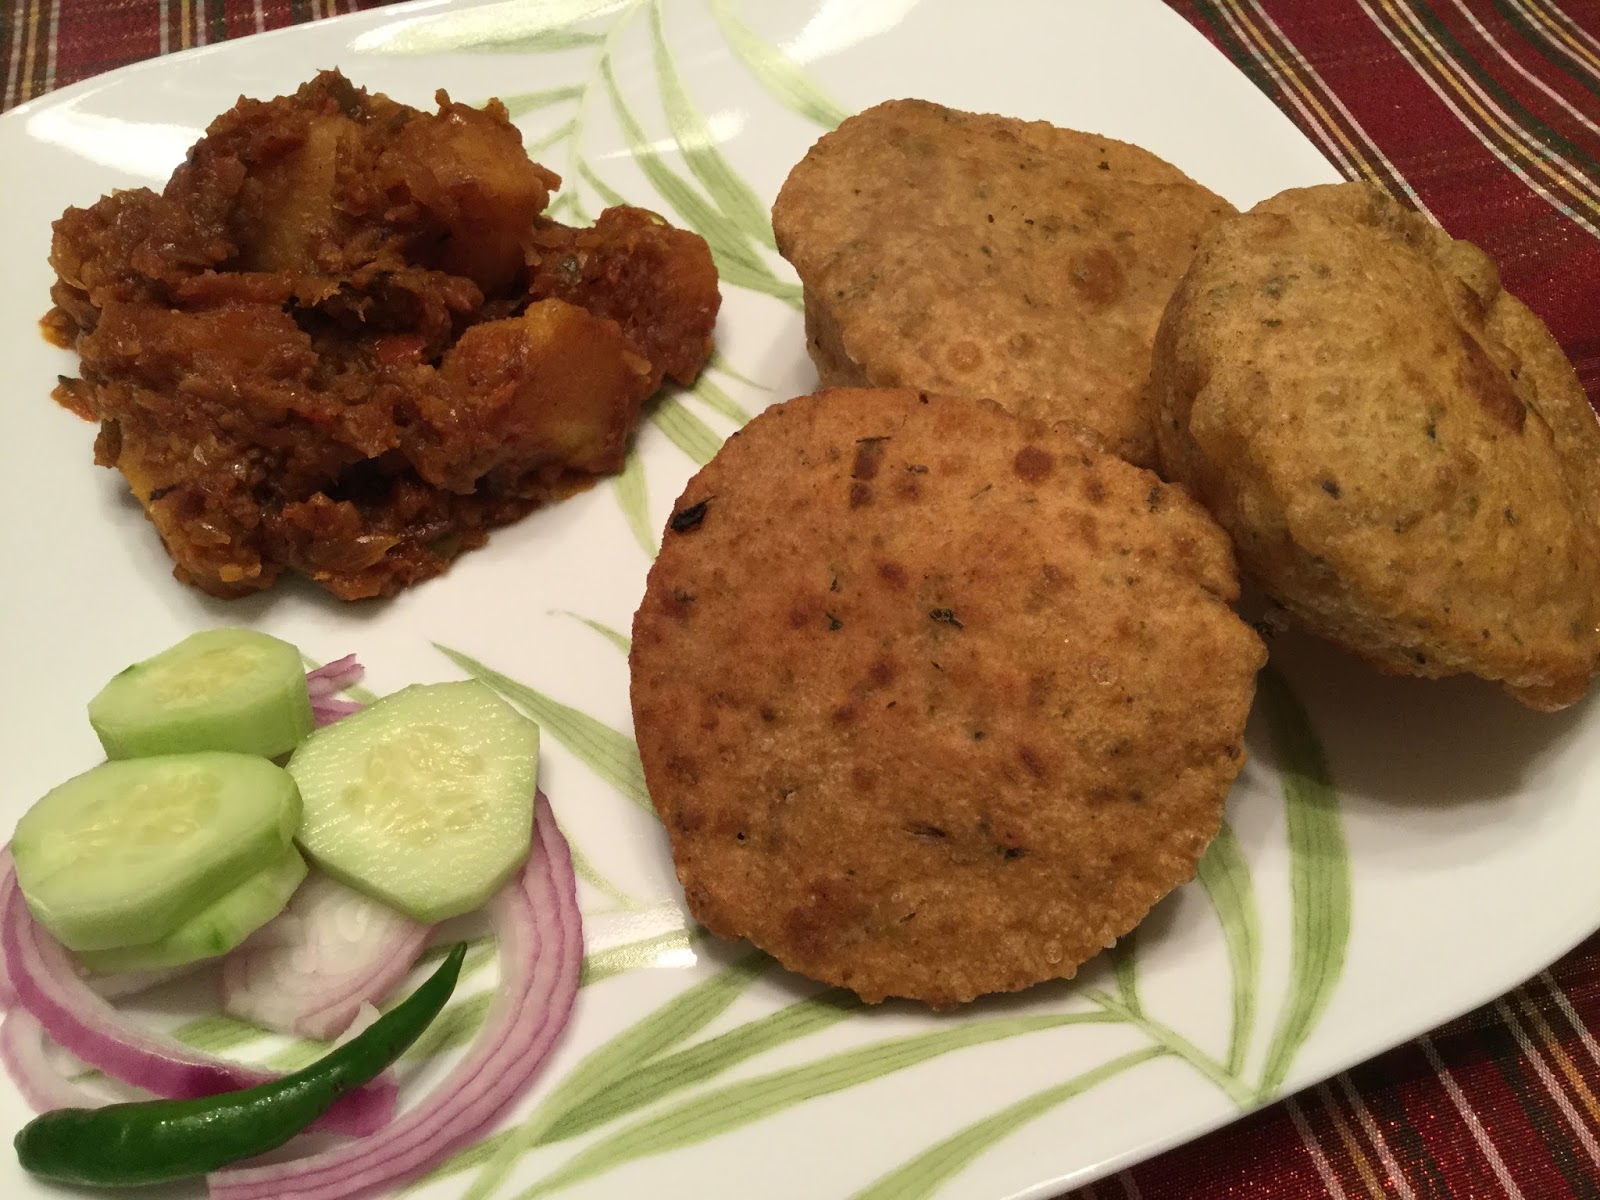
Masala Kachori with Alur Dom


Recommended reading:

Monday, 7 November 2016

Masala Kachori (Indian Puffed Bread with Spices)


Masala Kachori is one of those items which can not only be eaten as a snack with a cup of hot tea but also be served as a main course dish. I love Masala Kachoris as they are the perfect way to satisfy those naughty food cravings. 

Like Parathas, Kachoris can also be prepared by using different types of stuffing’s which may be vegetables (like sweet peas and potatoes) or lentils (like Mung dal). However, preparing stuffed Kachoris for the beginners is no easy task as the stuffing’s often break open hence I would like to start with a simple Kachori which is prepared by mixing several different types of spices in the flour itself. This makes the overall preparation easy. Unlike Parathas which are shallow fried on skillets, Kachoris are always deep fried. When kneaded and fried properly the Kachoris have a puffed, slightly hard crust with a beautiful golden color. Although they taste best when hot, you can also eat them at room temperature.


In India, you can find ready made packets of Kachori masala (spice mix for making Kachoris) and you can just mix them in the flour and instantly make yummy Kachoris. Earlier I used to buy them all the time and prepare them as a snack with Tea. However, I soon realized that the ready made masalas do not stay fresh for a long time and tend to loose the taste, hence I came up with a different solution. I used the leftover Mathri dough to prepare some Kachoris and served them with Alu dam and leftover Rajma and you know what? Debarshi loved it. So, if you have the ingredients for preparing Mathri just re-use them for making this Puffy bread any time.

Preparing Kachori from scratch is a time consuming process but believe me this yummy puffy flaky bread is worth all the extra labor. The best part is, you can serve it with any left over sabjis, curries or even with some pickle (Indian pickles like Mango or Red Chili) so this weekend try this yummy bread.

Bon Appetit!


Ingredients:
  • All Purpose Flour - 2 cups 
  • Whole Wheat Flour - ½ cup
  • Oil - 6 tablespoons + about 2- 3 cups for frying
  • Water – about 5 - 6 tablespoons
  • Carom Seeds - 1 teaspoon
  • Black Pepper - 2 teaspoons, coarsely crushed
  • Dry Fenugreek Leaves - 2 teaspoons 
  • Cumin Seeds - 1 teaspoon 
  • Asafoetida - ¼ teaspoon
  • Baking Soda - ¼ teaspoon
  • Salt - 1 teaspoon

Others:
  • Wok
  • Spider Spoon

Directions for Kneading the Dough by Hand:
  • Wash your hands, you will be using them a lot.
  • In a large bowl mix the All Purpose Flour, Whole Wheat Flour, Carom Seeds, Black Pepper, Dry Fenugreek Leaves, Cumin Seeds, Asafoetida, Baking Soda and Salt together. Mix using either your fingers or a whisk.
  • Now add the Oil. Mix with your fingers until you get a sandy texture.
  • Add water, a little at a time, and knead into a dough. You may need a few extra tablespoons of water if the dough feels tough. We need a tight dough so do not add a lot of water otherwise it will become gooey and too soft. Keep kneading it for another minute or two. 
  • When the dough feels smooth, cover the bowl with a kitchen towel or a plastic wrap and let the dough rest for at least 30 minutes. 

Directions for Kneading the Dough using a Stand Mixer:
  • Attach the Bowl and Hook to your Stand Mixer and connect it.
  • Add the All Purpose Flour, Whole Wheat Flour, Carom Seeds, Black Pepper, Dry Fenugreek Leaves, Cumin Seeds, Asafoetida, Baking Soda and Salt in the bowl.
  • Give them a whir on the lowest speed until its all well mixed.
  • Add the Oil and give it a whir again for a minute or two.
  • Now we start the kneading, start the mixer on lowest speed and slowly add a little water in the flour. I give it time to knead and form the dough. If the sides are sticking with the bowl too much I switch off the mixer and clean the sides using a spatula.
  • I keep it running until the dough begins to come together adding a teaspoon of water at a time. 
  • At this stage it will look dry, make sure not to add too much water at this stage. We need a tight dough so do not add too much water. Keep running the mixer. 
  • Now sometimes the dough turns out a bit stickier I usually add a little flour or a tablespoon of oil and keep it kneading until its smooth and almost non sticky. 
  • Remove the hook and cover the bowl with a kitchen towel or a plastic wrap and let the dough rest for at least 30 minutes. 

Tip: Use the whisk attachment to mix the oil in the flour evenly.


Directions: How to roll the Kachoris
  • Once the dough has rested, re-knead the dough for a few seconds. Then divide the dough into 2 equal parts. Roll each part into a log like a thick breadstick. Divide both the logs into 14 equal pieces. 
  • Now these 14 pieces will make 14 Kachoris. Take a piece of dough between your palms and roll it into a ball. Press the ball between your palms lightly to flatten it a little like a disc. Put all the other balls of dough back in the bowl and cover it. This will prevent the dough from drying out.
  • Now let’s roll the Kachori, if the Meon (Oil) has been added properly (6 tablespoons) then it will allow the dough to roll smoothly so you will not need any flour for dusting. This will also bring a smoother texture and make the Kachoris flaky. However, if you find it difficult to roll, you can use All Purpose Flour.
  • Place the disc on the rolling board and start rolling it. It should be small and round and not too thick. A little unevenness in shape is ok. 
  • Now we are ready to start frying the Kachoris. You may want to roll a few more Kachoris before starting the first batch. Make sure you are not putting the rolled out Kachoris on top of each other. Keep them on a cookie sheet or a big platter on a single layer.


Directions for frying the Kachori:

  • Heat oil in a deep frying pan or wok over medium- medium high heat.
  • Test the temperature of the oil by dropping a small ball of dough into the oil. If there isn’t any bubbling, then the oil isn’t ready. If it’s furiously bubbling and there is smoke, that’s too hot. If the temperature is perfect the dough ball will take a dip and immediately float to the surface of the oil and start changing color.
  • At this perfect temperature, add one Kachori at a time and fry by gently pressing it down with the frying spoon at different places.
  • Turn over when puffed up (or after a couple of seconds) and fry the Kachori till golden brown.
  • Transfer the fried Kachori on a paper towel or napkin to absorb the excess oil.
  • Serve the Kachori hot with Alu Dam or eat it with a cup of hot tea.


Tips:

  • Switch on the exhaust fan.
  • I find it ok to multi task for this recipe but if at any point you find it overwhelming you may want to do one step at a time.
  • The perfect frying temperature is very important for making puffy Kachoris. So, keep checking the temperature.
  • If you are not able to fry a perfect puffy Kachori, it maybe due to the oil temperature. So, maintain an even temperature. Remember, preparing deep fried bread is a difficult task which needs patience and experience.
  • Even if your Kachoris do not puff up, they will still taste great so do not throw them out.
  • Make sure not to use a lot of flour while rolling the Kachoris, this will leave a lot of burnt flour in the oil and you will not be able to re use this oil for the next batches.
  • I usually line a Colander with two paper towels and keep the fried Kachoris in it. The holes of the Colander allow the steam of the hot Kachoris to pass through thus maintaining the crispiness.
  • Finally, as I said earlier do not pile the rolled out Kachoris on top of each other as the uncooked flour will stick together. Keep them on a single layer.
  • When serving to guests, fry the Kachoris before hand and keep them warm and crispy by placing them in an oven safe dish. Heat the oven to the lowest temperature (170 degrees F) and place the Kachoris inside the oven. When ready to serve, they will be just as warm and crisp.


Recommended reading:

Tuesday, 10 May 2016

Excited to use new spices? Know more about Hing (Asafoetida)


Hing or Asafoetida is a flavor enhancer used frequently in Indian cooking. If you have ever had any South Indian dish like Dosa, Idli or Sambar Bara I am sure you have tasted this spice. It is used along with other spices to tamper the oil before adding the vegetables. Now I always recommend to taste any new ingredients before adding them in our dish, but for Hing I recommend a different approach.

Hing has a pungent smell and taste so I recommend not to taste it as it may be harsh on your taste buds rather try smelling it like you would smell a perfume – rub a pinch of it between your fingers and whiff it from a distance. Do not be worried by its strong smell as we will only be adding a pinch or two of it in our food. When we cook Hing with the other ingredients, its pungent flavor subsides and brings aromatic flavors in the dish.

Many vegans who do not usually eat Onion and Garlic prefer to add it in the food for extra flavor. Like many other spices and herbs used in the Indian cuisine, Hing also has many health advantages, people consume it as a medicine for digestive aids, headaches etc.

While storing it be very careful to close the lid properly and put the container in a ziplock. This will prevent its odor from contaminating the other spices. I always store all my spices in a cool and dry place away from heat and light.

Last but not the least make sure to buy the smallest pack of Hing as it is always used in small quantities and lasts for a long time without going bad. 

Bon Appetit!


Recommended Reading:

Thursday, 4 February 2016

How to Deep-Fry food with Confidence


If I am given a chance to choose between two plates of food where the 1st plate has a nutritious Salad and the 2nd plate has a deep fried food like French fry or Fritters, I will definitely choose the 2nd plate and eat it before anyone can judge me! I know eating healthy goes a long way but I love deep fried food. In fact now it has been proven by the Keto diet that fat is considered a natural part of our diet and consuming fat while you are on Keto diet is not harmful to the body. I have been so happy ever since I started following this diet plan because I am one of those people who look forward to their meal and love to cook. Staple Bengali food, for sure, does not fall into most, or any, diet plans. Being full of fried food and carbs, any diet plan leaves me craving for the food I grew up on.

We Bengalis just love deep fried food. In fact most of our side dishes and snacks are deep-fried.

A typical breakfast will always have Luchi (deep fried bread) or Porotha (pan fried bread) with some simple Torkari. Even our most common and simple lunch menu will have some fried vegetables like Alu Bhaja, Bhindi Bhaja, Begun Bhaja and Mach Bhaja (potato, okra, eggplant and fish fry). The evening snack will have fried Peanuts with Muri (puffed rice). The love of fried food is not contained to Bengalis or Eastern parts of the country. North Indians snack on Samosas, Pakoras or Chat which are all deep-fried. South Indians are famous for their Mirchi Vadas (deep fried Chili Peppers dipped in batter). Dinner menus throughout India usually includes deep-fried food to enhance the taste.

Now you must be thinking how we survive? The answer is simple; the daily food menu is balanced. When it has the yummy slightly unhealthy portions, it is balanced with whole wheat carb options like Roti (flatbread baked on stove top) and Salad. Our lunch will have Rice, Dal and a leafy vegetable to start. Although, the menu normally available at an Indian restaurant, is not our everyday meal, I won’t say we do not enjoy occasionally a hefty meal consisting of Luchi with a rich Potato Curry and some slow cooked delicious Kosha Mangsho (goat curry).

From a general observation, every Bengali knows how to cook. I think it’s because of our inherent connection with food, in a way that we take it as our personal responsibility to learn how to cook. I guess it is safe to say, there are businessmen and there are philosophers but Bengalis are best known for their love of food. 

I know now you are interested to know the tips on deep-frying food. Below are the pointers, which I follow. These are simple but effective and work for me every time.


Frying the food:

I use a deep Wok with a round bottom (karahi - I like this as it is easier and doesn’t take a whole container of oil to fry) or you can also use a deep-walled Saucepan or a deep Fryer. I always use a wide spider-frying Spoon with a long handle to remove the hot food. I recommend keeping an Oven Safe Dish lined with a paper towel on the side. This makes it easier to transfer the hot food from the wok. Also I never put all the pakoras or vegetables at the same time in the wok, as it will drop the temperature of the oil. I add only a couple of pakoras (or vegetable/ meat pieces) at a time and keep it moving in the wok after a couple of seconds to allow the oil to fry all the sides equally. Another must have equipment while frying is a Splatter Screen. Once I drop the food into the wok and move it around I cover it with the splatter screen. It blocks the oil splutter. It’s a fine mesh with a handle and I can see through the mesh and flip the food as soon as it’s done.

Pat-dry the vegetable/ meat:

If there is any water in the vegetable the batter will not coat evenly on it. Also, water will make the oil jump. Its scary and the hot oil burns are bad. Adding the food in the oil is an important task and should be done with utmost care.

Safety first:

Ensure there are no children or people in the kitchen who are unaware of the hot oil. If possible use the back burner to deep-fry food to prevent any burns from the burner itself. I always place one pakora at a time in the oil, very carefully to prevent any splash of hot oil outside the pan. I know it sounds scary but believe me the farther you are from the hot oil the more it will splash. If I am not feeling confident to put my hand inside the hot wok I use the frying spoon to place food in the oil. I will not recommend multitasking when you are deep-frying as at that high temperature it only takes a matter of seconds to turn a well-fried food to burnt food.

I know all this information may look scary but believe me they really help. Even a simple chicken curry tastes great if you deep-fry the pieces first.

I will soon add the recipe for the Panch Bhajas, which you can try and believe me Alu Bhaja tastes very different than French Fries. You got to try it yourself to understand the difference in taste. The recipe will be a complete lunch menu along with Steamed Rice and Arhar Dal, which are my favorite comfort food.

“The only time to eat diet food is while you’re waiting for the steak to cook.”


Debarshi is enjoying his favorite breakfast on his birthday: Luchi, Alur Dom ar Chaler Payesh.


Recommended Reading: