Featuring over 350 tried and tested recipes that can be prepared at home. From comfort food to restaurant style. Plus 110+ articles on Kitchen and Cooking Tips, Restaurant Reviews and more.
Showing posts with label Tandoori Chicken. Show all posts

Wednesday, 24 April 2019

Plum Chutney


Chutney or as we Bengalis call it - Chaatni is a quintessential Bengali lunch item. It is served after the meal as a final course. When Debarshi’s mom prepared this Plum Chutney for lunch, I had no idea this could be so versatile. The fact is, you can have this with anything. Below are a few ideas:
  • With your authentic Bengali lunch (of course!)
  • As a preserve with a good Bread and Cheese
  • With leftover roasted meat
  • As a dip with grilled chicken
  • As a spread for your turkey sandwich
  • As a dip with your burger
  • As a dip with savory snacks like Samosa, Pakora, Kabab and spring rolls
  • Pair with plain Parathas
  • As a spread on crackers with cream cheese


Plum, raisins and just enough sugar makes this perfect chutney. If you are used to readymade chutneys and preserves, then it is time to give homemade a try. If you love making chutneys at home, this is the right recipe for you. The very taste of this chutney will tingle your senses with sweet and tangy flavors. Plus, by preparing this yourself you will be assured that no artificial preservatives or spoiled fruits have been used. This is delicious, lip smacking and absolutely unique. And, it has been tried and tested by my mom-in law for several years. 

I don’t have to write here the numerous health benefits Plum have. They are rich in antioxidants, relieve constipation and lower cholesterol levels. They are also an excellent source of vitamins, minerals and fibers. So, what are you waiting for? Grab a box of plums on your next grocery shopping. Eat some fresh and cook some for this chutney. This fresh chutney is indeed a refreshing change from our usual condiments like ketchup and barbecue sauce. 

This chutney also makes a cute present. Just spoon it into a small mason jar and tie it up with a beautiful ribbon. It can be kept in the fridge for at least 10 days (that’s the time period we had it in our fridge).


Ingredients:
  • Plum – 4, cut into big pieces
  • Salt – ½ teaspoon
  • White Vinegar – 2 tablespoons
  • White Sugar – ¼ cup
  • Raisins – ¼ cup


Directions:
  • Boil the Plums in a pressure cooker with the Salt over medium high heat.
  • Once the pressure drops, crush the plums with a wooden spatula or a potato masher.
  • Add the White Vinegar. Mix and bring to a boil over medium high heat.
  • Add the Sugar. Mix and continue boiling for another 3-4 minutes.
  • Add the Raisins. Mix and reduce the heat to low.
  • Continue cooking for 20 minutes till it reaches a thick consistency.
  • Cool and serve.


Serve this chutney with the following:

Tuesday, 29 January 2019

Tandoori Masala


Tandoori Masala is a mixture of spices specifically intended to marinate the meats and vegetables cooked in clay oven (tandoor). The spices include Mace, Nutmeg, Cinnamon, Black Pepper, Cardamom, Cloves, Garlic, Ginger, Onion, Cayenne Pepper and sometimes Coriander, Cumin and Fenugreek with some Red Food Color. I always get readymade packets of Tandoori Masala from the Indian store. Tandoori Masala brings a rich color and flavor to your dishes and you can very well use it in any marinade. You can also use it for stove top cooking and fry it with meat or vegetables to bring that delicious savory flavor. 

Use Tandoori Masala in the following recipes:

Tuesday, 31 July 2018

Jalapeno Poppers with Cream Cheese and Bacon


These Jalapeno Poppers are a great addition to our movie nights. Since they do not contain any added carbs they are also a nice appetizer in our Keto diet. However, the beauty of this dish is, you can enjoy them anytime you want, Keto or not. They are the perfect party finger foods. If you don’t mind a little heat in your food, you will become seriously addicted to these. They taste absolutely creamy, cheesy and decadent. 

I love these types of recipes where you don’t have to work a lot to eat something delicious and this recipe is incredibly easy. All you have to do is mix the cream cheese with the cheddar, garlic and onion and stuff it in halved jalapeños, then bake. That’s it! no mess no fuss. Yeah don’t forget to wear gloves otherwise there will be a lot of mess and fuss. Believe me, last time I did this mistake and after a while my hands started burning really bad and if that wasn’t the whole punishment! I accidentally touched my face! Ah! So you can understand how a small step is so important.

If you have friends coming over, having a movie or game night and want to prepare something quick then this is definitely the best thing to go for. Everyone just loves these irresistible Poppers. Plus, the convenience of using only a handful of ingredients is always a plus side. As I always say, the less time you spend in the kitchen, the more time you have with your loved ones.

For the Keto dieters, these Jalapeno poppers are not just party food but just the right food for their diet. The cheese and bacon adds in all the necessary fats and since we wont be wrapping the bacon around the jalapenos, it also saves a ton of time.

Bon Appetit!

Ingredients (serves 2):
  • Jalapeno – 2, medium, washed
  • Cheddar Cheese - 2 tablespoons, shredded or cut into small cubes
  • Cream Cheese - 1 ounce, softened
  • Onion - 1 tablespoon, chopped
  • Garlic - 1 clove, minced
  • Bacon - 2 slices (pre-cooked)


Others:
  • Parchment Paper
  • Disposable gloves


Core the Jalapenos:
  • Coring will help to remove most of the heat because we will be cutting out and removing the insides of the pepper. 
  • Start by wearing disposable gloves so that the seeds do not burn your hands. Always wash your hands after touching the Jalapenos and do not touch your eyes or face while cutting them.
  • Cut the stems and slice the jalapenos in half.
  • Take a spoon or a short knife and scrape out the membrane working from the bottom to the top of the pepper. 
  • Your jalapenos are now ready to be filled.


Directions:
  • In a small bowl, mix the Cream Cheese, Cheddar cheese, Onion and Garlic. 
  • Crumble the Bacon strips and stir in the above mix.


Tip: If the Cream Cheese is too hard, put it in the microwave and heat for a few seconds.

  • Preheat the oven to 400 degrees F. 
  • Line a baking sheet with parchment paper.
  • Fill the Jalapeno halves with the mixture pressing lightly to stuff it properly.
  • Place onto the lined baking sheet.


  • Bake about 15 minutes or until the peppers are soft. Remember if the peppers are not yet soft then they will taste very hot.
  • Remove from the oven and serve hot.


Tips:
  • When properly cooked, the peppers wont taste hot but still carry a hint of heat and flavor.
  • For an enhanced palate, use a flavored cheddar cheese.
  • Make sure not to overfill your jalapeno halves because the cheese will ooze out when they bake.
  • Don’t forget to wear gloves and wash your hands well after handling the jalapenos.
  • Make sure to soften the cream cheese. I always keep it outside, on the kitchen counter for 15-20 minutes before mixing it in any dish. It makes it soft and easier to mix in.
  • You can prepare some extra filling and use it as a dip or a spread.
  • Buy Jalapenos which are about 3-4 inches long. The smaller ones are harder to stuff in. 
  • If you like spicy and hot food, feel free to leave some of the seeds in the jalapenos (keep a drink ready at hand, just in case).

Cooking the Bacon:
  • I find cooking the Bacon in the microwave a lot easier than doing it on the stovetop. 
  • Place a sheet of paper towel on a microwave-safe plate.
  • Lay the Bacon slices on the paper towel in a single layer.
  • Place another sheet of paper towel on top.
  • Heat in the microwave on high for 2-3 minutes (usually the packet will have the cooking time mentioned on it).
  • Remove from the microwave, wait for a few minutes then crumble.


Friday, 6 July 2018

Cream of Asparagus Soup


I have a friend who doesn’t like cooking, she likes to enjoy good food but never thinks of preparing anything herself. When I asked her the reason, she said, “Oh I am quite horrible at it, tried a couple of times it didn’t work.” In situations like this I always get very interested to know what went wrong and do you know the answer? Readymade food. Yes, she refuses to cook because everything is already available in the market in fresh, packed and processed form. 

Life has become really easy these days with the exploding market of convenient food options. Craving for a salad? No need to buy a head of lettuce, you can just pick up a readymade salad from a grocery shop. Why grill a burger when it is already available at a nice restaurant? Why buy spices, utensils and cooking gadgets when anything you want to eat can be found readymade. Let me tell you, if you are reading this article you want to make some changes in your life. I believe there is an inherent foodie and cook in all of us and sooner or later there will come a time in your life when you will actually feel the urge to pick up the spatula and cook something yourself. We have been cooking since the pre-historic times and it’s in our DNA to cook food. You may be too busy to dedicate proper time to cook but once you set your mind to it nothing is impossible. Yes, you may say I am just not one of those people who like cooking, you may not enjoy cooking and may not want to do it everyday. Here you have to understand that cooking means something different to everyone — many people look at it as a source of comfort, for my mom it’s for her family and health; my friends love to cook to entertain; Debarshi cooks to make memories. I find cooking delightful and de-stressing. It fulfills my urge to learn and try something new every day. The moment I step into the kitchen I feel excited. Ideas rush into my mind. What do I want to cook today? Do I have all the ingredients? Which gadget can I use. Should I try a new recipe? Right now you may be miles away from this step but I firmly believe that by trying a few easy and quick recipes you will soon enter into that stage where you will not only enjoy cooking but also work with the leftovers and raw ingredients which are otherwise just sitting in your fridge. Of course even I don’t like cooking everyday. There are days when I just want to sit with a glass of wine and enjoy my favorite TV shows or just want to go out and enjoy a nice meal in a good restaurant. Remember you don’t have to cook everyday but you should know how to do it to avoid any waste. Also, when you are not eating out everyday you can actually choose to go to places where you can have something new.

With this message in mind let me share a delicious soup recipe with you. I learnt this soup only a couple weeks ago when Debarshi and I went for our 5th anniversary celebration. It was an Asparagus soup and what impressed me was the creamy buttery texture and appetizing flavor. Now I am not a huge fan of asparagus and I don’t like having it everyday but Debarshi loves it and we usually get a big pack of it from Costco. Of course it is only a matter of days when it starts going bad. This soup is a life saver! You can make a big batch and store it in your fridge for 2-3 days (in a covered container) and enjoy it whenever you want. It is especially a good option for us because we are on keto diet and this soup has no extra carbs in it but is loaded with all the healthy fats we need. This delicious, creamy soup is made with heavy cream which not only packs in a ton of flavor but also brings a rich consistency in the soup. 

Debarshi loves this Creamy Asparagus Soup, he says it’s pure comfort in a bowl. The preparation is pretty simple too. This recipe has just five ingredients (of course I am not counting the Salt and Black Pepper) and gets ready in 20-25 minutes. You can prepare it on a low heat while cooking your main course and serve it hot. If you want it to cook fast, just chop the asparagus into smaller pieces and don’t forget to trim the ends. Use a good sharp knife because it greatly reduces your efforts and does work more efficiently. You can choose to garnish with Parmesan cheese/ Butter or Heavy cream or a combination of these. 

Well, I wanted to see if this simple recipe can encourage my friend to try cooking because she loves asparagus. I invited her over for a bowl of soup and cooked it right in front of her. Needless to say she was pretty impressed with the quality of flavor created in such a short time. She took the recipe from me and texted me today that she has prepared this soup a couple of times now and is absolutely in love with it. She even said that she is ready to experiment with some more easy recipes which means, I have successfully turned her into a believer. 

Needless to say that by preparing a meal ourselves we can not only manage our budget more efficiently but also create memories, something to share with our friends and family like I created by sharing this recipe with my friend. 

What do you say? Ready to pick up your spatula and create something wonderful? Well, you will need the recipe first so here we go:


Ingredients (Serves 2):
  • Butter - 2 tablespoons, unsalted sweet cream
  • Salt – to taste (about ¼ teaspoon)
  • Garlic - 2 medium cloves, minced
  • Chicken Broth - 1 cup, low-sodium
  • Heavy Cream - ½ cup 
  • Black Pepper – coarsely grounded, ¼ teaspoon
  • Asparagus - 6-9, ends trimmed, cut into 1 inch pieces


To garnish:
  • Parmesan Cheese – grated, 1-2 teaspoons
  • Heavy Cream – 1-2 tablespoons
  • Butter – 1-2 tablespoons


Directions:
  • Heat a pot over medium heat.
  • Add the Butter in it.
  • When the Butter melts, add the Garlic. 
  • Cook for a minute till it gets fragrant then add the Asparagus. 
  • Season with Salt and Black Pepper and mix and cook until golden for about 5 minutes, stirring occasionally. 
  • Add the Broth and reduce the heat to low. Cover and cook until the Asparagus is very tender but still green, about 10-15 minutes. 
  • Remove the soup from the heat. If you are using a hand blender, cool for 10-15 minutes. For Nutri bullet you may want to wait for at least 20 minutes otherwise the steam may lock the blade. Purée the soup in a couple of batches until it looks smooth.
  • Add the Heavy Cream with the Black Pepper and taste to adjust the seasonings.
  • At this point you can do either of these steps: Return the soup to the wok, warm it up and serve immediately. Or, cool the soup completely, transfer it in an airtight container and refrigerate. Before consuming, simply heat it up in the microwave and add a dollop of butter.
  • Before serving don’t forget to garnish with a combination or either of Parmesan Cheese / Heavy Cream or Butter. Enjoy!


Tips:
  • Remember hot soup will create steam which will lock your Nutri Bullet’s blade so give it ample time to cool down. You do not want to rush this step.
  • Use the extractor blade of your Nutri Bullet.


Recommended Reading:

Friday, 22 June 2018

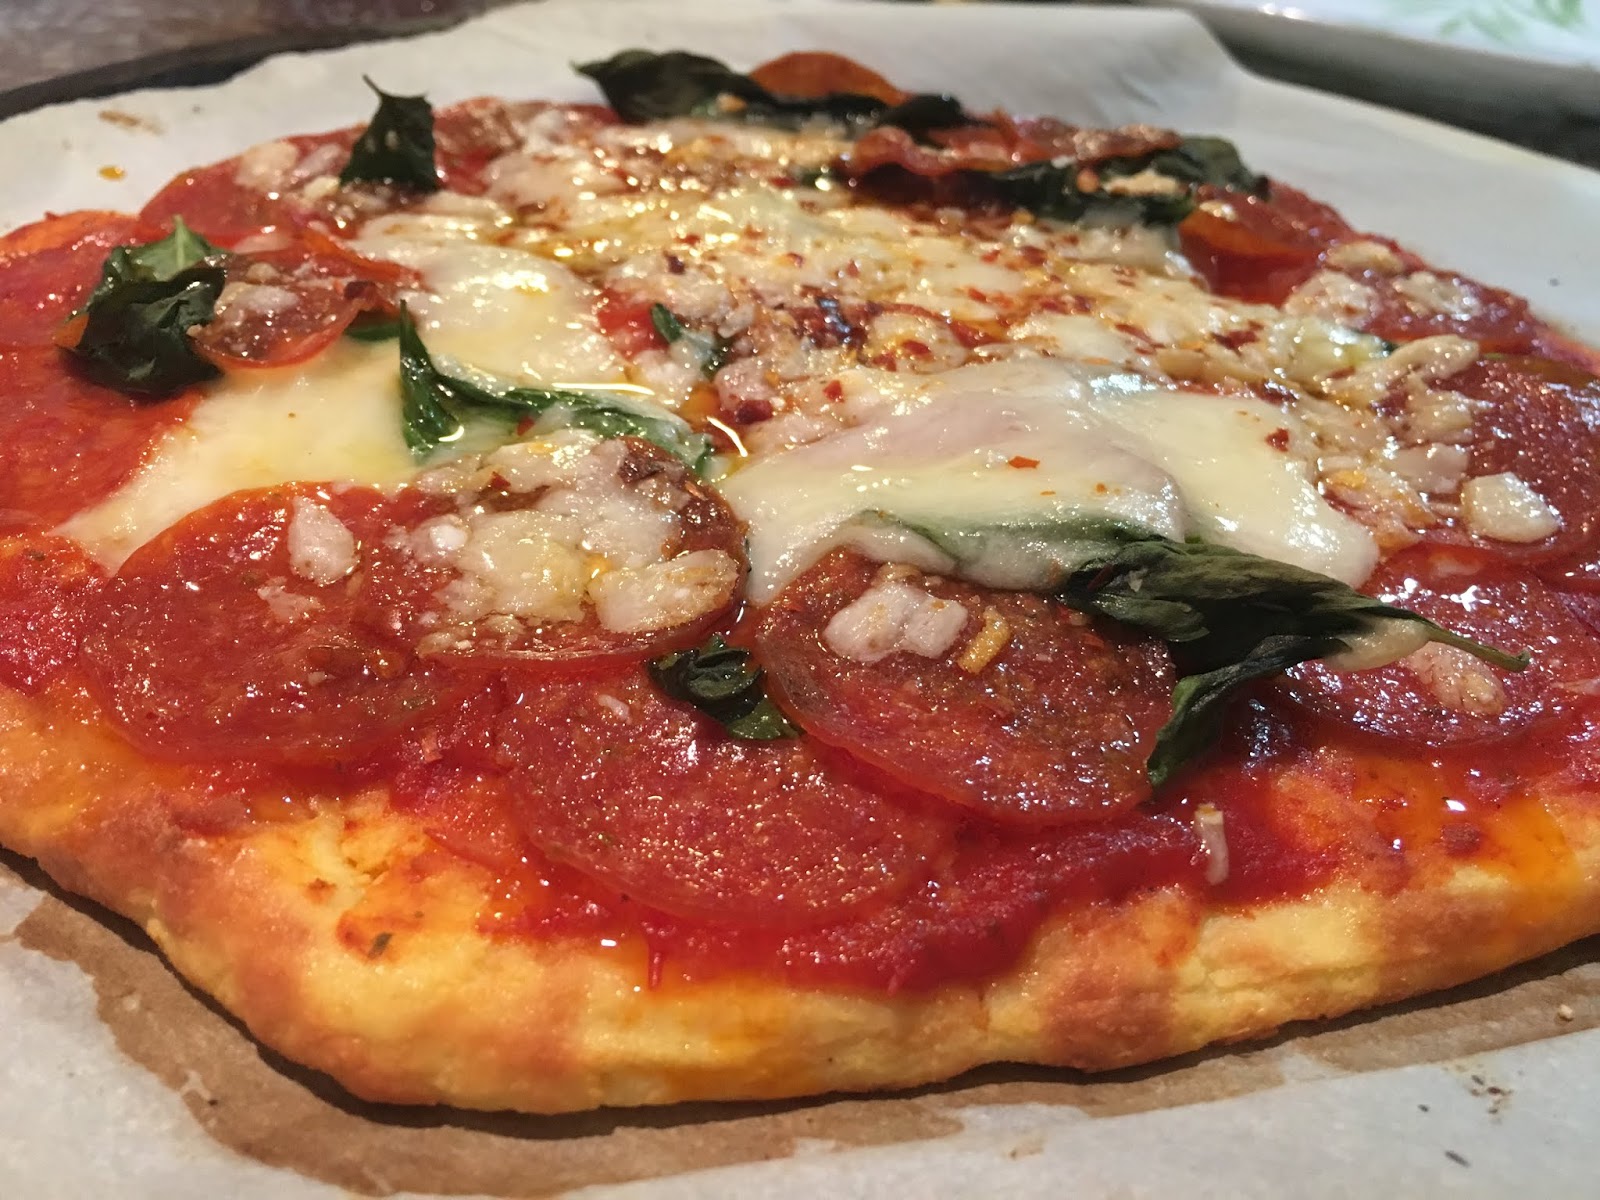
Keto Pizza with Pepperoni, Parmesan and Basil


If only I knew that I could eat Pizza every week on Keto diet, I would have started it sooner. Yes, I may soon start craving for my all time favorite comfort foods (Rice, Dal and Bhajas) but right now, I am really happy with my diet. The fun part is, we are loosing weight regularly and it’s especially commendable when you have Pizza for dinner the previous night and the next morning the weight scale shows that you have lost weight! It just brings a big smile on my face. 

Last week I baked a Pepperoni Pizza. It had lots of Mozzarella Cheese and Pepperoni and although I wanted to have another slice, I was so full that I couldn’t. So, this week I decided to bake it again only this time with more flavors. I went to the grocery shop and got some fresh Basil and a block of good quality Parmesan Cheese. It hardly took 15 minutes to bake and was a hit! Now I should tell you that the Mozzarella Cheese we will be using in this pizza is just the regular shredded pack which I got from Costco. It’s economical and delicious. So give this pizza a try and if you are also on keto diet, may your pizza nights be as good as ours.


Bon Appetit!


Ingredients for the Pizza base:
  • Mozzarella Cheese - 1 ½ cups, shredded
  • Cream Cheese - 1 ounce, cut into cubes
  • Eggs – 2, large, beaten
  • Coconut Flour – 1/3 cup 
  • Garlic Powder – ¼ teaspoon


Toppings:
  • Low Carb Marinara Sauce – ½ cup 
  • Fresh Basil Leaves – a handful, washed
  • Mozzarella Cheese – ½ cup, shredded
  • Parmesan Cheese – ½ cup, shredded
  • Pepperoni – 1 small pack
  • Olive Oil – 1 tablespoon


Others:


Tip: I use Botticelli low carb marinara sauce (available at Costco).


Directions to bake the Pizza base:
  • Preheat the oven to 425 degrees F. 
  • Line a baking sheet or pizza pan with parchment paper.
  • Combine the Mozzarella Cheese and Cream Cheese in a microwave safe large bowl. 
  • Microwave for 45 seconds, stir with a spatula. Then put it back and microwave for another 45 seconds. Stir again until everything is well combined. 
  • Stir in the beaten Eggs, Garlic Powder and Coconut Flour. The mixture will be hot so be very careful while kneading with your hands. You can use a rubber or plastic spatula. Knead until a dough forms. 


Tip: If the dough becomes hard before fully mixed, microwave for 10-15 seconds. It will soften it.

  • Transfer the dough onto the lined baking pan and cover it with another piece of parchment (this will make the rolling much easier, otherwise it will stick on the rolling pin and your hands).
  • Roll the dough using your hands or a rolling pin. Make sure to keep the center thin and the sides a little bit thick. Roll it into an 8-inch pizza base.


Tip: Make ahead – you can roll the dough and keep it covered in a cool dry place till you are ready to bake. 

  • Use a toothpick or fork to poke lots of holes throughout the crust to prevent bubbling.
  • Bake for 6 minutes. Poke more holes in any places where you see bubbles forming. Bake for 2-4 more minutes, until golden brown (keep a watch on the pizza base while baking the second time, we don’t want it to get brown).
  • Once the base is ready, let’s assemble our Pizza.


To assemble the Pizza:
  • Spread the Marinara Sauce generously on the pizza base. 
  • Arrange a layer of Pepperoni slices in a single layer over it.
  • Sprinkle the Mozzarella Cheese over it. 
  • Arrange the Fresh Basil Leaves on top along with the Parmesan Cheese and another layer of Pepperoni slices.
  • Return the pizza back to the oven for 5 more minutes or until the crust edges are golden brown and the cheese is bubbling.
  • As a finishing touch, drizzle the Olive Oil before cutting. 
  • Sprinkle some Red Chili Flakes and Dried Oregano. Enjoy.


Tips: 
  • You will have about half of the Pepperoni unused. You can store it in a zip lock pack in the freezer. Reuse whenever you want.
  • You can freeze the pizza slices as well. Use parchment paper to line the slices on top of each other and freeze in zip lock bags. When ready to eat again, bake them at 425 till the cheese bubbles.


Recommended Reading (Keto recipes):

Thursday, 14 June 2018

Egg Drop Soup


Photo Courtesy: Dr. Debarshi Chatterji


We have decided to make our Keto diet exciting by trying new recipes everyday. So Mondays are Chinese nights and this week I decided to prepare Egg Drop Soup and serve it with a hearty Garden Salad followed by Stir Fried Shrimp and Scallions on a bed of Zucchini Noodles. The dinner was a hit and Debarshi even gave me the compliment that if I continue to serve him such good meals then he will not miss rice at all (which is a huge compliment because he loves to eat rice everyday!). So, without further ado, let me present to you the recipe of easy homemade Egg Drop Soup.

Ingredients (Serves 2):
  • Egg - 1 
  • Chicken Broth – 2 cups
  • Red Pepper Flakes – a pinch
  • Black Pepper - freshly grounded (for more flavor)
  • Scallions – 1, cut into thin slices (for garnish)
  • Soy Sauce – 1 teaspoon, optional


Directions:
  • Scramble the Egg in a bowl with the fresh Black Pepper and set aside.
  • Heat a small pot on the stove over high heat.
  • Add the Chicken Broth with the Red Pepper Flakes in it.
  • Once it starts boiling, slowly stir in the Egg mixture and continue to mix until it boils again. 
  • Egg Drop Soup is ready! Garnish with the Scallions and serve immediately.


Tip: Add a few drops of Soy Sauce in the soup for color and flavor.


Recommended Reading:

Sunday, 10 June 2018

Keto Pizza with grilled Chicken and Shrimp


Last time when we were on the Keto diet, we had a big problem coming up with recipes. We wanted to try different varieties of dishes everyday but more often than not we got stuck with the same old recipes. Mind you, a few years back there weren’t these many number of good recipes on Keto and hence soon it became monotonous. This time luckily our friends – Neha and Subhadeep had been doing this diet before we started and they gave us a couple of wonderful ideas. Today’s pizza idea was also given by Neha and I just added the toppings and improvised a bit. I have to tell you that this pizza tastes so great that you wont be able to tell the difference. Roll the crust according to your personal preference and load it up with your favorite toppings. So, why wait? Let’s move on to the recipe. Keto or not Wednesdays are always ‘Pizza Nights’ at our home. You will notice that this recipe has only 1/3 cup of Coconut Flour which means it is super low carb and perfect for our Keto diet.


Ingredients for the Pizza base:
  • Mozzarella Cheese - 1 ½ cups, shredded
  • Cream Cheese - 1 ounce, cut into cubes
  • Eggs – 2, large, beaten
  • Coconut Flour – 1/3 cup 

Toppings:
  • Low Carb Marinara Sauce – ¼ cup (or as you like)
  • Chili Garlic Sauce – 2 tablespoons
  • Grilled Chicken – ½ cup, boneless, bite size pieces
  • Grilled Shrimp – ½ cup
  • Spinach – a handful, washed
  • Mozzarella Cheese – 1 cup, shredded
  • Salt and Black Pepper – to season
  • Onion – ¼ of a small onion, cut into small thick slices

Others:
  • Red Chili Flakes
  • Parchment Paper

Tip: I use Botticelli low carb marinara sauce (available at Costco).


Directions to bake the Pizza base:
  • Preheat the oven to 425 degrees F. 
  • Line a baking sheet or pizza pan with parchment paper.
  • Combine the Mozzarella Cheese and Cream Cheese in a microwave safe large bowl. 
  • Microwave for 45 seconds, stir with a spatula. Then put it back and microwave for another 45 seconds. Stir again until everything is well combined. 
  • Stir in the beaten Eggs and Coconut Flour. The mixture will be hot so be very careful while kneading with your hands. You can use a rubber spatula (but I have found that the kneading is way easier if I am using my hands). 
  • Knead until a dough forms. 

Tip: If the dough becomes hard before fully mixed, you can microwave for 10-15 seconds to soften it.

  • Transfer the dough onto the lined baking pan and cover it with another piece of parchment (this will make the rolling much easier, otherwise it will stick on the rolling pin and your hands).
  • Roll the dough using your hands or a rolling pin. Make sure to keep the center thin and the sides a little bit thick. Roll it into an 8-inch pizza base.


Tips: Make ahead – you can roll the dough and keep it covered in a cool dry place till you are ready to bake. 

You can save a small portion of this dough and use it to make Keto Tacos

  • Use a toothpick or fork to poke lots of holes throughout the crust to prevent bubbling.
  • Bake for 6 minutes. Poke more holes in any places where you see bubbles forming. Bake for 3-7 more minutes, until golden brown (keep a watch on the pizza base while baking the second time, we don’t want it to get brown).
  • Once the base is ready, let’s assemble our Pizza.


To assemble the Pizza:

  • Mix the Marinara Sauce and the Chili Garlic Sauce together and spread it generously on the pizza base. 
  • Arrange the grilled Chicken and Shrimp slices in a single layer over it.
  • Sprinkle the Mozzarella cheese (1 cup) over it. 
  • Arrange the Spinach on top along with the Onion slices.


  • Return the pizza back to the oven for 10 more minutes or until the crust edges are golden brown and the cheese is bubbling.
  • Sprinkle some Red Chili Flakes and enjoy.


Recommended Reading (Keto recipes):