Featuring over 350 tried and tested recipes that can be prepared at home. From comfort food to restaurant style. Plus 110+ articles on Kitchen and Cooking Tips, Restaurant Reviews and more.
Showing posts with label Mughlai Kabab. Show all posts

Wednesday, 24 April 2019

Plum Chutney


Chutney or as we Bengalis call it - Chaatni is a quintessential Bengali lunch item. It is served after the meal as a final course. When Debarshi’s mom prepared this Plum Chutney for lunch, I had no idea this could be so versatile. The fact is, you can have this with anything. Below are a few ideas:
  • With your authentic Bengali lunch (of course!)
  • As a preserve with a good Bread and Cheese
  • With leftover roasted meat
  • As a dip with grilled chicken
  • As a spread for your turkey sandwich
  • As a dip with your burger
  • As a dip with savory snacks like Samosa, Pakora, Kabab and spring rolls
  • Pair with plain Parathas
  • As a spread on crackers with cream cheese


Plum, raisins and just enough sugar makes this perfect chutney. If you are used to readymade chutneys and preserves, then it is time to give homemade a try. If you love making chutneys at home, this is the right recipe for you. The very taste of this chutney will tingle your senses with sweet and tangy flavors. Plus, by preparing this yourself you will be assured that no artificial preservatives or spoiled fruits have been used. This is delicious, lip smacking and absolutely unique. And, it has been tried and tested by my mom-in law for several years. 

I don’t have to write here the numerous health benefits Plum have. They are rich in antioxidants, relieve constipation and lower cholesterol levels. They are also an excellent source of vitamins, minerals and fibers. So, what are you waiting for? Grab a box of plums on your next grocery shopping. Eat some fresh and cook some for this chutney. This fresh chutney is indeed a refreshing change from our usual condiments like ketchup and barbecue sauce. 

This chutney also makes a cute present. Just spoon it into a small mason jar and tie it up with a beautiful ribbon. It can be kept in the fridge for at least 10 days (that’s the time period we had it in our fridge).


Ingredients:
  • Plum – 4, cut into big pieces
  • Salt – ½ teaspoon
  • White Vinegar – 2 tablespoons
  • White Sugar – ¼ cup
  • Raisins – ¼ cup


Directions:
  • Boil the Plums in a pressure cooker with the Salt over medium high heat.
  • Once the pressure drops, crush the plums with a wooden spatula or a potato masher.
  • Add the White Vinegar. Mix and bring to a boil over medium high heat.
  • Add the Sugar. Mix and continue boiling for another 3-4 minutes.
  • Add the Raisins. Mix and reduce the heat to low.
  • Continue cooking for 20 minutes till it reaches a thick consistency.
  • Cool and serve.


Serve this chutney with the following:

Tuesday, 26 March 2019

5-minute Garlic Aioli


I have made this Garlic Aioli so many times in the last two months and every time I have forgotten to click a decent picture. We will be traveling next month so I wont be able to post many new recipes. So, today I thought maybe I should just get a few pictures from google and upload the recipe. 

Few months back Debarshi and I went to Red Robin’s (Yum!). We were both craving for burger and fries and thought bottomless fries would be perfect to satisfy our potato cravings. The waiter brought garlic fries with some garlic aioli and immediately I thought, why haven’t I been making this dip? It was delicious and paired very well with the burger and fries. So, I looked up the recipe and guess what? It just takes 5 minutes to prepare this garlicky dip. Plus, since it has almost no carbs you can also enjoy it on a low carb diet. 

Have questions? Below I have answered some of the questions I thought may help you:

What does Garlic aioli taste like?
This dip is prepared with mayonnaise hence it will look and taste like mayo. However, it’s the addition of salt, pepper, lemon juice and garlic which really elevates the flavors.

How long can I keep it refrigerated?
Since this recipe uses mayo and no raw eggs, you can easily keep the aioli for up to 10 days in the fridge. Although if you do like it, it will be gone within a few days.

Why 5 minutes?
This aioli is so easy to make that you wont have to put in more than 5 minutes to prepare this. All you have to do is peel and mince the garlic then whisk everything together. I often prepare this fresh before packing Debarshi’s tiffin in the morning. This packs a real raw garlic punch and adds flavor in even blandest of foods. Plus, you get the satisfaction of preparing this from scratch!

Do I have to cook it?
No! Just peel and mince the garlic cloves and whisk it with the other ingredients. 

What can I serve with this dip?
I love to serve it with my Shrimp Stir Fry and you can also enjoy it with:
  • Bread
  • Crudités (assorted raw vegetables served as an hors d'oeuvre)
  • As a Sandwich spread
  • Grilled/ Fried Fish
  • Burgers
  • Fries
  • Tater Tots


Now let’s discuss the recipe:

Ingredients:
  • Mayonnaise – ¾ cup 
  • Garlic - 3 cloves, minced
  • Lemon Juice - 1 ½ tablespoons 
  • Salt – ¼ teaspoon 
  • Ground Black Pepper – ½ teaspoon 


Directions:
  • Mix the Mayonnaise, minced Garlic, Lemon Juice, Salt and ground Pepper in a bowl. Whisk it till smooth. 
  • Cover and refrigerate for at least 30 minutes before serving.


Other Chutneys, Condiments and Dips you may like:

Doing low carb diet? Try this dip with the following:

Tuesday, 29 January 2019

Tandoori Masala


Tandoori Masala is a mixture of spices specifically intended to marinate the meats and vegetables cooked in clay oven (tandoor). The spices include Mace, Nutmeg, Cinnamon, Black Pepper, Cardamom, Cloves, Garlic, Ginger, Onion, Cayenne Pepper and sometimes Coriander, Cumin and Fenugreek with some Red Food Color. I always get readymade packets of Tandoori Masala from the Indian store. Tandoori Masala brings a rich color and flavor to your dishes and you can very well use it in any marinade. You can also use it for stove top cooking and fry it with meat or vegetables to bring that delicious savory flavor. 

Use Tandoori Masala in the following recipes:

Meat Masala


This spice blend is used to add flavor and fragrance in dishes. You can add this in the marinade, Kabab mix or while frying/ cooking the meat. You can also add this spice in vegetarian curries and Paratha/ fritter fillings. Remember with the proper spices you can make restaurant quality dishes at home and enjoy them whenever you want. A few readymade spices like this really saves the day, specially when you are having guests over. Some of the ingredients of Meat Masala are: Red Chili, Paprika, Salt, Coriander seeds, Turmeric, Cumin, Ginger, Garlic, Green Cardamom, Black Pepper, Brown Cardamom, Cinnamon, Black Cumin, Fennel seeds, Clove, Fenugreek Seed, Nigella, Carom seeds and Cane Sugar. Just like Tandoori Masala, I always grab a packet of Meat Masala from the local Indian stores because it is way more convenient to do that. Plus, when stored properly the masala can last up to 3-4 months (if I haven’t already used all of it in my cooking!)

Use Meat Masala in the following recipes:

Tuesday, 3 July 2018

Butter Paneer (Indian Recipe: Fresh Cheese in a creamy buttery gravy)


I prepared this creamy buttery dish for a party with my friends and everyone liked it so much that I thought this must be the next recipe on my blog. Now before we move on to the recipe let me give you a brief introduction of the dish: Butter Paneer is a gourmet Indian Recipe where Fresh Cheese is fried in butter till it turns golden red in color. The fried pieces are then dipped in a creamy buttery gravy prepared with tomato, onion, a hint of garlic and whole spices. Though it is easy and quick to prepare, Butter Paneer tastes absolutely divine and equals the quality of a restaurant bought dish. My secret? my homemade Garam Masala. The best part is since this dish is loaded with healthy fats you can also enjoy it on Keto diet. 

Are you having guests over and thinking what to cook for dinner? No problem! Serve this delectable buttery gravy with Naan or Pulao and your guests will lick their fingers for more. 

Just a small tip: Have a little patience while preparing the gravy. It will take time to cook through and release the oil so cook it over medium low heat and stir occasionally. Use a good non stick skillet and wok otherwise the Paneer and gravy will stick on the bottom of the pan.
Ingredients (for frying the Paneer):
  • Butter – 2 tablespoons 
  • Paneer – 3 cups (cut into cubes, rectangles or any shape you like)
  • Salt – ¼ teaspoon 
  • Turmeric Powder -  ¼ teaspoon 
  • Red Chili Powder - ¼ teaspoon 
  • Tandoori Masala – 1-2 teaspoons 


Ingredients (for the gravy):
  • Butter –3 tablespoons 
  • Salt –about ½ teaspoon 
  • Red Chili Powder -  ½ teaspoon
  • Tandoori Masala – 2-3 tablespoons 
  • Dried Red Pepper – 2-3, broken in halves
  • Cloves – 3-4
  • Green Cardamoms – 4
  • Bay Leaves – 1-2
  • Onion – ½ of a big onion, minced
  • Garlic - 2, minced
  • Tomato – 3 big, pureed 
  • Heavy Cream - 1 ½ cups 
  • Garam Masala – ¼ teaspoon 
  • Green Chili – 3, slit in half lengthwise (optional)
  • Kasuri Methi – 2 tablespoons
  • Milk – ¼ cup (if required)


Directions for frying the Paneer:
  • Heat a non stick pan on medium heat.
  • Add the Butter (2 tablespoons) in it.
  • Carefully start adding the Paneer pieces in the pan. Make sure you are not burning the butter.
  • Sprinkle the Salt (¼ teaspoon), Turmeric Powder (¼ teaspoon), Red Chili Powder (¼ teaspoon) with the Tandoori Masala (1-2 teaspoons) and mix well.
  • We want a nice golden red color on the Paneer pieces so make sure to fry them till they turn beautifully bright red.
  • Switch off the heat and transfer the Paneer pieces to a bowl.
  • Now let’s prepare the gravy.


Tips:
  • Use a good non stick frying pan and wok for preparing this dish otherwise the Paneer will stick on the bottom of the pan and break.
  • Maintain a medium – medium low heat for frying the Paneer pieces. Paneer has a delicate texture and may burn easily.


Directions for making the gravy:
  • Heat a wok on medium high heat. 
  • Add the Butter (3 tablespoons) in it. As soon as the butter starts to melt, add the Onion and Garlic in it. If you are adding Green Chilies, add them as well.
  • Start adding the whole spices (Dried Red Pepper, Cloves, Green Cardamoms and Bay Leaves) in it.
  • Keep frying the Onion till it caramelizes to a dark brown color. It will take about 5-10 minutes.
  • Carefully add the Tomato Puree in it and reduce the heat to medium. Mix well and cover and cook for about 10 minutes.
  • Add the Heavy Cream in it. Mix well and cover and cook for another 10 minutes.
  • Now add the Salt, Tandoori Masala (2-3 tablespoons) and Red Chili Powder. Mix well and cover and cook for 5 minutes. 
  • Stir then reduce the heat to medium low. Cover and cook for about 10 minutes, stirring occasionally. 
  • Add the Garam Masala. Mix well and cover and cook for another 10 minutes. This will help to reduce the sauce and develop the creamy consistency. This will also make the dish aromatic and add flavor.
  • At this stage you will see the butter separating from the gravy, this means the gravy is ready. It is very important to let the gravy cook till this stage otherwise it will taste very different.
  • Add the Paneer pieces. The gravy will be hot and boiling so be very careful. The bowl will have some butter and Tandoori Masala from the cooked Paneer pieces, use a spatula to transfer it in the wok as well. Stir to mix.
  • Check the consistency, I usually like to add a little Milk at this stage (for the gravy). Switch off the heat and add the Kasuri Methi. 
  • Butter Paneer is ready, serve with Naan, Tandoori Roti/ Plain Roti, Rice or Pulao and enjoy!


Tips:
  • Make sure to ask your guests if they have any diet restrictions before serving.
  • I use my chopper to cut the onion and garlic and Nutri bullet to make the tomato puree.
  • Cooking time is the essence of this dish. If you do not cook the gravy enough, it will be watery and very light like a curry. Remember every stove top heats differently so give it proper time to develop the gravy. Once the butter starts to separate this means the gravy is ready. 
  • When cooked properly, the dish will have a layer of butter on top of the gravy. See the photo? It will look very rich with a deep orange color.


Recommended Reading:

Recommended Reading (Keto recipes):

Friday, 22 June 2018

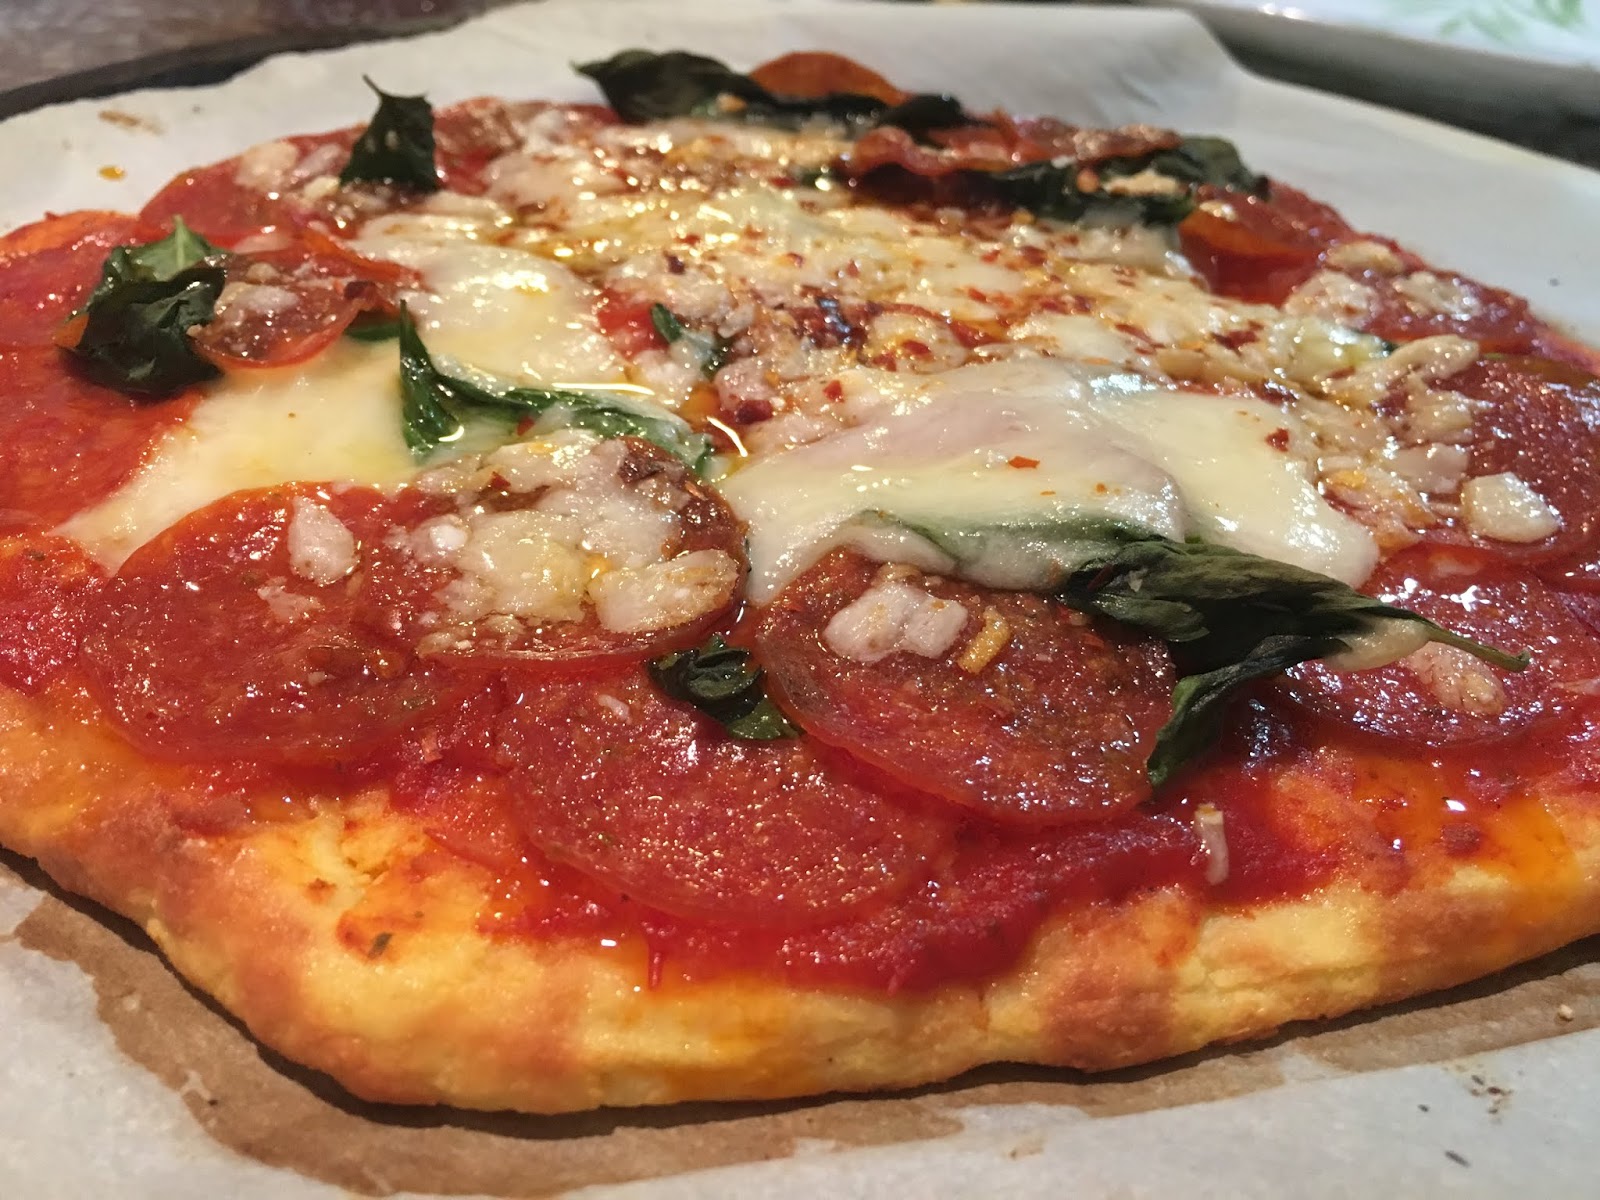
Keto Pizza with Pepperoni, Parmesan and Basil


If only I knew that I could eat Pizza every week on Keto diet, I would have started it sooner. Yes, I may soon start craving for my all time favorite comfort foods (Rice, Dal and Bhajas) but right now, I am really happy with my diet. The fun part is, we are loosing weight regularly and it’s especially commendable when you have Pizza for dinner the previous night and the next morning the weight scale shows that you have lost weight! It just brings a big smile on my face. 

Last week I baked a Pepperoni Pizza. It had lots of Mozzarella Cheese and Pepperoni and although I wanted to have another slice, I was so full that I couldn’t. So, this week I decided to bake it again only this time with more flavors. I went to the grocery shop and got some fresh Basil and a block of good quality Parmesan Cheese. It hardly took 15 minutes to bake and was a hit! Now I should tell you that the Mozzarella Cheese we will be using in this pizza is just the regular shredded pack which I got from Costco. It’s economical and delicious. So give this pizza a try and if you are also on keto diet, may your pizza nights be as good as ours.


Bon Appetit!


Ingredients for the Pizza base:
  • Mozzarella Cheese - 1 ½ cups, shredded
  • Cream Cheese - 1 ounce, cut into cubes
  • Eggs – 2, large, beaten
  • Coconut Flour – 1/3 cup 
  • Garlic Powder – ¼ teaspoon


Toppings:
  • Low Carb Marinara Sauce – ½ cup 
  • Fresh Basil Leaves – a handful, washed
  • Mozzarella Cheese – ½ cup, shredded
  • Parmesan Cheese – ½ cup, shredded
  • Pepperoni – 1 small pack
  • Olive Oil – 1 tablespoon


Others:


Tip: I use Botticelli low carb marinara sauce (available at Costco).


Directions to bake the Pizza base:
  • Preheat the oven to 425 degrees F. 
  • Line a baking sheet or pizza pan with parchment paper.
  • Combine the Mozzarella Cheese and Cream Cheese in a microwave safe large bowl. 
  • Microwave for 45 seconds, stir with a spatula. Then put it back and microwave for another 45 seconds. Stir again until everything is well combined. 
  • Stir in the beaten Eggs, Garlic Powder and Coconut Flour. The mixture will be hot so be very careful while kneading with your hands. You can use a rubber or plastic spatula. Knead until a dough forms. 


Tip: If the dough becomes hard before fully mixed, microwave for 10-15 seconds. It will soften it.

  • Transfer the dough onto the lined baking pan and cover it with another piece of parchment (this will make the rolling much easier, otherwise it will stick on the rolling pin and your hands).
  • Roll the dough using your hands or a rolling pin. Make sure to keep the center thin and the sides a little bit thick. Roll it into an 8-inch pizza base.


Tip: Make ahead – you can roll the dough and keep it covered in a cool dry place till you are ready to bake. 

  • Use a toothpick or fork to poke lots of holes throughout the crust to prevent bubbling.
  • Bake for 6 minutes. Poke more holes in any places where you see bubbles forming. Bake for 2-4 more minutes, until golden brown (keep a watch on the pizza base while baking the second time, we don’t want it to get brown).
  • Once the base is ready, let’s assemble our Pizza.


To assemble the Pizza:
  • Spread the Marinara Sauce generously on the pizza base. 
  • Arrange a layer of Pepperoni slices in a single layer over it.
  • Sprinkle the Mozzarella Cheese over it. 
  • Arrange the Fresh Basil Leaves on top along with the Parmesan Cheese and another layer of Pepperoni slices.
  • Return the pizza back to the oven for 5 more minutes or until the crust edges are golden brown and the cheese is bubbling.
  • As a finishing touch, drizzle the Olive Oil before cutting. 
  • Sprinkle some Red Chili Flakes and Dried Oregano. Enjoy.


Tips: 
  • You will have about half of the Pepperoni unused. You can store it in a zip lock pack in the freezer. Reuse whenever you want.
  • You can freeze the pizza slices as well. Use parchment paper to line the slices on top of each other and freeze in zip lock bags. When ready to eat again, bake them at 425 till the cheese bubbles.


Recommended Reading (Keto recipes):

Thursday, 14 June 2018

Egg Drop Soup


Photo Courtesy: Dr. Debarshi Chatterji


We have decided to make our Keto diet exciting by trying new recipes everyday. So Mondays are Chinese nights and this week I decided to prepare Egg Drop Soup and serve it with a hearty Garden Salad followed by Stir Fried Shrimp and Scallions on a bed of Zucchini Noodles. The dinner was a hit and Debarshi even gave me the compliment that if I continue to serve him such good meals then he will not miss rice at all (which is a huge compliment because he loves to eat rice everyday!). So, without further ado, let me present to you the recipe of easy homemade Egg Drop Soup.

Ingredients (Serves 2):
  • Egg - 1 
  • Chicken Broth – 2 cups
  • Red Pepper Flakes – a pinch
  • Black Pepper - freshly grounded (for more flavor)
  • Scallions – 1, cut into thin slices (for garnish)
  • Soy Sauce – 1 teaspoon, optional


Directions:
  • Scramble the Egg in a bowl with the fresh Black Pepper and set aside.
  • Heat a small pot on the stove over high heat.
  • Add the Chicken Broth with the Red Pepper Flakes in it.
  • Once it starts boiling, slowly stir in the Egg mixture and continue to mix until it boils again. 
  • Egg Drop Soup is ready! Garnish with the Scallions and serve immediately.


Tip: Add a few drops of Soy Sauce in the soup for color and flavor.


Recommended Reading:

Sunday, 10 June 2018

Keto Pizza with grilled Chicken and Shrimp


Last time when we were on the Keto diet, we had a big problem coming up with recipes. We wanted to try different varieties of dishes everyday but more often than not we got stuck with the same old recipes. Mind you, a few years back there weren’t these many number of good recipes on Keto and hence soon it became monotonous. This time luckily our friends – Neha and Subhadeep had been doing this diet before we started and they gave us a couple of wonderful ideas. Today’s pizza idea was also given by Neha and I just added the toppings and improvised a bit. I have to tell you that this pizza tastes so great that you wont be able to tell the difference. Roll the crust according to your personal preference and load it up with your favorite toppings. So, why wait? Let’s move on to the recipe. Keto or not Wednesdays are always ‘Pizza Nights’ at our home. You will notice that this recipe has only 1/3 cup of Coconut Flour which means it is super low carb and perfect for our Keto diet.


Ingredients for the Pizza base:
  • Mozzarella Cheese - 1 ½ cups, shredded
  • Cream Cheese - 1 ounce, cut into cubes
  • Eggs – 2, large, beaten
  • Coconut Flour – 1/3 cup 

Toppings:
  • Low Carb Marinara Sauce – ¼ cup (or as you like)
  • Chili Garlic Sauce – 2 tablespoons
  • Grilled Chicken – ½ cup, boneless, bite size pieces
  • Grilled Shrimp – ½ cup
  • Spinach – a handful, washed
  • Mozzarella Cheese – 1 cup, shredded
  • Salt and Black Pepper – to season
  • Onion – ¼ of a small onion, cut into small thick slices

Others:
  • Red Chili Flakes
  • Parchment Paper

Tip: I use Botticelli low carb marinara sauce (available at Costco).


Directions to bake the Pizza base:
  • Preheat the oven to 425 degrees F. 
  • Line a baking sheet or pizza pan with parchment paper.
  • Combine the Mozzarella Cheese and Cream Cheese in a microwave safe large bowl. 
  • Microwave for 45 seconds, stir with a spatula. Then put it back and microwave for another 45 seconds. Stir again until everything is well combined. 
  • Stir in the beaten Eggs and Coconut Flour. The mixture will be hot so be very careful while kneading with your hands. You can use a rubber spatula (but I have found that the kneading is way easier if I am using my hands). 
  • Knead until a dough forms. 

Tip: If the dough becomes hard before fully mixed, you can microwave for 10-15 seconds to soften it.

  • Transfer the dough onto the lined baking pan and cover it with another piece of parchment (this will make the rolling much easier, otherwise it will stick on the rolling pin and your hands).
  • Roll the dough using your hands or a rolling pin. Make sure to keep the center thin and the sides a little bit thick. Roll it into an 8-inch pizza base.


Tips: Make ahead – you can roll the dough and keep it covered in a cool dry place till you are ready to bake. 

You can save a small portion of this dough and use it to make Keto Tacos

  • Use a toothpick or fork to poke lots of holes throughout the crust to prevent bubbling.
  • Bake for 6 minutes. Poke more holes in any places where you see bubbles forming. Bake for 3-7 more minutes, until golden brown (keep a watch on the pizza base while baking the second time, we don’t want it to get brown).
  • Once the base is ready, let’s assemble our Pizza.


To assemble the Pizza:

  • Mix the Marinara Sauce and the Chili Garlic Sauce together and spread it generously on the pizza base. 
  • Arrange the grilled Chicken and Shrimp slices in a single layer over it.
  • Sprinkle the Mozzarella cheese (1 cup) over it. 
  • Arrange the Spinach on top along with the Onion slices.


  • Return the pizza back to the oven for 10 more minutes or until the crust edges are golden brown and the cheese is bubbling.
  • Sprinkle some Red Chili Flakes and enjoy.


Recommended Reading (Keto recipes):