Featuring over 350 tried and tested recipes that can be prepared at home. From comfort food to restaurant style. Plus 110+ articles on Kitchen and Cooking Tips, Restaurant Reviews and more.
Showing posts with label Grilled Lamb Kababs. Show all posts

Tuesday, 29 January 2019

Tandoori Masala


Tandoori Masala is a mixture of spices specifically intended to marinate the meats and vegetables cooked in clay oven (tandoor). The spices include Mace, Nutmeg, Cinnamon, Black Pepper, Cardamom, Cloves, Garlic, Ginger, Onion, Cayenne Pepper and sometimes Coriander, Cumin and Fenugreek with some Red Food Color. I always get readymade packets of Tandoori Masala from the Indian store. Tandoori Masala brings a rich color and flavor to your dishes and you can very well use it in any marinade. You can also use it for stove top cooking and fry it with meat or vegetables to bring that delicious savory flavor. 

Use Tandoori Masala in the following recipes:

Friday, 22 June 2018

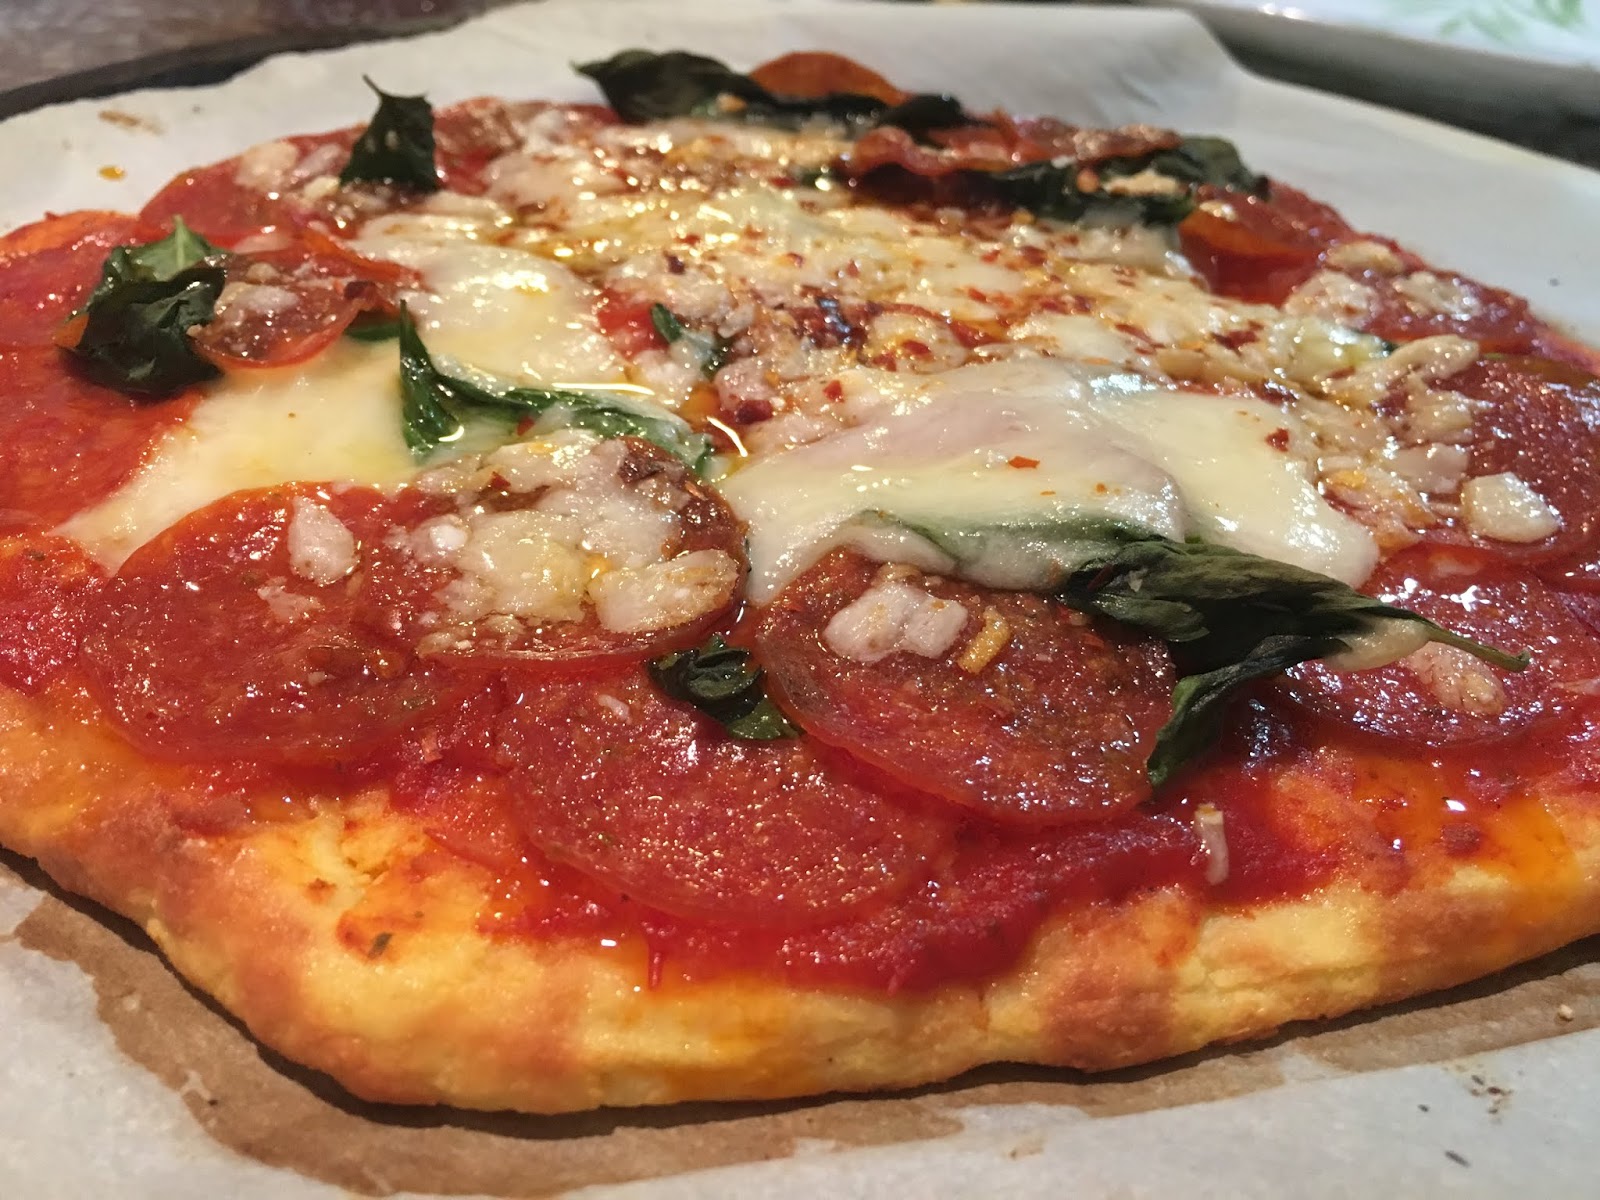
Keto Pizza with Pepperoni, Parmesan and Basil


If only I knew that I could eat Pizza every week on Keto diet, I would have started it sooner. Yes, I may soon start craving for my all time favorite comfort foods (Rice, Dal and Bhajas) but right now, I am really happy with my diet. The fun part is, we are loosing weight regularly and it’s especially commendable when you have Pizza for dinner the previous night and the next morning the weight scale shows that you have lost weight! It just brings a big smile on my face. 

Last week I baked a Pepperoni Pizza. It had lots of Mozzarella Cheese and Pepperoni and although I wanted to have another slice, I was so full that I couldn’t. So, this week I decided to bake it again only this time with more flavors. I went to the grocery shop and got some fresh Basil and a block of good quality Parmesan Cheese. It hardly took 15 minutes to bake and was a hit! Now I should tell you that the Mozzarella Cheese we will be using in this pizza is just the regular shredded pack which I got from Costco. It’s economical and delicious. So give this pizza a try and if you are also on keto diet, may your pizza nights be as good as ours.


Bon Appetit!


Ingredients for the Pizza base:
  • Mozzarella Cheese - 1 ½ cups, shredded
  • Cream Cheese - 1 ounce, cut into cubes
  • Eggs – 2, large, beaten
  • Coconut Flour – 1/3 cup 
  • Garlic Powder – ¼ teaspoon


Toppings:
  • Low Carb Marinara Sauce – ½ cup 
  • Fresh Basil Leaves – a handful, washed
  • Mozzarella Cheese – ½ cup, shredded
  • Parmesan Cheese – ½ cup, shredded
  • Pepperoni – 1 small pack
  • Olive Oil – 1 tablespoon


Others:


Tip: I use Botticelli low carb marinara sauce (available at Costco).


Directions to bake the Pizza base:
  • Preheat the oven to 425 degrees F. 
  • Line a baking sheet or pizza pan with parchment paper.
  • Combine the Mozzarella Cheese and Cream Cheese in a microwave safe large bowl. 
  • Microwave for 45 seconds, stir with a spatula. Then put it back and microwave for another 45 seconds. Stir again until everything is well combined. 
  • Stir in the beaten Eggs, Garlic Powder and Coconut Flour. The mixture will be hot so be very careful while kneading with your hands. You can use a rubber or plastic spatula. Knead until a dough forms. 


Tip: If the dough becomes hard before fully mixed, microwave for 10-15 seconds. It will soften it.

  • Transfer the dough onto the lined baking pan and cover it with another piece of parchment (this will make the rolling much easier, otherwise it will stick on the rolling pin and your hands).
  • Roll the dough using your hands or a rolling pin. Make sure to keep the center thin and the sides a little bit thick. Roll it into an 8-inch pizza base.


Tip: Make ahead – you can roll the dough and keep it covered in a cool dry place till you are ready to bake. 

  • Use a toothpick or fork to poke lots of holes throughout the crust to prevent bubbling.
  • Bake for 6 minutes. Poke more holes in any places where you see bubbles forming. Bake for 2-4 more minutes, until golden brown (keep a watch on the pizza base while baking the second time, we don’t want it to get brown).
  • Once the base is ready, let’s assemble our Pizza.


To assemble the Pizza:
  • Spread the Marinara Sauce generously on the pizza base. 
  • Arrange a layer of Pepperoni slices in a single layer over it.
  • Sprinkle the Mozzarella Cheese over it. 
  • Arrange the Fresh Basil Leaves on top along with the Parmesan Cheese and another layer of Pepperoni slices.
  • Return the pizza back to the oven for 5 more minutes or until the crust edges are golden brown and the cheese is bubbling.
  • As a finishing touch, drizzle the Olive Oil before cutting. 
  • Sprinkle some Red Chili Flakes and Dried Oregano. Enjoy.


Tips: 
  • You will have about half of the Pepperoni unused. You can store it in a zip lock pack in the freezer. Reuse whenever you want.
  • You can freeze the pizza slices as well. Use parchment paper to line the slices on top of each other and freeze in zip lock bags. When ready to eat again, bake them at 425 till the cheese bubbles.


Recommended Reading (Keto recipes):

Chocolate Ganache - Keto Dessert


Photo Courtesy: Dr. Debarshi Chatterji

Year 2016 was special. We moved to a bigger house, made loads of friends and I learnt tons of new recipes. You can imagine what happened when I asked Debarshi to choose his birthday cake. He gave me quite the assignment! A Chocolate Raspberry Cake with Chocolate Ganache. The cake was supposed to have two layers of soft chocolate sponges, coated liberally with chocolate ganache and topped with fresh raspberries. Well I took the challenge and completed it. What do you think?


This rich, velvety, dark chocolate layer also known as Ganache is the most delectable thing you will ever taste. It gets quite thick as it cools down and it just melts in your mouth. You can use it as a filling for your cake or eat it as it is (like we do). Believe me ever since I baked this cake, Debarshi has requested me several times to prepare just the Ganache. He likes to enjoy a small portion of it after dinner like a dessert and so I try to present it like a proper dessert by portioning it into small bowls and decorating it with dried fruits and chopped nuts.

I know Chocolate Ganache may sound like something fancy and you may think that it will be difficult to prepare or may involve too much hassle. Believe me when I say, it isn’t! To prepare Ganache, all you need to do is mix equal quantities of chocolate and heavy cream. Melt them together and then you can use it for a variety of purposes, you can glaze a cake or fill it up, make a fluffy frosting, or eat it as it is. I usually heat one cup of Bittersweet Chocolate Chips (60% Cacao) with one cup of Heavy cream in the microwave for two minutes and whisk them together till it gets totally combined and looks shiny. At this time the Ganache is very hot and pourable but once it cools down it sets beautifully and is very soft when you cut or eat it. 

Now you are thinking, is Chocolate allowed on Keto diet? Well, to maintain the state of Ketosis you have to eat a low carb diet and I find it easier to continue a diet when I am not craving for my favorite foods all the time. Mind you, I have a sweet tooth and although I am fully aware that it is responsible for my weight gain, I just can’t live without my sweets. So, I prefer to cheat a little rather than going astray on my diet. This Chocolate Ganache is my savior. I have tweaked the recipe to suit my Keto diet needs. I prepare it by using Dark Chocolate with 100% cocoa which Keto friendly. Now because 100% cocoa is very low in sugar, it actually tastes bitter so I usually mix 1-2 teaspoons of Truvia (or Splenda) to sweeten the Chocolate and increase the amount of Heavy Cream (allowed on Keto diet) to add more natural sweetness. Then I portion it into small containers and decorate it with dried fruits and nuts. By keeping my dessert low carb, I can have it and eat it too!

Remember, you can always use the original recipe (1 cup of Bittersweet Chocolate Chips with 1 cup of Heavy cream) to prepare Ganache and use it as a quick ice cream or cheesecake topping for the Chocolate lovers. You can also use it to glaze or fill any cake and decorate it further by using fresh mint or fruits or even edible flowers which will look very elegant with the satin look of Chocolate Ganache. Just imagine! 

Prepare this Chocolate Ganache tonight and enjoy it with your loved ones.

Ingredients:
  • 100% Cocoa Unsweetened Chocolate Baking Bar such as Ghirardelli – 4 Ounce or 1 bar
  • Heavy Whipping Cream – 1 cup
  • Truvia or Splenda – 1-2 teaspoons
  • Chopped Nuts such as Almonds – 3-4 tablespoons
  • Sweet Cream Unsalted Butter – 2-3 tablespoons


Directions:
  • Take a microwave safe medium bowl.
  • Break the Chocolate bar into small pieces and place in it.
  • Add the Heavy Cream in it and place inside the microwave.
  • Heat the Cream for a minute.
  • Add the Truvia and the Butter in it and stir to mix.
  • Heat it for another minute then take the bowl out from the microwave (careful its hot!)
  • Let it stand for a minute
  • Now let’s start the stirring and remember this is important. We need to stir it slowly so that the chocolate mixes well with the cream. Believe me this will bring the shine in the Ganache. Keep stirring until the Chocolate is all melted and the mixture looks smooth. 
  • I usually divide the mixture into 5-6 small bowls or containers. I pour 2 tablespoons of Ganache into each (small portions mean even less carbs).
  • Decorate with the chopped nuts.
  • Cover with plastic wrap and refrigerate for about an hour until the Ganache is cold.
  • Serve as a dessert.

Tip: 
The butter adds more fats in the dessert thus making it a Keto Fat Bomb (energy balls made of high fat low carb ingredients to be eaten when your fat intake throughout the day has been low or you are in dire need of a snack prepared with good fats). The addition of Butter also makes the Ganache shinier and pourable. You can of course skip it if you don’t want to have extra fat in the dessert.


Recommended Reading (Low Carb Recipes):

Sunday, 10 June 2018

Keto Pizza with grilled Chicken and Shrimp


Last time when we were on the Keto diet, we had a big problem coming up with recipes. We wanted to try different varieties of dishes everyday but more often than not we got stuck with the same old recipes. Mind you, a few years back there weren’t these many number of good recipes on Keto and hence soon it became monotonous. This time luckily our friends – Neha and Subhadeep had been doing this diet before we started and they gave us a couple of wonderful ideas. Today’s pizza idea was also given by Neha and I just added the toppings and improvised a bit. I have to tell you that this pizza tastes so great that you wont be able to tell the difference. Roll the crust according to your personal preference and load it up with your favorite toppings. So, why wait? Let’s move on to the recipe. Keto or not Wednesdays are always ‘Pizza Nights’ at our home. You will notice that this recipe has only 1/3 cup of Coconut Flour which means it is super low carb and perfect for our Keto diet.


Ingredients for the Pizza base:
  • Mozzarella Cheese - 1 ½ cups, shredded
  • Cream Cheese - 1 ounce, cut into cubes
  • Eggs – 2, large, beaten
  • Coconut Flour – 1/3 cup 

Toppings:
  • Low Carb Marinara Sauce – ¼ cup (or as you like)
  • Chili Garlic Sauce – 2 tablespoons
  • Grilled Chicken – ½ cup, boneless, bite size pieces
  • Grilled Shrimp – ½ cup
  • Spinach – a handful, washed
  • Mozzarella Cheese – 1 cup, shredded
  • Salt and Black Pepper – to season
  • Onion – ¼ of a small onion, cut into small thick slices

Others:
  • Red Chili Flakes
  • Parchment Paper

Tip: I use Botticelli low carb marinara sauce (available at Costco).


Directions to bake the Pizza base:
  • Preheat the oven to 425 degrees F. 
  • Line a baking sheet or pizza pan with parchment paper.
  • Combine the Mozzarella Cheese and Cream Cheese in a microwave safe large bowl. 
  • Microwave for 45 seconds, stir with a spatula. Then put it back and microwave for another 45 seconds. Stir again until everything is well combined. 
  • Stir in the beaten Eggs and Coconut Flour. The mixture will be hot so be very careful while kneading with your hands. You can use a rubber spatula (but I have found that the kneading is way easier if I am using my hands). 
  • Knead until a dough forms. 

Tip: If the dough becomes hard before fully mixed, you can microwave for 10-15 seconds to soften it.

  • Transfer the dough onto the lined baking pan and cover it with another piece of parchment (this will make the rolling much easier, otherwise it will stick on the rolling pin and your hands).
  • Roll the dough using your hands or a rolling pin. Make sure to keep the center thin and the sides a little bit thick. Roll it into an 8-inch pizza base.


Tips: Make ahead – you can roll the dough and keep it covered in a cool dry place till you are ready to bake. 

You can save a small portion of this dough and use it to make Keto Tacos

  • Use a toothpick or fork to poke lots of holes throughout the crust to prevent bubbling.
  • Bake for 6 minutes. Poke more holes in any places where you see bubbles forming. Bake for 3-7 more minutes, until golden brown (keep a watch on the pizza base while baking the second time, we don’t want it to get brown).
  • Once the base is ready, let’s assemble our Pizza.


To assemble the Pizza:

  • Mix the Marinara Sauce and the Chili Garlic Sauce together and spread it generously on the pizza base. 
  • Arrange the grilled Chicken and Shrimp slices in a single layer over it.
  • Sprinkle the Mozzarella cheese (1 cup) over it. 
  • Arrange the Spinach on top along with the Onion slices.


  • Return the pizza back to the oven for 10 more minutes or until the crust edges are golden brown and the cheese is bubbling.
  • Sprinkle some Red Chili Flakes and enjoy.


Recommended Reading (Keto recipes):

Guacamole with Goat Cheese and Bacon


This year to celebrate our 5th wedding anniversary we went to Branson. The idea was to have a quiet romantic getaway and explore the city. There we went to a place called ‘Top of the Rock’ which offers breath taking views of the Ozark Mountains and Table Rock Lake. 


After we had finished exploring the beautiful scenery and taken a golf cart ride to the caves, we went to a restaurant called Arnie's Barn at Top of the Rock. Now Mexican cuisine may not be ideal for the keto dieters but it is the perfect place to have a wonderful lunch specially if you are celebrating something special! We started our meal with Tortilla Chips and Bacon Guacamole which had House Smoked Bacon, Roasted Corn Salsa and Queso Fresco.


This Guacamole was so good that we immediately decided to try this at home. So, yesterday I looked for the recipe, made a few changes and improvised it to suit my Keto needs. Foodies enjoy this delicious Keto Guacamole with Goat Cheese and Bacon.


Photo Courtesy: Dr. Debarshi Chatterji

Ingredients (Serves 2): 

  • Avocado - 1, ripe
  • Green Chili – 1-2 or or Jalapeno Pepper – ½ 
  • Onion – ¼ of a big onion
  • Fresh Cilantro – a handful, washed
  • White Vinegar or Lime Juice – 2 teaspoons
  • Salt – ¼ teaspoon (or as per taste)
  • Black Pepper – ¼ teaspoon, ground
  • Bacon - 3 slices, cooked and crumbled, divided into two parts
  • Goat Cheese – ¼ cup, crumbled, divided into two parts


Serve with: Keto Tacos

Directions:

  • Using a food chopper, chop Green Chili (or Jalapeno Pepper) and Onion. Transfer to a small serving bowl.
  • Run short pulses to chop the Avocado and Cilantro then transfer to the bowl.
  • Add the White Vinegar (or Lime Juice), Salt and Black Pepper. Mix, taste and season (if desired). 
  • Stir in one part each of the Bacon and Goat Cheese. 
  • Top with the remaining Bacon and Goat Cheese as garnish. 
  • Serve immediately with Keto Tacos.


Recommended Reading:

Monday, 10 July 2017

Salad - Roasted Asparagus with Feta Cheese


Today I thought how about a crisp salad recipe? There is nothing more delicious like some roasted Asparagus. Top it with some Feta cheese and you got yourselves a treat! I tried this salad last night and it was so good I decided to post it on the blog straightaway. 

Bon Appetit!


Ingredients:
  • Asparagus – ½ bunch fresh, washed, trimmed and cut into bite-size pieces 
  • Olive Oil - 1 tablespoon
  • Garlic Powder - 2 pinches, or Garlic – 1 clove, minced
  • Iceberg Lettuce Leaves - 2 cups, cut into bite-size pieces 
  • Grape Tomatoes – ½ cup, halved 
  • Feta Cheese – ½ cup crumbled (try some flavored Feta cheese like Jalapeños, Peppercorn or Tomato and Basil)


Directions:
  • Preheat oven to 400 degrees F.
  • Place asparagus in a large bowl. 
  • Drizzle olive oil over asparagus and season with garlic powder; toss well.
  • Transfer asparagus to a baking sheet in a single layer.
  • Bake in the preheated oven until asparagus are tender, about 10-12 minutes.
  • Place lettuce in the same bowl used for asparagus; top with tomatoes, feta cheese, and asparagus. Serve.


Tuesday, 27 June 2017

Picnic at Smithville Lake, Missouri

There is something special about childhood memories. Granted, now I don’t play and run as much as I used to do as a kid still... it feels good to just pack a bag and spend an entire day away from home with no schedules to follow. Debarshi and I love going on picnics and when we were in Montgomery, Alabama we used to go to the nearby lakes and parks often to enjoy a blissful serene day. 


(Photo taken at the Lake Lurleen State Park, Alabama)

Even though it sounds pretty fascinating to just take out a blanket and go for a picnic, it’s always better to plan for it ahead of time so that you have things to do and plenty to eat and drink. I have a picnic list which I have built over time (believe me when you forget things as much as I do it’s always better to write everything down!) and today I am going to share it with you:

Look for the Perfect Weather: 
First and foremost, check the weather. You do not want to spend the entire day amidst rain. Just a pleasant day with a light breeze, not too hot or cold is perfect for a picnic and if you keep an eye on the local weather, you will easily find such a beautiful day.  If there is a chance of rain, make sure to pack umbrellas. I read somewhere that taking a shower liner is a good idea if you are suspecting the ground to be wet or dirty. Just place it below your mat or blanket and start unpacking.

Where to go?
Debarshi and I love to go to state parks or near lakes and I think choosing the perfect place is very important. So, look around, do some research on the internet and try to find that perfect place. If you are going with friends, a big park with a wide open space will be good for playing games. 


(Photo taken at the Smithville Lake)

Be comfortable:
This is important, if you are not feeling comfortable then you will get bored easily. So check the weather and wear clothes accordingly. Normally I prefer to wear loose light clothes with shoes because I don’t want to get bitten by insects while walking on the grass. I do pack a light sweater because sometimes after it rains you may feel a bit cold after sitting outside for a while. 

Seating arrangements:
Take a soft big blanket so that everyone can comfortably sit on it. You can also take folding chairs if you don’t want to sit on the ground but blanket is a must. 

Now about a nap on the cozy blanket? Sounds good? Take some pillows. I love to lie down and just look around at nature, listen to the birds, hear the water flowing and pillows complete that whole experience.


Food and drinks:
Ah! The most important part of any outing. Good food is good life so make sure to take lots of food, water, munching snacks and drinks. This time we decided to get everything readymade so we went to our local Hy-Vee (grocery) shop and got ourselves sandwiches, a plate of Chinese, fried chicken with mashed potatoes and some sushi. I think it’s always better to take some extra food so that you can start the picnic early and don’t have to worry about running out of food. Remember, state parks and lakes are usually a bit away from the hum drum of the city so it’s always better to pack extra.

We also got chips and cold drinks with bottled water because finger foods are great to munch during the games. Now you can of course cook ahead and pack everything or you can get ingredients for grilling and utilize the park grills to prepare foods then and there. Take some chocolate or cookies to complete the meal or olives and cheese with crackers if you are carrying wine. If you are going with friends, potluck is a good idea because then everyone will be bringing something and you will have lots of different options.


We enjoyed the leftovers of the picnic the next day (From top right: Sushi, Chinese – noodles and chicken with rangoon and egg roll, some Indian – biryani with chicken 65 and a cheese chicken sandwich)

Take a cooler:
You know what sets off the mood? When the water and cold drinks are not chilled enough. So, take a cooler and make sure to fill it with lots of ice. This is also great at the end of the day when you have leftovers. Just wrap the food items in a plastic bag and put them inside the cooler. 

Silverware or Plastic?
If you are going on a romantic date then taking good quality silverware, dishes and napkins is a good idea. Personally I always prefer to take everything plastic so that I don’t have to worry about washing the dirty dishes after coming home. So, plastic cups, fork, spoons, knives, paper plates and towels are a big Yes on my list. Use them to eat and then throw them out. Just one less thing to worry about after coming home. 

Plan the activities:
When you are going with friends I think it’s again a good idea to ask everyone to bring something. Music is a must, nothing sets the mood like some good music. Board games and cards are great. Softballs and Frisbees are fun and everyone can take rounds playing them. If you don’t want to do a lot of physical activity, take a book with you. It’s always good to plan the activities as per your interest and the company.

Take a tote bag or picnic box:
Well, you will be carrying a lot of stuff so it’s a good idea to keep them together and organized so that they are easier to find. Tote bags are great to carry the blankets and pillows from the car to the picnic spot. You can of course take a smaller bag for keeping the paper towels, cups and spoons etc.

Extra but essential items:
Don’t let the fear of insects stop you from enjoying a carefree day, take some insect repellant with you. Also sunscreen and sunglasses are a must whenever you are outside. I also recommend to take a small first aid kit with a few band aids and any necessary medications you feel like taking. Trash bags are very important. I always transfer the empty bottles and boxes straightaway in the trash bags so that we don’t have to devote extra time for clean up later on. Also, always take a bottle opener with you, walking around with a chilled bottle in hand and nothing to open it with is just disappointing.

Above all, enjoy! If you have forgotten something, there is nothing to do about it so improvise. It’s one day away from home so try not to be too engaged with your phones, keep the texting and emailing to a minimum. Don’t fret about the grocery list or whether you have switched off the fan. Just play games, eat good food and enjoy the nature while listening to your favorite music.


Recommended Reading: