Featuring over 350 tried and tested recipes that can be prepared at home. From comfort food to restaurant style. Plus 110+ articles on Kitchen and Cooking Tips, Restaurant Reviews and more.
Showing posts with label Panch Bhaja (Crispy Deep Fried Vegetables). Show all posts

Friday, 16 August 2019

Kopi Chechki (Stir-fried Cauliflower and vegetables)


This stir-fry is my mother-in law’s specialty. Although it may seem like just another stir-fry, it isn’t. You have to make sure that the cauliflower is cooked through and yet it should hold its shape. If it is overcooked, it will become too soft and break. You should be able to see all the vegetables in their proper texture and shapes. I think Debarshi’s whole love of cauliflower is because of this amazing stir-fry. I may not cook like his mom but re-creating this recipe is sure fun. Now always use mustard oil to cook Bengali dishes because only it can create that authentic flavor. Cauliflower anyway tastes great in any dish (if cooked properly). This dish is best served with Luchi. However, it also goes very well with plain Paratha or even roti. The trick while cooking this dish is to maintain high heat so that all the vegetables get a nice sear and cook at the same time.


Ingredients: 
  • Cauliflower - 2 cups, cut into 1 inch florets 
  • Potato - 1 cup, cut into medium cubes
  • Eggplant - 1 ½ cups, cut into medium cubes
  • Green chilies - 2, split in halves
  • Turmeric powder - ½ teaspoon
  • Mustard Oil -  2 tablespoons
  • Salt - ½ teaspoon
  • Sugar - ½ teaspoon
  • Tomato - 1 medium, diced
  • Peas - ½ cup


Directions: 
  • Heat a wok on high heat.
  • Add the Oil in it and wait for a few seconds.
  • When the oil begins to smoke, turn down the heat to medium and temper the Oil with Green Chilis.
  • After a few seconds, add the Cauliflower, Potato and Eggplant in it. Tip: If the oil jumps, add a little turmeric in it and mix well.
  • Fry till the vegetables are golden in color then add the Turmeric Powder, Sugar and Salt and mix well.
  • Add the Tomato and Peas and mix well.
  • Cook uncovered on high heat till the potatoes are cooked through. Check by mashing a piece of potato with your spatula. Check the Cauliflower by breaking a floret in half, if they are cooked then turn off the heat. 
  • Serve hot with Luchi or Paratha.


Tuesday, 13 August 2019

Alu Potol Kumror Dalna (Potato, Pointed Gourd and Pumpkin curry)


Potol also known as Parwal or Pointed Gourd is one of the vegetables I never cook! I guess the reason is, big seeds. Potol has chewy skin, mushy interior and rather hard and crunchy seeds inside. These seeds turn harder as the Potol ripens. So, there are quite a few dishes where the seeds are removed and the Potol is filled with some other delicious filling. In Northern India, Potol is one of the summer vegetables and hence is frequently prepared in Torkari (stir-fries) and Jhols (curries) during summer months. Growing up, I don’t remember having any friends who loved Potol (remember the reason?) and hence there was no chance for me to exchange my lunch box. However now occasionally enjoying a bowl of Potol er Dalna doesn’t seem that bad. Actually, I quite liked the curry which Debarshi’s mom prepared for us. So, I took the recipe from her in the hope that if I don’t cook it maybe some Potol lover will!

In other news, I have just started going to the gym again and I have made some very good friends there. We take the same classes and yesterday after our class we started talking. They were very interested in Indian food and we discussed a few things about slow cooking vs pressure cooking food. It always makes me happy to find people from other cultures who love Indian food. So, the next time I see them, I am going to ask them to try some Indian curries (who knows, maybe they will like Potol).

If you do try this recipe, serve this with hot Luchi or Paratha fried in ghee. This is a traditional Bengali dish and can be served for brunch or dinner. Don’t forget to add ghee because it will really enhance the flavor.

Potol er Dalna or Jhol:
Bengali curries are broadly divided into Dalna and Jhol and although it is easier for me to distinguish between the two, I would like to explain here why and how a curry can be named Dalna and not Jhol and vice versa. Jhol is a thin soupy, runny curry whereas Dalna is a thick and richer gravy. Both Jhol and Dalna can be totally vegetarian (niramish - meaning no onion and garlic will be used in the preparation) or non-vegetarian (amish – with onion and garlic and sometimes fish/ egg). This recipe is an amish Dalna because it uses onion and ghee making the dish rich and the gravy thick. The addition of Onion will also make this Dalna unsuitable to be consumed on fasting days in India (In India we do not consume any meat, fish or egg on fasting days. On such days, we don’t even use onion or garlic to prepare foods because they count as ingredients used for adding flavor in non-vegetarian foods).


Ingredients:
  • Mustard Oil – 2-3 tablespoons
  • Cumin Seeds – ½ teaspoon
  • Dried Red Pepper Pods – 2-3
  • Onion – ½ cup, cut in cubes
  • Potol – 10, small, cut in halves, washed and peeled slightly
  • Potato – 1, cut in big pieces, washed
  • Pumpkin – ½ cup, cut very small, washed
  • Coriander Powder – ½ teaspoon
  • Turmeric – ½ teaspoon
  • Red Chili Powder – ¼ teaspoon
  • Salt – ½ teaspoon
  • Sugar – ½ teaspoon
  • Tomato - ½ cup, diced
  • Whole Wheat Flour - 1 tablespoon
  • Ghee - 1 tablespoon


Directions:
  • Heat a wok on medium high heat.
  • Add the oil in it. When the oil begins to smoke, reduce the heat to medium low so that it cools off a bit. This is done to remove the pungent taste and smell of the Mustard Oil.
  • Temper the oil with cumin seeds and dried red pepper pods.
  • After a few seconds, add the Onion. Fry lightly till it turns golden in color.
  • Now add all the vegetables (Potol, Potato and Pumpkin). Fry lightly.
  • Add the spices (Coriander Powder, Turmeric, Red Chili, Salt and Sugar). Mix well
  • Add the Tomato, mix well.
  • Reduce the heat to low.
  • Continue cooking to fry the masala.
  • When the masala looks fried, about 10-15 minutes, add about 1 cup of water along with the Whole Wheat Flour and Ghee. 
  • Cover and continue cooking till the potatoes cook through.
  • Serve hot with Luchi or Paratha.


Love Indian dishes with Potatoes? Try these recipes as well:

Wednesday, 24 July 2019

Achari Kaddu (Spiced stir-fried Pumpkin)


The word Pumpkin originated from the greek word Pepon which means large melon. Let me share a fun fact with you: If someone asks you whether Pumpkin is a fruit or vegetable, I would suggest simply saying, “Yes”. Why? Because a pumpkin qualifies for both! Webster's Dictionary defines Pumpkin as: A large, round, orange-yellow, edible fruit with many seeds. However, it is widely used for cooking and baking treating it like a vegetable. Pumpkin is like tomatoes, beans and green peppers. These are all fruits but since they are not so sweet, they are popularly called vegetables.

Here in U.S, pumpkin is one of the most popular crops. It is widely used in fall, starting with the pumpkin carving around Halloween to making pumpkin pie, soups and purees for thanksgiving dinner. Although I am yet to make a pumpkin pie, I did help Debarshi a couple of times to carve pumpkins for Jack-o’-lanterns.

It will also be interesting to note here that Pumpkin is loaded with numerous health benefits:
  • It is high in vitamin A – which helps promote sharp vision and boasts your immune system.
  • Pumpkin is high in minerals and low in calories (canned pumpkin is nearly 90% water so it will keep you hydrated and full with lesser calories).
  • It is rich in antioxidants.
  • Pumpkin is also a good source of fiber which helps to keep the appetite in check. In fact, in a recent WebMD article, I read that one cup of canned pumpkin contains 7 grams of fiber which is lot more than what we get from 2 slices of whole grain bread. Something to think about, right!
  • Unlike potatoes or corn which are high in carbs, pumpkin contains comparatively lower carbs (lower amounts of sugar and starch) and can be consumed on Keto (low carb high fat) diet. However, you should watch for the portion size because it does contain some carb. As you know Debarshi and I keep doing low carb diet on and off. Pumpkin is my all time favorite option even on Keto diet and I use it to make Kumror torkari or Chochchori. When not on keto, I can just deep fry it and enjoy it with rice and dal or make a delicious lentil soup (Sambar).
  • Pumpkin seeds are full of protein, magnesium, copper, and zinc. Remember, the Pumpkin seeds are known as Pepitas. They are edible and make a delicious snack. I love adding them in salads and oatmeal. A handful of Pepitas with dried cranberry makes a delightful topping and goes great with anything.


Plus, it is really easy to include pumpkin in your diet as it can easily be roasted, pureed or baked. I always prefer to cook savory pumpkin stir-fries without potatoes because that cuts down the carbs even further.

Canned or Fresh Pumpkin:
Although opening a can is way easier than cutting and peeling a fresh pumpkin, I prefer to use fresh ingredients in my recipes. Plus, my recipes involve cutting the pumpkin into cubes where as canned pumpkin is always pureed. However, if you are making pumpkin pie, using canned/ fresh wouldn’t make much of a difference. In fact, an article from Mayo clinic says:
  • Both fresh pumpkin and canned pumpkin are packed with nutrients, such as potassium, vitamin A and iron. 
  • Canned pumpkin without salt is a healthy alternative.


However, you should know that Canned pumpkin pie mix usually contains added sugar and is therefore higher in calories than regular canned pumpkin.

So, I guess it would depend on the recipe you are cooking/ baking. Personally I recommend using fresh produce.

Wow! All this interesting information almost made me forget that today I am running a fever. There is nothing to worry, I just got a bit carried away with my work out schedule. Turns out, if you don’t workout everyday you get so unfit that after every rigorous workout, your body starts to ache really badly. I still kept pushing myself up to the extent where I got fever due to extreme fatigue. So, today as I am lying on the bed, doing nothing, I decided to share this delicious vegetarian recipe.

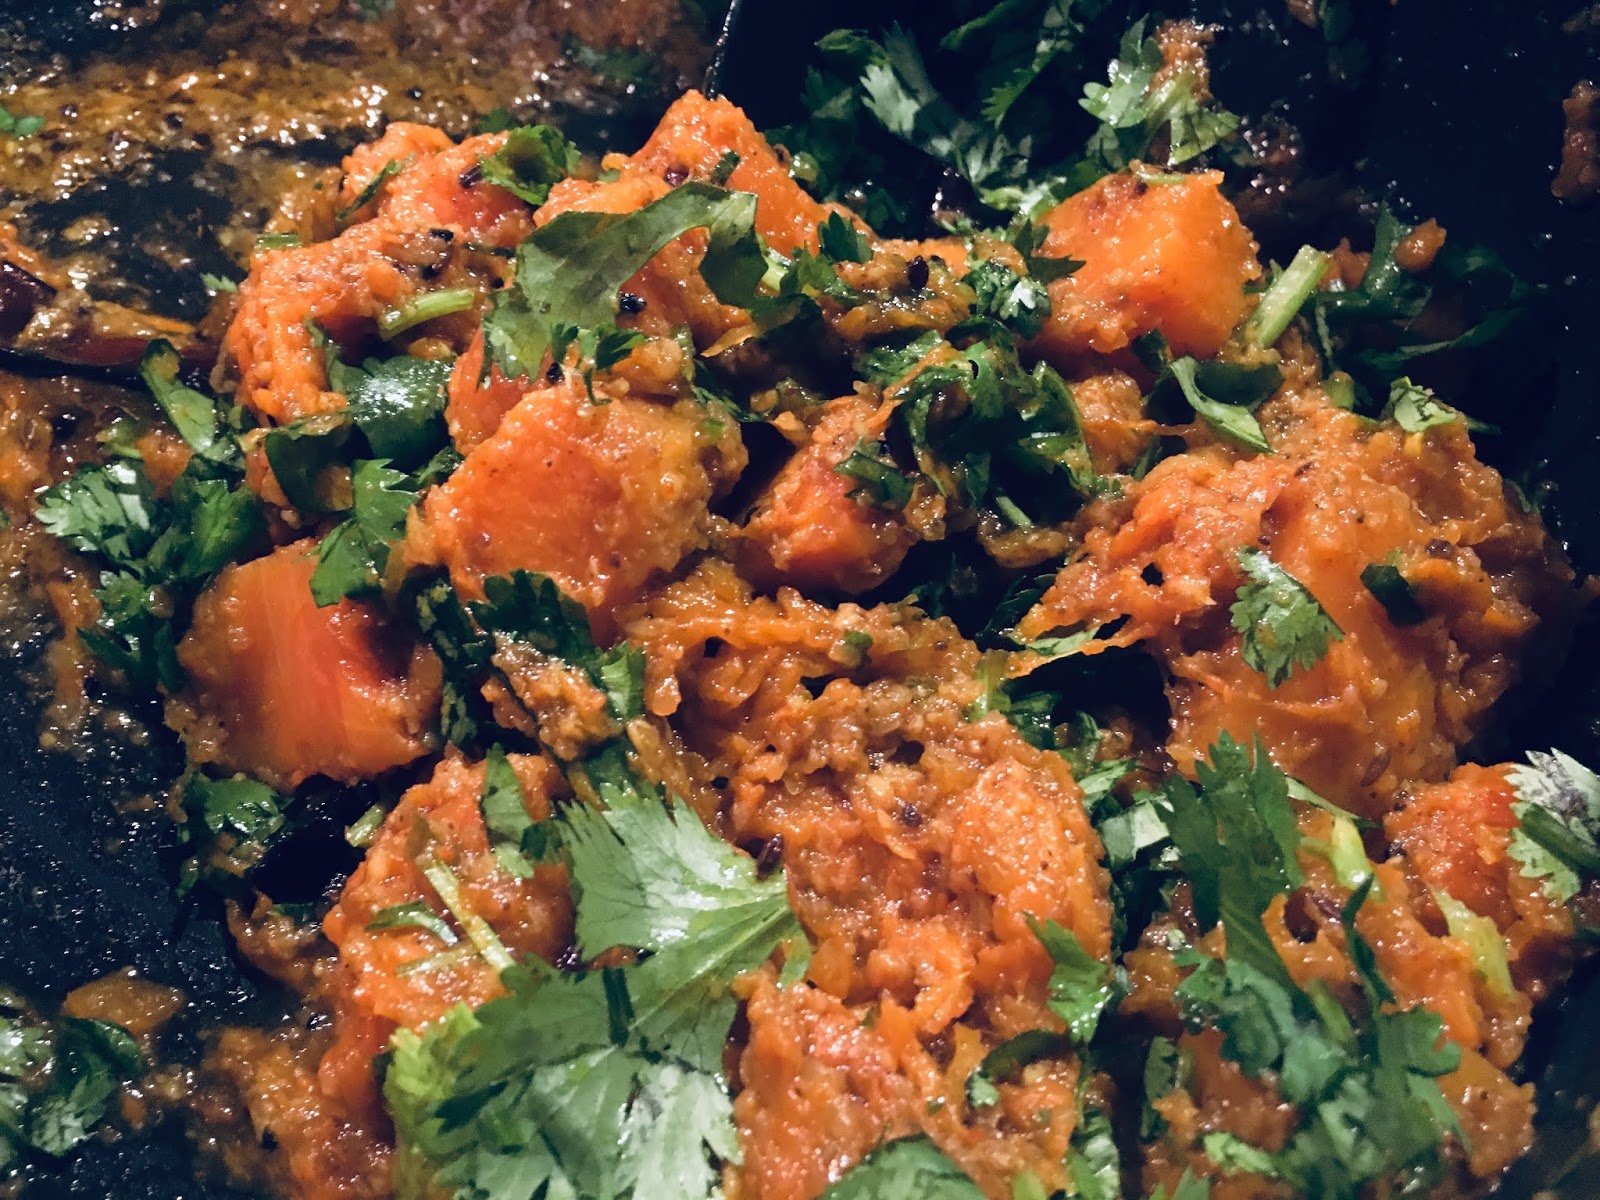
I stumbled on this recipe a few days back. This is indeed a delicious medley of spices and pumpkin. It’s a dry stir-fry and can be served with roti/ Luchi/ Namkeen Puri or Plain Paratha. Try it! This tastes every bit as delicious as it looks. I left the pumpkin for a few extra days in the fridge and it got a bit over-ripe (hence the mashed pieces in the photo). I am sure this dish will have a better texture with a fresh bought pumpkin.

As always I have tried to provide a detailed explanation of the steps so that even the novice cooks can easily prepare it. I was a bit skeptical while trying this recipe because it has Panch Fhoran, Asafoetida (which are used in the vegetarian dishes only) with garlic and garam masala. However, this turned out to be amazingly delicious.

So, give this a try sometime and then post in the comments how it turned out. You can also post on my Instagram #lifewithoutalu with your photos and comments.


Ingredients:
  • Red Pumpkin - half, peeled, washed and cut into 1 inch cubes
  • Ginger – 1 inch, finely chopped
  • Garlic - 2 large cloves, finely chopped
  • Panch Fhoron - 1 teaspoon
  • Hing (Asafoetida) - ¼ teaspoon
  • Green Chili - 2, slit in half
  • Red Chili Powder – ¼ teaspoon
  • Amchur (Dry Mango Powder) - 1 teaspoon
  • Turmeric Powder – ½ teaspoon 
  • Garam Masala – ¼ teaspoon
  • Canola Oil - 2 Tablespoons 
  • Salt – to taste (about ½ teaspoon)
  • Fresh Cilantro - a handful, washed and chopped

Directions:
  • Heat a wok/ cooking pot over medium-high heat.
  • Add Oil in it.
  • Temper the Oil with Panch Fhoron and Hing. 
  • When the seeds sizzle, add the Ginger, Green Chili and Garlic in it. 
  • Reduce the heat to medium and add the pumpkin. Mix well. Fry, stirring carefully.
  • Once the pumpkin looks fried, start adding the spices (Red Chili Powder, Amchur,  
  • Turmeric Powder, Garam Masala and Salt). Stir to mix. 
  • Lower the heat to simmer and cover the wok. Let it cook for 5-10 minutes till the Pumpkin is thoroughly cooked.
  • Garnish with the Cilantro.
  • Serve hot with Luchi or Paratha.


Love Pumpkin? Try these recipes as well:

Wednesday, 19 December 2018

Jeera Rice (Rice flavored with Cumin Seeds)


Jeera rice is an Indian recipe where rice is fried in Ghee and whole spices. The star of the show is of course Cumin seeds which instils an earthy, aromatic fragrance in the rice. I read somewhere that after Black Pepper, Cumin is the most used spice in the world and it makes perfect sense. It is not that expensive like Nutmeg or Mace and it can be used both in seed and powdered form. Cumin is widely used in Indian cooking. Starting with Dals and curries to rice and Chaat, it is the most versatile spice I have ever used. 

I think most of the Indian restaurants cook Jeera Rice because it can be served with almost anything! Starting with Dal fries to non vegetarian curries, this dish also goes very well with a simple potato curry or even a slice of pickle. In fact, many people eat this regularly as a comfort food because of its easy preparation. Unlike Biryani, which takes a lot of time, preparation and ingredients, Jeera Rice can be prepared easily. 

So, what all do we need to prepare this delicious rice? Just a few whole spices which are easily available in your pantry (like Green Cardamom, Bay Leaf, Cinnamon, Cloves, Black Cardamom and Mace). Of course we also need Cumin Seeds. I always get my spices from the Indian Store and keep them in a cool and dry place. Also, make sure to keep them in an airtight container so that their aroma stays intact.


Jeera rice is known for its fragrance and beautiful texture. Each grain of rice should be separate and fluffy. Correct cooking time is crucial for rice dishes like this. This does not take long to cook just 10-15 minutes, so make sure to pay close attention while you are cooking it. Same goes for the water. Rice to water ratio should be 1:2. So, for every one cup of rice, two cups of water will be added. If you are thinking this does not seem a lot, won't the rice be undercooked? then let me tell you, covering the pot helps to create enough steam to cook the rice just right.

Now if you do happen to overcook the rice, don’t panic. Jeera Rice will still taste amazing because of all the good stuffs added in it. It may not look very presentable but the taste will blow you away!


The best part about this dish is, you don’t need a fancy equipment or even a rice cooker to make this. Just a pot with a lid. Yes, there are three things which I would definitely recommend, first use a good quality basmati rice. Believe me it makes all the difference in texture. Second, use a homemade Garam Masala. I know this spice mix is always used in small quantities but even a pinch of good quality masala is enough to elevate a dish. Third, Ghee! Yes, clarified butter is way tastier and aromatic than butter or oil and it creates a gourmet flavor in the dish.

I think it is very important to know which dish should be paired with what. While plain steamed rice can be paired almost with any curry and Dal, Jeera rice adds a level of sophistication in the menu. Especially if you are having guests over and preparing something special. This easy yummy cumin flavored rice gives a whole new level to your homemade curries. Just by tempering the Ghee with a few whole spices and cumin seeds, you transform plain rice to an aromatic and flavorful dish. 

Many people sprinkle chopped cilantro on Jeera Rice. I often add cilantro or Kasuri Methi in my Dals and curries and hence I prefer not to add it in the rice. Now this is an important point, always make sure that the garnish is complimenting your dishes. Adding them left and right is not going to make your cooking any special. In fact, too much garnish can be disappointing because that is all you will taste in your first bite.


There are numerous times when this simple rice dish has helped my mom serve a gorgeous meal in no time. My parents have always been very active socially. There have been so many times when a relative or friend decided to stop by our house unannounced. It was an unsaid rule to serve them lunch or dinner. Obviously no one ever expected her to serve anything fancy at that last minute but she would prepare Jeera Rice and voila! suddenly the Dals and curries will taste amazing! I think these little things come with experience. The more time we spend in the kitchen we more we know these little tips.

So, what do you say? Try this delicious Jeera rice tonight. Hopefully this recipe will help you as it has helped my mom so many times.


Photo Courtesy: Dr. Debarshi Chatterji
Recipe Courtesy: Mamma

Photo features: Jeera rice with Chanar Dalna, Payesh and Panch Bhaja. I prepared all these dishes to celebrate Lakshmi Ganesh Puja on Diwali at our home.


Ingredients:
  • Basmati rice - 1 ½ cups, washed and soaked in water
  • Water - 3 cups (to cook the Pulao, use normal tap water)
  • Garam Masala – about ¼ teaspoon
  • Salt – about ½ teaspoon (or as per taste)
  • Green Cardamom - 2 to 3 
  • Cumin Seeds – 1 teaspoon 
  • Bay Leaf – 1
  • Cinnamon - 1 inch 
  • Cloves -3-4
  • Black Cardamom – 1 - 2
  • Mace - 1 blade
  • Ghee - 4 tablespoons 

Directions:
  • Heat a wok over high heat.
  • Add the Ghee in it.
  • Add all the whole spices (Green Cardamom, Cumin Seeds, Bay Leaf, Cinnamon, Cloves, Black Cardamom and Mace) in it.
  • Fry for about 15- 20 seconds so that the spices start crackling, then add the drained rice. This step ensures that the fragrance and flavor of the spices is absorbed by the rice.
  • Fry till the rice turns golden in color.
  • Add the water, the wok is hot so the water will instantly start to boil, mix and cover. Reduce the heat to low and allow it to cook for 10 minutes. (Tip: Do not take off the cover while the rice is cooking. This will let out the steam and change the cooking time).
  • Add the Garam Masala and Salt, mix well and cover. Allow it to cook for another 7-10 minutes.
  • Press a grain of rice under your spatula to check if it has been cooked through. (Tip: When properly cooked, each grain of the rice will be tender but no longer crunchy. Since it has been fried before cooking, it will not stick together and hold its shape. Don’t worry if has been overcooked because it will still taste amazing).
  • Turn off the heat and fluff the rice (move around the rice in the wok carefully) with a spatula. This will dry the extra water and bring a beautiful texture.
  • Serve hot with a yummy Dal or curry of your choice.


Recommended Reading (Few recipes where you can use Cumin Seeds/ Powder):

Pair this delicious Jeera Rice with:

Wednesday, 14 November 2018

Arhar Dal (Toor Dal or Split Yellow Pigeon Peas Soup)


Photo courtesy: Dr. Debarshi Chatterji
Recipe courtesy: Mamma


Arhar Dal also known as Toor Dal (in Hindi) or Split (Yellow) Pigeon Pea is one of the most common Dals in Indian homes. I think the reason is, the ease of preparation. You don’t need a ton of ingredients to prepare this dal and yet it tastes divine. Dal, Bhat and Bhaja is one of my favorite comfort foods and this dal literally takes two whistles to cook. You can also make a delicious dal fry by adding onion, tomatoes, cilantro, ginger and garlic in it.  However, most of the times, I just boil the dal and temper it later with some ghee, cumin seeds and green chili. Debarshi often requests a different temper which also includes some minced garlic. You can prepare it either way, depending on your mood. You can also just add a dollop of ghee in the boiled dal and have it with some rice or fresh roti. You can also have it like a soup. See, the possibilities are endless.

My mom always prepares a different type of dal everyday. She says that every dal differs in its nutrition and hence it is recommended to keep them on rotation. Plus, every dal tastes different and the way you temper it also alters its flavor. Growing up, I never really thought about all the planning that goes in the preparation of a well balanced meal. Now when I think about it, I can’t help but smile for all those times when I threw a tantrum just because of dal! I was not a picky eater but Arhar dal was my favorite and that is what I wanted everyday. Having a meal together is an important tradition in most of the families. It is a time for everyone to sit together and share things. Hence, my mom would always tell us to keep quiet and eat whatever was served on the plate. I never really thanked her for teaching us this valuable lesson. However, once I moved to Delhi and had to cook my own meals, I thoroughly missed those family dinners. Then I would get bored of eating the same dal everyday and most of all the discussion, the fun and the laughter. I have maintained this tradition in our home as well. Debarshi and I always eat our meals together. We talk and share whatever we did throughout the day. Now, I may not cook a different dal everyday but I do know all the amazing recipes and I do prepare them often.


Now let’s come back to Arhar dal. This dal is also used to prepare Sambar (lentils with vegetables served with fritters) so you can just get one bag of dal and prepare it in different ways. For the busy weeks, I always boil a big batch of dal in the cooker. Then I divide it into 3-4 portions and temper/ fry it as I feel like. I think this recipe is easy and quick and perfect for the weeknight dinners. You can freeze the leftover dal and thaw it later as per your need. For those of my friends who don’t have a pressure cooker at home, please make sure to cook the dal very well before consuming. It doesn’t matter much if you overcook the dal but you should definitely check that it is not undercooked. Just mash the dal lightly with a rubber spatula/ spoon and if it gets mashed easily then it is cooked.

The best part is, you can enjoy this dal as a simple comfort menu or convert it to a multi course meal. Just start the meal with some Saag, followed by dal and some Bhaja or torkari (Alu Bhindi or Alu Posto), then serve the fish or meat course and finally Payesh. We Bengalis usually cook this multi course meal for special occasions but I am going to share with you my little secret. You see, I almost always have leftovers. Over the years I have learned to serve those leftovers as a planned meal. So, if I have some Bhaja or torkari and some meat or fish leftovers from my weeknight dinners then I can very well serve a full multi course meal on weekends! All I have to do is cook some fresh dal and rice and serve with fresh crisp salad.

Now if I have convinced you to give this dal a try then you must be wondering where can you buy it. You can find Arhar dal in almost all Indian stores and often in the Asian or oriental aisles of other grocery shops. I would urge you to give this dal a try and then post in the comments how it turned out.


Ingredients:
  • Arhar Dal (Toor Dal or Split Yellow Pigeon Peas) - ½ cup
  • Water – 2 cups
  • Salt – ½ teaspoon
  • Turmeric Powder – ½ teaspoon
  • Oil – 1 teaspoon

For tempering:
  • Green Chilies - 1-2, slit in halves
  • Cumin seeds – 1 teaspoon
  • Ghee – 1 tablespoon
  • Garlic – ½ teaspoon, minced (optional)

Let’s cook the dal:
  • Wash the dal well.
  • Add the dal in the pressure cooker along with the Salt, Turmeric powder, and Oil. 
  • Add the water in it and mix well.
  • Close the cooker and put it on medium heat. Make sure to put the whistle and rubber on the lid and close it properly.
  • When the cooker whistles for 2-3 times, turn off the heat and let it cool down.
  • Once the pressure drops and the lid opens, start the tempering process.

Directions to temper the Dal:
Indian cooking often involves tempering hence my mom has given me a special temper pan. It’s a small pan about the size of a cup. It has a sturdy handle and a flat base which makes it easier to place on the stove top. Now, if you have even a slightest doubt that the pan will not stay put on the stove top, it will be best to hold the handle till it heats up and the spices sizzle. You can get the temper pan from Amazon.com using the keyword - Tadka pan.


  • Add the Ghee, Green Chilies, Cumin seeds and Garlic (if using) in the pan and heat it over medium high heat.
  • Once the seeds start popping (the garlic will start changing color to golden red, do not burn it), turn off the heat. 
  • Carefully pour it in the cooked Dal and cover immediately (sometimes the hot spices make the water in the dal jump).
  • Bring the dal to a boil. 
  • Serve hot with steamed rice or Roti and torkari.

Tip: If you don’t have a temper pan, use a small cooking pot for this step.


Recommended Reading:

Tuesday, 30 October 2018

Gobindobhog Chal diye Patali Gurer Payesh (Bengali Rice Pudding with Date Palm Jaggery)


For those of my friends who know about this and intentionally clicked the title, ‘Welcome Back Payesh Lovers!’. If you don’t have an idea what the title means, read on. 

Rice Pudding also known as Payesh in Bengali is one of the most decadent desserts you will ever taste. When prepared properly it is very creamy and even a small portion will leave you satisfied. It is quite heavy and it often becomes a challenge to save room for this delicious dessert after enjoying a multi course Bengali feast. Hence, hats off to all those Payesh lovers who manage to finish a bowl of this creamy dessert after finishing their entire meal.

Patali Gur is a form of Jaggery prepared from Date Palm. It can be rightly called a delicacy which is found only during winter months. Since it is mainly produced in West Bengal, we in Northern India have always depended on our relatives and certain Bengali shop keepers for this particular jaggery. 

I understand that here in U.S, jaggery is not a common pantry item. However, in India, a box of jaggery is a must have in every kitchen. Jaggery is used for making varieties of desserts. A piece of jaggery with some warm milk and fresh roti (stove top cooked flatbread) is often served as the final course in many homes. During winter months normal jaggery is replaced by Patali Gur and everyone wants to get seconds. Why?

Patali Gur adds a beautiful rustic earthy flavor to the dish. Be it your regular milk and roti or a special dessert like Payesh, it adds its own unique taste. In fact, its flavor is so different that you can immediately tell the difference. For comparison try a spoon of Payesh cooked with sugar and then with Patali Gur. 

Aside from Payesh, Patali Gur is also used in a variety of sweets like Sandesh. It not only lends a beautiful flavor but also brings a caramel color in the sweets. You do not need to add any additional flavoring because the Gur itself will have enough flavor of its own.

I think it will be correct to say that the taste of Patali Gur grows on you. With every spoonful, your taste buds get more and more immersed in its flavor. By the time you finish the bowl, your eyes will already be scanning everywhere in hope to get seconds. I guess this is the reason why everyone tries to conserve their stock of Patali Gur.

Growing up, I was more into savory dishes. Now I can’t help but feel miserable about all those times when I was offered something as divine as Patali Gur and I refused to take it. Believe me, unless you have a sweet tooth and living away from your country it will be very difficult for you to understand my situation. Patali Gur like many other exotic Indian ingredients is not exported in huge quantities and hence it is quite expensive. 

Now as I have told you before, preparing Payesh is not difficult. In fact, I will say it is one of the easiest desserts you will ever learn. However, the catch is, Time! You need a lot of time to prepare a thick creamy Payesh. You need patience and it demands constant attention. You can never leave a pot of simmering milk and do something else. If the bottom starts sticking, then the whole batch is ruined. Hence, an even low temperature should be maintained at all time. Stir it occasionally and it will be ready in its own time. Many people use a heavy pot to prevent the milk from burning. I use a big non stick pot and once the milk comes to a boil, I turn down the heat to low where it remains for let’s say, 3-4 hours. 

Let’s talk about the rice now – Gobindobhog. You can very well use basmati (which I have done in my previous article) for making Payesh. However, this particular rice has its own significance. Gobindobhog is a short grain, white and aromatic rice. It is sticky in texture which turns out really well when added in Payesh. It makes the pudding creamier. It is a specialty of the Burdwan district of West Bengal (India). You can also use it in other dishes. The photo above shows the same rice served in main course. I will say it tastes amazing with Jharna ghee (a type of clarified butter).

This time when Debarshi and I visited our parents (in India), we were lucky to have some Patali Gur. His mom saved some for us and although it wasn’t a fresh batch, we loved it all the same. I even prepared a batch of Payesh for Debarshi’s birthday and shared it with friends. Although the initial method for preparing the Payesh remains the same, a few steps change in the later stages. 

It is important to add the Patali Gur right before you switch off the heat. Add the crushed jaggery and immediately cover the pot. The jaggery will take its own time to melt and mix with the milk. Wait for 15-20 minutes, then stir. Since Payesh is usually served cold, I don’t think there is any hurry to mix the jaggery at this stage. Make sure to have the jaggery at room temperature otherwise it will take longer to melt. 

I am not sure if you can find Patali Gur online or in selected stores in bigger cities. If you do, please give this recipe a try. Post in the comments section how it turned out.


Ingredients:
  • Gobindobhog Rice – 1/3 cup
  • Whole Milk - 1 gallon
  • Patali Gur – 1 cup, broken in small pieces
  • Ghee (Clarified Butter) – 1 tablespoon
  • Green Cardamom - 8 pods, crushed or powdered, skins removed
  • Raisins – ¼ cup (or ½ cup)
  • Almonds or Pecans – ¼ cup, sliced or broken into small pieces
  • Bay leaf – 2, small


Let’s do some preparations first:
  • Wash the rice. 
  • Drain it well then transfer to a small bowl. 
  • Add the Ghee and Bay leaves to the rice and mix. Keep this aside.


Directions:
  • Heat a big pan or wok over medium high heat. Slowly and carefully pour the milk into it.
  • Keep the heat on medium for the first 10-15 minutes, stirring occasionally then turn it down to medium low.
  • Keep boiling the milk till it is reduced to 2/3 of its original volume (Tip: This simply means that the milk will be more than half but less than its original volume). Keep stirring occasionally.
  • Now add the rice along with the bay leaves and ghee to the milk. Stir to mix.
  • Allow it to cook for 15-20 minutes, stirring occasionally then mash a grain of rice to check if it’s slightly tender. If it isn’t keep cooking and stirring.
  • After 10-15 minutes, add the crushed Green Cardamom, Raisins and sliced Almonds. Keep stirring and cooking. Any thick milk should be cleaned off the sides and mixed in the Payesh itself so keep stirring and scraping the bottom and sides of the pan. 
  • Check after 10-15 minutes, the rice should be cooked well by now. The addition of the nuts will slightly deepen the color of the milk. The Payesh should have a thick consistency now (the milk at this time is almost reduced to half of its original volume).

  • Switch off the heat.
  • Add the Patali Gur in the Payesh and cover immediately.

  • Let it melt. Wait for 15-20 minutes, then stir. 
  • Serve the Payesh cold.


Tips:
  • Use mortar pestle to crush the cardamom pods.
  • Use a big wok or pot to boil the milk. It should be properly washed before adding the milk and use a clean wooden or rubber spatula to stir the milk.
  • Do not use reduce calorie (1% or 2%) milk.
  • Payesh is a task of patience. The milk should be allowed to boil and reduce on a low heat. After you add the nuts the color of the milk will darken a bit.
  • Patali Gur will bring a beautiful caramel color in the Payesh. Do not be confused when this happens. 
  • The Payesh can be kept in the fridge for 4-5 days. You can also put it in a zip lock bag and freeze it. Enjoy whenever you want.


Recommended Reading: