Featuring over 350 tried and tested recipes that can be prepared at home. From comfort food to restaurant style. Plus 110+ articles on Kitchen and Cooking Tips, Restaurant Reviews and more.
Showing posts with label Chocolaty Chocolate Chip Muffins. Show all posts

Tuesday, 14 November 2017

Yummy Brownies


Photo Courtesy: Dr. Debarshi Chatterji


A few weeks back I started watching a series called ‘The 70s Show’ and in it they always show Mrs. Forman baking Brownies. She is one of the main characters in the show and is portrayed as a very loving, caring and joyful mother who loves to take care of her family and friends and she loves to bake! She bakes for fun, she bakes when she is stressed and she bakes to make everyone happy and one of her most frequent bakes is Brownies. They have been showing it so frequently that I started craving to bake and eat some delicious Brownies. So, I looked up a recipe and gave it a try. Result? Delicious mouth watering chocolate rich brownies. The best part about this recipe is, you wont even need a stand mixer or a hand beater. Just a bowl and spatula with the ingredients and you are ready. Measure, mix, bake and above all enjoy! I followed the example of my favorite character and shared this with everyone I know and believe me it made me as happy as Mrs. Forman!

Happy Baking!


Ingredients:

For the Brownie - 
  • Unsalted Butter – ½ cup (or 1 stick) + more for greasing the pan
  • White Sugar - 1 cup (or ½ cup Truvia)
  • Eggs - 2 
  • Vanilla Extract - 1 teaspoon 
  • Unsweetened Cocoa Powder - 1/3 cup 
  • All-Purpose Flour – ½ cup + a handful for flouring the pan
  • Salt – ¼ teaspoon 
  • Baking Powder – ¼ teaspoon 


For the Frosting - 
  • Unsalted Butter - 2 tablespoons, softened 
  • Unsweetened Cocoa Powder - 1 tablespoon
  • Honey - 1 tablespoon 
  • Vanilla Extract - ½ teaspoon 
  • Confectioners' Sugar - 1 cup 


Tip: 
  • Keep the Butter outside at room temperature so that it softens. Do not melt it in the microwave as it will make the frosting very runny.


Directions:
  • Grease and flour an 8-inch square pan. I used cold butter for this step, I rubbed it all over the pan using my fingers for a smooth even spread, specially around the edges. 
  • To flour the pan, add a handful of flour on the pan and move it around so that it sticks on the butter. Then tilt the pan upside down over the sink so that the extra flour falls off.


  • Place the Butter in a large microwave safe bowl and microwave for a minute so that it melts. You can also do this step in a saucepan over your stove top.
  • Preheat the oven to 350 degrees F.
  • Now remove from butter from heat (or take out the bowl from the microwave), and in the same bowl, stir in the White Sugar, Eggs and Vanilla Extract. 
  • Sift in the Unsweetened Cocoa Powder, All-Purpose Flour, Salt and Baking Powder and beat them together. 


  • Spread the batter into the prepared pan. Smooth with a spatula.


  • Bake in the preheated oven for 25 to 30 minutes (Do not overcook).

Tip: Prepare the frosting while the Brownie is in the oven. See directions below.
  • Once baked, take it out of the oven and transfer to a cooling rack. Don’t take the brownie out of the tray yet. Switch off the oven.


Let’s make the Frosting: 
  • While the Brownie is baking, let’s prepare the frosting. Now you can very well skip this step, however, if you are planning to apply the frosting, make sure to utilize the baking time so that the frosting spreads evenly over the warm brownies.
  • Combine the Unsalted Butter, Unsweetened Cocoa Powder, Honey, Vanilla Extract and Confectioners' Sugar in a small bowl.
  • Stir until smooth. 


  • Frost brownies while they are still warm. 
  • Let the frosting set, allow the brownies cool down a bit then cut them into big pieces and serve.


Tips:
  • If you have any leftover plain icing, use it for this.
  • If your icing is in the freezer, make sure to keep it outside for 2-3 hours, prior starting the baking. This will give it ample time to soften up. Do not microwave!


Recommended Reading:

Tuesday, 31 October 2017

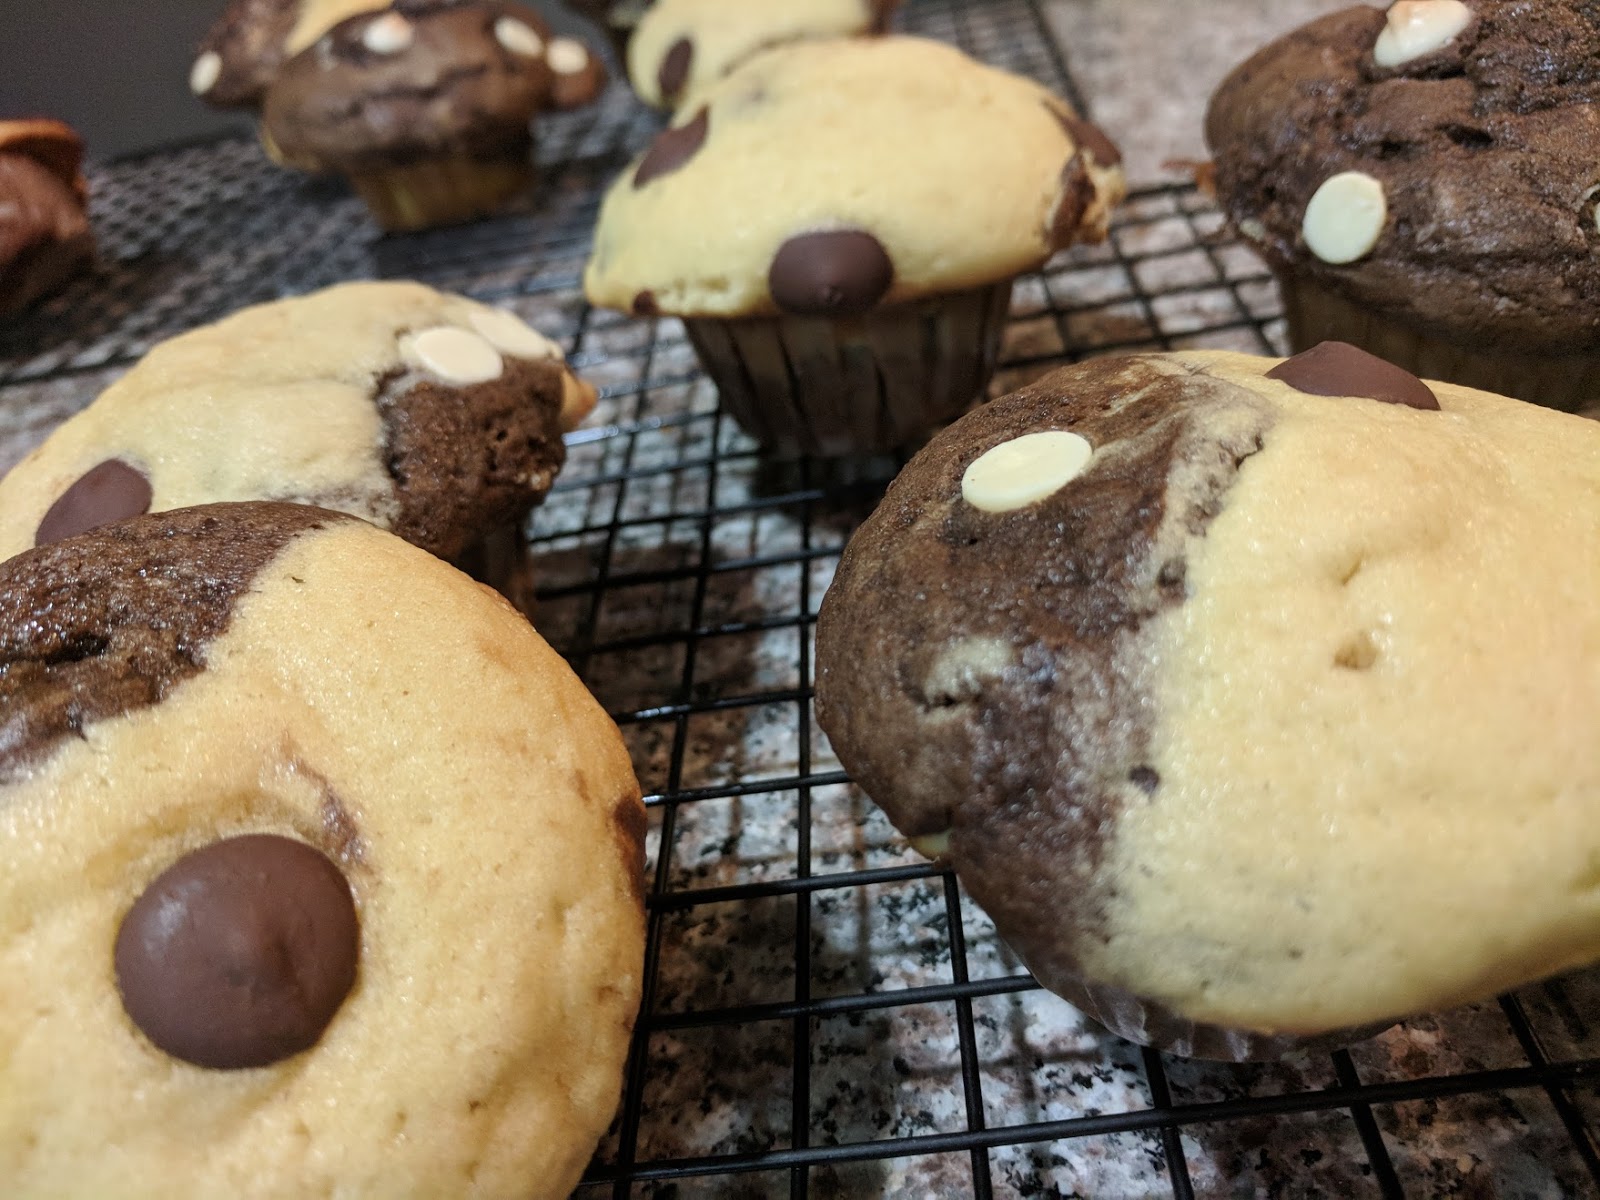
Chocolate and Vanilla Half and Half Muffins


Photo Courtesy: Dr. Debarshi Chatterji

I baked these delicious muffins for Debarshi’s office party and let me tell you, these muffins are not only fun to bake but great to eat too. These soft and fluffy buttery sugary Chocolate Vanilla muffins are sure to be a hit in a party as kids love the chocolate over load and adults adore the cute combination. Decorated with both white and dark chocolate chips these muffins will bring a smile on your face before you even eat them. I made a few changes in the original recipe and they turned out amazing! Also, just for this recipe, I decided not to follow the ¾ cup rule which asks to fill the muffin cups only to the ¾th cup level, I filled them up to the top so once they started rising, the tops rose to form big beautiful round domes just like the ones sold in bakeries. So don’t wait, bake these scrumptious half and half muffins today!


This recipe will yield 12 big muffins

Ingredients:
Dry Products-
  • All Purpose Flour - 2 and ½ cups 
  • Unsweetened Cocoa Powder – 3 tablespoons
  • Baking Soda - 1 teaspoon
  • Baking Powder - 1 tablespoon
  • Salt – ½ teaspoon
  • Dark Chocolate Chips - about 2-3 tablespoons (I used Ghirardelli Chocolate Premium Baking Chips, 60% Cacao, Bittersweet Chocolate)
  • White Baking Chips - about 2-3 tablespoons (I used Ghirardelli Chocolate Premium Baking Chips, Classic White Chips)


Wet Products-
  • Unsalted Butter - ½ cup (or 1 stick) at room temperature
  • White Sugar - 1 cup 
  • Plain Yogurt - ½ cup 
  • Milk - ½ cup (I used 2%)
  • Eggs - 2 large, at room temperature
  • Vanilla Extract - 1 teaspoon 


Others:
  • Muffin Tray
  • Muffin Cups - 12
  • Spray Oil – for greasing
  • Stand mixer recommended


Directions:
  • Prepare the muffin baking tray – grease the tray, arrange the muffin cups on them and grease/ spray them with Oil, this double greasing will prevent the batter from sticking on the tray thus yielding smooth bakery standard muffins.
  • Put a sifter on a large bowl and sift all the dry ingredients (All Purpose Flour, 
  • Baking Soda, Baking Powder and Salt). Set aside. Please do not skip this step. 
  • In the stand mixer bowl, combine the Unsalted Butter and White Sugar. Attach the flat beater and beat on medium speed for about 3 minutes or until fluffy. 
  • Add the Eggs (one at a time), Plain Yogurt and Milk and beat until well mixed. 
  • Preheat the oven to 350 degrees F. 
  • Add the flour mixture a little at a time, beating on low speed until just blended, being careful not to over mix (Tip: I keep the stand mixer running on low speed and I add continuously a tablespoon of the flour mixture into the egg mixture. This ensures that the flour mixes properly. I keep adding the flour until I have used the entire mixture)
  • Divide the batter between two bowls. Stir Vanilla Extract into one bowl of the batter. Stir Unsweetened Cocoa Powder into the other bowl of the batter.
  • Spoon vanilla batter into one side of each of the prepared muffin cups. Spoon chocolate batter into the other side of each muffin cup, filling the cups full. Sprinkle dark chocolate pieces over the vanilla batter and white baking pieces over the chocolate batter. 
  • Bake for 15 to 17 minutes or until a toothpick inserted in centers comes out clean. Remove the muffins from the oven and let them sit inside the pan for 2 minutes.
  • In the meantime, arrange cooling racks on the kitchen counter and carefully remove the Muffins from the tray and transfer them on the cooling rack. Do not turn the tray upside down as the Muffins will be soft and may break. Do not skip this step as it will make the bottoms soggy (Tip: I use two spoons to scoop out the hot muffins from the tray and transfer).
  • Let them cool for about 5- 10 minutes then serve.
  • Enjoy these scrumptious Muffins whenever you want. They are made of Chocolate remember.


Tips: 
  • Measure all the ingredients before starting the mixing and baking. Sometimes it may seem that you have enough flour or vanilla extract but when you actually measure them, they are less than you expected. So, instead of running to the store at that last minute, measure them beforehand.
  • Keep the eggs and butter at room temperature so that they mix easily and evenly.
  • Make sure you are not dropping any egg shells in the mixing bowl. If you are having trouble, use a small bowl. Crack each egg into the bowl, check for shell fragments, then pour it into the mixing bowl. This is also a great way to make sure that we are not using any rotten eggs.
  • Chocolate tastes even better the next day but do not keep these muffins outside for long. Transfer to a container in a single layer, cover and refrigerate. Before serving, heat them up for 10-15 seconds in the microwave.


Recommended Reading:

Tuesday, 25 July 2017

Delicious Chocolate Orange Muffins


Photo Courtesy: Dr. Debarshi Chatterji


If you ask me, how have I spent my last few weeks, I will tell you only two words – Chocolate and Orange. Yes, I have been trying to develop a perfect balance of these two flavors. It started with my idea that I will be baking a three tiered cake for Debarshi’s birthday this year. I asked Debarshi three of his favorite flavors with chocolate and got three suggestions - Chocolate Orange, Chocolate Pecan and Chocolate with Coconut. So far, I have baked 3 Chocolate Orange cakes and 3 batches of muffins. Now that I am happy with the results it’s time to share the recipe with everyone! 


This recipe will yield 12 muffins

Ingredients:
Dry Products-
  • All Purpose Flour - ¾ cup and 2 tablespoons 
  • Sugar - ¾ cup
  • Unsweetened Cocoa Powder – ¼ cup and 2 tablespoons 
  • Baking Soda - ¾ teaspoon
  • Baking Powder - ¾ teaspoon
  • Salt – ½ teaspoon


Wet Products-
  • Water - ½ cup 
  • Milk – ½ cup
  • Vegetable Oil – ¼ cup 
  • Egg - 1 Large
  • Orange Marmalade - 2 tablespoons + about ½ cup for topping the muffins 


Others:
  • Muffin Tray
  • Muffin Cups - 12
  • Spray Oil – for greasing
  • Wisk
  • Spatula 
  • Big Bowls – 2


Directions:
  • Prepare the muffin baking tray - arrange the muffin cups on them and grease them with Oil.
  • Put a sifter on a large bowl and sift all the dry ingredients (All Purpose Flour, Sugar, Cocoa Powder, Baking Powder, Baking Soda and Salt). Please do not skip this step. 
  • Preheat the oven to 350°F.
  • In a separate bowl, whisk together the Water, Milk, Vegetable Oil, Egg and Orange Marmalade.
  • Add to the dry ingredients all at once.
  • Stir just to moisten using a large spatula. Resist the urge to mix it smooth. 
  • The resultant batter will be thin so do not use a spoon to fill the cups rather use a measuring cup (¼ size) to fill the muffin batter into the cups. Do not press the batter.
  • Bake in the pre-heated oven for 18 - 20 minutes or until a toothpick comes out clean
  • Remove the muffins from the oven and let them sit inside the pan for 2 minutes.
  • Arrange cooling racks on the kitchen counter and carefully remove the Muffins from the tray and transfer them on the cooling rack. Do not turn the tray upside down as the Muffins will be soft and may break. Do not skip this step as it will make the bottoms soggy (Tip: I use two spoons to scoop out the hot muffin from the tray and transfer).
  • Let them cool for about 5- 10 minutes.
  • Spoon a little marmalade on top of the muffins while they are still slightly warm and serve.
  • Enjoy these scrumptious Muffins whenever you want. They are made of Chocolate remember.


Tip: 
  • Chocolate tastes even better the next day but do not keep these muffins outside for long. Transfer to a container in a single layer, cover and refrigerate. Before serving, heat them up for 10-15 seconds in the microwave.


Recommended Reading:

Friday, 21 July 2017

Basic Kitchen Measurements


I love baking because it follows some very basic rules of mix and match and the result is always something delicious. It is essential to measure each and every one of your ingredient properly before mixing them all together. Just imagine if you added extra salt or leavening agent in your batter. Mistakes happen when we eye ball ingredients because no two ingredients are same. Cracking and dropping an egg directly into the batter looks appealing but have you ever dropped a piece of shell along with the egg yolk? Same goes for the butter, try creaming it without bringing it first to the room temperature and you will be at it for quite some time. It’s the little tips and tricks which make our life easier and baking so much fun. So today I am going to share with you a few tips:

Buy measuring spoons and cups:
Now this may seem unimportant but believe me it makes everything so easy when you are using 1 teaspoon as per the standard unit of measurement. The spoons we use everyday in our kitchen are not fit for this job and should not be used for it. The same goes for measuring cups, do not use your tea or coffee cups when it comes to baking, always use standard measuring cups. 


How to measure liquids?
To measure liquids like Buttermilk, Milk or Vanilla Extract, place the measuring spoon or cup on your kitchen counter or any flat stable surface. Then fill it till it’s full. Make sure that you are not measuring any liquid over your mixing bowl as you may easily spill thus increasing the amount of the liquid in your batter.  


How to measure dry products?
To measure dry products like Flour, Baking Powder, Soda, Salt and Sugar, one technique is to fill the spoon or cup with another spoon and then level it off with the straight edge of a knife. I usually follow the dip and sweep method, which is done by dipping my measuring cup or spoon directly into the container in which I have my flour, sugar etc. I fill the cup with the product and lift it out. Then I use the straight edge of a knife to level off the top. 


To measure Brown Sugar or Cheese fill the spoon or cup and then lightly press it to release any air pockets. 


To measure Cream Cheese and Butter, I prefer to use the measurement given on the pack or wrapper itself. The lines clearly indicate where you need to cut to get the exact number of tablespoons or ounces. 


Eggs – Large or Extra Large:
You must be thinking why am I mentioning Eggs in this article because we don’t measure eggs with cups or spoons. The reason is, they are an integral part of our baking world. We need eggs for almost all the recipes and although it is the simple part, it can be quite challenging at times. 

Now, you will always find clear instructions in your recipe about eggs and the simplest way is to buy the type of eggs mentioned in the recipe itself (large or extra large). Remember using a different size of egg in your recipe will change the overall outcome.


Now, sometimes the recipe will ask you just for the egg white or yolk of a large egg. For a new baker this may seem overwhelming and this maybe one of those things where once you try it, it becomes easy. Believe me, it’s really easy to separate the egg white and yolk and you can easily do it at home, yourself without having to spend extra money on it. 

First make sure you are using refrigerated cold eggs, this will prevent the yolk from breaking out. Place a bowl in front of you, tap the center of the egg on a flat surface like your kitchen counter. Hold the egg over the bowl and slowly pull apart the two cracks to widen them. When it starts breaking, place your other hand below it in a cupped form. The white will run through your fingers while the yolk will stay on. If you have to crack more than one egg, use a different bowl every time so that in case of any mistake your previous batches are not ruined. Check the bowl for any shell fragments. You can keep the yolk in a different bowl and if you are not using it for the recipe, don’t throw it away. I usually mix a little milk in the yolks, whisk them with some salt and pepper and make myself scrambled eggs.


My final tip to you, find a good recipe and trust it. Most of our home baking fails because we start improvising too soon. Remember extra flour will dry up the baked product and extra milk will make the batter too thin thus increasing the baking time. You can bake the perfect cake; all you need to do is follow the instructions as they are.

I hope you use these tips for your next baking adventure. 


Photo features: Homemade Pecan cake with Rum frosting

Recommended Reading: 

Friday, 14 July 2017

Fabulous Lemon Muffins with Lemon Syrup


Photo Courtesy: Dr. Debarshi Chatterji


A few weeks ago, Debarshi and I went to the historic downtown of Liberty, Missouri. After strolling around for a while, we came across a local café – Hammerhand Coffee. We got ourselves Iced Coffee and I just started looking in their display case trying to find something for my sweet tooth.  I spotted a muffin along with the beautiful scones and croissants but it didn’t look like a berry or fruit muffin. Curious, I asked about it and came to know it was a Lemon muffin. 


Photo taken at: Hammerhand coffee, Liberty, Missouri. 
Features: Iced Coffee and Lemon Muffins


Now I love lemon but I have never had a Lemon muffin before and that muffin may have looked plain but it was packed with flavors. It was sweet but just enough to cut the tart flavor of the Lemons and its lemony aroma was just refreshing. After coming back home, I started looking for its recipe and finally found one which I liked. Foodies I present to you -  Fabulous Lemon Muffins with Lemon Syrup recipe.

Now whenever you try a new flavor, feedback is important, so I prepared a batch of muffins and sent them to Debarshi’s office. I was a bit anxious because I had never baked with Lemon flavor before. Thankfully, everyone liked it and I got great reviews!!


Lemon is one of my favorite fruits. It has a fresh citrusy flavor and as soon as you start grating or juicing it, the whole house fills with this beautiful fragrance. Papa (my maternal grandfather) had a big garden in his house and along with other trees and plants, he also had a Lemon tree. I used to love walking in that garden and smell the different flowers and fruits. I think Lemon has a very different almost a playful aroma which always lifts my spirit and makes me smile.

Lemon has several health benefits, it is especially good for the liver, it strengthens the immune system and clears dandruff and rashes. Lemon is also one of the easiest options to detoxify your body. I have a routine of drinking lemon juice and honey in some lukewarm water first thing in the morning. This low calorie drink gives me a boast of energy all through the day while aiding my digestion. In fact, I also read that drinking lemon water can also cure the cold and flu. Lemon also restores the body’s pH level which means you will have a younger skin, increased metal alertness and restful sleep.

Now whenever you are trying this recipe, I would recommend to use fresh lemon juice and zest. Believe me, you will enjoy that fresh citrusy aroma while you are baking with it. Wear a glove because all that citric acid may make your fingers itchy while you are juicing the Lemon. These yummy delicious muffins only take 20 minutes to get ready and can be enjoyed any time of the day, so don’t wait, bake a batch today!


Ingredients:
For the muffin - 
  • All-Purpose Flour - 2 cups 
  • White Sugar – ½ cup 
  • Baking Powder - 3 teaspoons 
  • Salt – ½ teaspoon 
  • Lemon Zest - 1 tablespoon grated (approximately 1 big lemon)
  • Milk – ¾ cup 
  • Vegetable Oil – 1/3 cup 
  • Egg - 1 (at room temperature)
  • Vanilla Extract - ½ teaspoon 


For the lemon syrup -
  • Lemon Juice - ¼ cup (approximately 1 big lemon)
  • Sugar - ¼ cup 
  • Lemon Zest - to garnish (approximately 1 big lemon)


Extras:
  • Muffin Tray
  • Muffin Cups - 12
  • Spray Oil or a brush with ½ cup vegetable oil – for greasing the cups


Directions:
  • Prepare the muffin baking tray - arrange the muffin cups on them and grease them with Oil.
  • Sift all the dry ingredients (All Purpose Flour, White Sugar, Baking Powder and Salt), Whisk them together and mix the Lemon Zest.  Smell it, its fruity citrusy fragrance is refreshing.
  • In a separate bowl, beat the Milk, Oil, Egg and Vanilla.
  • Preheat the oven to 375 degrees F.
  • Pour the wet ingredients into the dry and beat with a spoon just until smooth.
  • Fill the muffin batter into the cups using a spoon or scoop. Fill them full but do not overfill them. Do not press the batter.
  • Bake in the pre-heated oven for 20 minutes or until a toothpick (insert in the center of the muffin to check if its baked through) comes out clean.
  • While the muffins are in the oven, let’s prepare the Lemon syrup. Whisk the lemon juice, zest and sugar together in a small saucepan and boil for about five minutes or until slightly reduced and shiny. Remove from the heat.
  • Remove the muffins from the oven and let them sit inside the pan for 5 minutes.
  • Arrange cooling racks on the kitchen counter and carefully remove the Muffins from the tray and transfer them on the cooling rack. Do not turn the tray upside down as the Muffins will be soft and may break. Do not skip this step as it will make the bottoms soggy.
  • Poke a couple toothpick holes in each muffin (I poked 4 in each) and carefully drizzle about 1 teaspoon of hot syrup over each of them. Decorate with the zests.
  • Let the muffins cool for at least 10 minutes so that they can absorb the syrup, then serve.


Tip:
  • Do not pour a lot of syrup over the muffins otherwise it will get too tangy and sweet. Just one teaspoon for each muffin is perfect. Add some lemon zest over each of them to complete the decoration.


Recommended Reading:

Tuesday, 27 June 2017

Picnic at Smithville Lake, Missouri

There is something special about childhood memories. Granted, now I don’t play and run as much as I used to do as a kid still... it feels good to just pack a bag and spend an entire day away from home with no schedules to follow. Debarshi and I love going on picnics and when we were in Montgomery, Alabama we used to go to the nearby lakes and parks often to enjoy a blissful serene day. 


(Photo taken at the Lake Lurleen State Park, Alabama)

Even though it sounds pretty fascinating to just take out a blanket and go for a picnic, it’s always better to plan for it ahead of time so that you have things to do and plenty to eat and drink. I have a picnic list which I have built over time (believe me when you forget things as much as I do it’s always better to write everything down!) and today I am going to share it with you:

Look for the Perfect Weather: 
First and foremost, check the weather. You do not want to spend the entire day amidst rain. Just a pleasant day with a light breeze, not too hot or cold is perfect for a picnic and if you keep an eye on the local weather, you will easily find such a beautiful day.  If there is a chance of rain, make sure to pack umbrellas. I read somewhere that taking a shower liner is a good idea if you are suspecting the ground to be wet or dirty. Just place it below your mat or blanket and start unpacking.

Where to go?
Debarshi and I love to go to state parks or near lakes and I think choosing the perfect place is very important. So, look around, do some research on the internet and try to find that perfect place. If you are going with friends, a big park with a wide open space will be good for playing games. 


(Photo taken at the Smithville Lake)

Be comfortable:
This is important, if you are not feeling comfortable then you will get bored easily. So check the weather and wear clothes accordingly. Normally I prefer to wear loose light clothes with shoes because I don’t want to get bitten by insects while walking on the grass. I do pack a light sweater because sometimes after it rains you may feel a bit cold after sitting outside for a while. 

Seating arrangements:
Take a soft big blanket so that everyone can comfortably sit on it. You can also take folding chairs if you don’t want to sit on the ground but blanket is a must. 

Now about a nap on the cozy blanket? Sounds good? Take some pillows. I love to lie down and just look around at nature, listen to the birds, hear the water flowing and pillows complete that whole experience.


Food and drinks:
Ah! The most important part of any outing. Good food is good life so make sure to take lots of food, water, munching snacks and drinks. This time we decided to get everything readymade so we went to our local Hy-Vee (grocery) shop and got ourselves sandwiches, a plate of Chinese, fried chicken with mashed potatoes and some sushi. I think it’s always better to take some extra food so that you can start the picnic early and don’t have to worry about running out of food. Remember, state parks and lakes are usually a bit away from the hum drum of the city so it’s always better to pack extra.

We also got chips and cold drinks with bottled water because finger foods are great to munch during the games. Now you can of course cook ahead and pack everything or you can get ingredients for grilling and utilize the park grills to prepare foods then and there. Take some chocolate or cookies to complete the meal or olives and cheese with crackers if you are carrying wine. If you are going with friends, potluck is a good idea because then everyone will be bringing something and you will have lots of different options.


We enjoyed the leftovers of the picnic the next day (From top right: Sushi, Chinese – noodles and chicken with rangoon and egg roll, some Indian – biryani with chicken 65 and a cheese chicken sandwich)

Take a cooler:
You know what sets off the mood? When the water and cold drinks are not chilled enough. So, take a cooler and make sure to fill it with lots of ice. This is also great at the end of the day when you have leftovers. Just wrap the food items in a plastic bag and put them inside the cooler. 

Silverware or Plastic?
If you are going on a romantic date then taking good quality silverware, dishes and napkins is a good idea. Personally I always prefer to take everything plastic so that I don’t have to worry about washing the dirty dishes after coming home. So, plastic cups, fork, spoons, knives, paper plates and towels are a big Yes on my list. Use them to eat and then throw them out. Just one less thing to worry about after coming home. 

Plan the activities:
When you are going with friends I think it’s again a good idea to ask everyone to bring something. Music is a must, nothing sets the mood like some good music. Board games and cards are great. Softballs and Frisbees are fun and everyone can take rounds playing them. If you don’t want to do a lot of physical activity, take a book with you. It’s always good to plan the activities as per your interest and the company.

Take a tote bag or picnic box:
Well, you will be carrying a lot of stuff so it’s a good idea to keep them together and organized so that they are easier to find. Tote bags are great to carry the blankets and pillows from the car to the picnic spot. You can of course take a smaller bag for keeping the paper towels, cups and spoons etc.

Extra but essential items:
Don’t let the fear of insects stop you from enjoying a carefree day, take some insect repellant with you. Also sunscreen and sunglasses are a must whenever you are outside. I also recommend to take a small first aid kit with a few band aids and any necessary medications you feel like taking. Trash bags are very important. I always transfer the empty bottles and boxes straightaway in the trash bags so that we don’t have to devote extra time for clean up later on. Also, always take a bottle opener with you, walking around with a chilled bottle in hand and nothing to open it with is just disappointing.

Above all, enjoy! If you have forgotten something, there is nothing to do about it so improvise. It’s one day away from home so try not to be too engaged with your phones, keep the texting and emailing to a minimum. Don’t fret about the grocery list or whether you have switched off the fan. Just play games, eat good food and enjoy the nature while listening to your favorite music.


Recommended Reading: