Featuring over 350 tried and tested recipes that can be prepared at home. From comfort food to restaurant style. Plus 110+ articles on Kitchen and Cooking Tips, Restaurant Reviews and more.
Showing posts with label Savory Crispy French Toasts (Indian Recipe). Show all posts

Tuesday, 13 August 2019

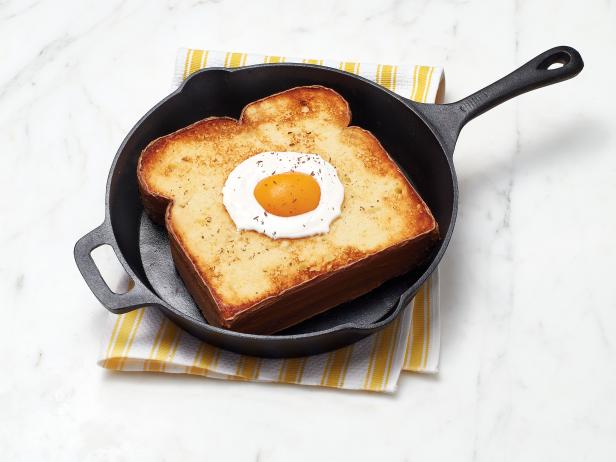
Egg in a Hole – Add Fun to Your Breakfast


Toast with butter
Toast with jam
Scrambled eggs or
Sausage, Bacon, Ham
If you want to add some fun
Make a hole in the bread
And crack the egg in it
Crispy, yummy Egg in a Hole
For a fun breakfast make Egg in a Hole!


You may not like my amateur poem writing skills but you will certainly like this breakfast. It’s fun to make and delightful to eat. Plus, you can serve this to anyone regardless of age. Egg in a hole makes a simple yet satisfying breakfast.


Ingredients:
  • Butter – Unsalted, 1 tablespoon
  • Bread - a thick slice of really good white or whole wheat country bread
  • Egg – 1 large
  • Salt and freshly ground Black Pepper


Tips:
  • I like a runny yolk which can be mopped up with the crispy bread. Cooking on a low heat is ideal for it.
  • Use a non-stick pan so that the egg doesn’t stick.


Directions:
  • Cut a round hole in the center of a slice of bread with a biscuit or cookie cutter. (You can even use the rim of a small glass.)
  • Heat the pan over medium heat. Add the butter and let it melt.
  • Add the bread and let the butter soak into the bread so that it develops the flavor and crunch.
  • Reduce the heat to low. Flip the bread and carefully crack a large egg into the center. Don’t move the bread for at least 30 seconds or so. Season with Salt and Pepper.
  • Fry the little bread circle as well till it turns beautifully brown.
  • Serve hot.


Other breakfast ideas you may like:

Thursday, 10 January 2019

No Knead Dutch Oven Artisan Bread


When I look back on my baking adventures, I cannot help but smile. I have been very lucky to be blessed by a husband who is a foodie. Even my friends, love my baked goods. Needless to say it has taken many failed attempts to be where I am today.


I started my baking adventures with a ready to bake cookie mix. Later one of my friends showed me how to bake bread rolls from scratch. I have been baking ever since and have learned quite a few delicious recipes. Be it cookies, cakes, pies or muffins, I love baking them all (and that too right from scratch). I also keep searching and experimenting with different types of bread recipes. I am still a novice but recently I discovered a fool proof recipe which bakes beautiful crusty bread without any labor.


Now usually when we think about Breads, the first thing which comes to our mind is kneading. Kneading helps to develop the gluten which then helps to make the bread firm on the outside but open and light textured on the inside. This kneading part is the most crucial part of bread baking. Without the correct amount of kneading and gluten formation, the bread will not rise properly, neither will it have that chewy texture. Well, what if I tell you that you can bake a beautiful loaf of bread without worrying about the kneading part. I think most people don’t attempt to bake breads at home because of all the time and effort that goes in it. However, any homemade good is free from preservatives and that is one of the reasons I focus on homemade food.


Paul Hollywood says in the British baking show; a slower rise gives more flavor to the bread. Now when we are adding hot/ lukewarm water in the flour, the yeast rushes to work. With the active Yeast and kneading we develop the gluten. But what will happen if we add room temperature water to the flour? Naturally the yeast will take more time to develop which will make the dough more flavorful. You must be thinking what will happen with the gluten? Do we still have to knead the dough before popping it in the oven?


No! That is why this recipe is called No Knead Bread. All you have to do is mix four ingredients – Flour, Salt, Yeast and Water. Cover and let it sit at room temperature for almost 18 hours. Straightaway transfer that mix in the Dutch Oven, bake and voila! Delicious crusty homemade bread. This recipe is so simple yet so flawless that it will win you over. Perfect for the busy ladies or mommies as well as for your date nights. The time you are actually working on the bread is so short that you can easily fit it between your other tasks. After all, who doesn’t like homemade bread baked from scratch?


You know what I realized after reading this recipe? I wasn’t paying any attention to the steaming part of bread baking. Unless the dough gets enough steam it will not form a crust. Yes, we can always spray some water on the bread while it is baking. I have also used other methods (ice/ water in a tray) to create that perfect amount of steam. The breads used to turn out good but honestly, considering all that time and effort, those breads just don’t stand before this crusty bread. Specially after knowing that we don’t have to do any of these steps to create the proper amount of steam. So, what is the secret?


Dutch Oven! When we bake the bread in the Dutch Oven (or Dutch Pot) with the lid on, it creates steam inside the pot. This steam is the water we mixed earlier in the dough. Since the lid seals, the moisture in the dough has nowhere to go but to convert to steam. This keeps the crust softer for a long time and helps to expand the bread in the initial stages of baking. It also creates a nice glossy crust on the bread. Just remember to follow the directions step by step. When preheating the oven, make sure to place the Dutch oven inside. This sort of transforms it into a small version of a professional steam injected oven. The Dutch oven distributes the heat and steam more evenly in the bread thus hardening the crust.


There is just one catch with this bread. You can’t plan it at the last minute. Since the dough has to sit at room temperature for almost 18 hours, you have to plan this ahead. You will feel a bit skeptical the first time, because the mixed dough will look like a sticky mess. Plus, the waiting time will make you question the recipe. But take my word, the resultant bread will be absolutely gorgeous.


Last but not the least, please use fresh ingredients. Yeast will not work if it has expired. So, pay close attention while adding the ingredients. Do not skip the parchment paper because it not only prevents the dough from sticking on the bottom of the pan but also helps to lift it out once the baking is done.


Some of the online recipes may suggest to shape the dough in a ball before baking it but I have never done that and I don’t think there is any need. You don’t even have to touch the sticky dough. Just push it out using a large rubber spatula on the parchment paper. Then transfer the parchment in the Dutch oven and do this carefully because the oven is hot! I have a big 5 quart Dutch Oven and the dough spreads out a bit. So, if you have a smaller one, you may consider using it so that the bread ends up taller.


Photo Courtesy: Dr. Debarshi Chatterji


I think, this bread checks all the boxes of my expectations –


First, the Salty taste, which is just yum! You can of course add some garlic or cheese for more flavor (like I do sometimes).
Second, the texture. The bread will have a hard crust on the outside and a light, soft middle. You will see the air pockets showing how the yeast worked. Always use a good serrated knife to cut the slices.
Third, the overall method. My god, it cannot get any easier than this and this bread has endless possibilities. You can:

Dunk it in a soup
Spread jam, soft cheese or butter on it
Top it with tomato, basil and olive oil
Make an egg in a hole
French Toast
Make a Sandwich
Or eat it just like that

The best part is, this bread not only tastes store bought but looks as well. This bread has become a staple at our home. I baked this delicious bread on Thanksgiving and we absolutely loved it. We even enjoyed it the next morning with some butter, coffee and my homemade delicious Boozy Fruitcake.


Try this bread, then let me know how it turned out. 


Nothing says ‘Home’ like the smell of Baking!


Ingredients:
  • All Purpose Flour - 3 cups 
  • Salt - 1 ½ teaspoons 
  • Dry Active Yeast – 1 ½ teaspoons 
  • Water – 1 ½ - 2 cups room temperature 

Do ahead:
  • Mix the dry ingredients in a bowl. 
  • Start adding the water (½ cup at a time), use a wooden spoon or spatula to mix everything together.
  • Cover with a plastic wrap and let it sit for 17 ½ hours at room temperature. 

Tips: 
  • Since we have to wait for almost 18 hours to bake the bread, timing is important. Calculate the hours so that when it is time to bake, it isn’t midnight. I find it best to mix the dough in evening so that I can bake it sometime during next day (around noon).
  • Make a Garlic bread by mixing ½ teaspoon Garlic powder in the dough.


Just after mixing 


After 17 ½ hours


Directions:
  • Place the Dutch pot inside the oven with the lid on.
  • Now preheat the oven to 500 degrees F (Switch on the central air/ vent, helps to air out any strong fumes from the oven).
  • Once the preheating is done, transfer the dough (it will be sticky) on parchment paper using a big spatula.


See how the yeast has worked! It’s amazing!


Optional: At this point I like to stick a couple pieces of my favorite cheese in the dough. You can also sprinkle some flour on it.


  • Take out the Dutch pot from the oven and quickly and carefully, remove the lid and transfer the dough along with the parchment in it. Do not take out the Dutch pot before this step.


  • Place the lid back on and slide inside the oven.
  • Bake in Dutch pot (with the lid on) for 30 minutes. 
  • Reduce the oven temperature to 450 F, take off the lid and bake for 15 minutes more.
  • Switch off the oven and let the Dutch pot sit inside for 10-15 minutes. This will help to cool it off a bit and also bring a better crust on the bread.


The cheesy bread will have a slightly different color.

  • Transfer the hot bread on a cooling rack.


  • Wait for a minute then cut into slices and enjoy!
Tip: Use a good long serrated knife for cutting the slices.


Dip the bread in herbed oil, spread butter or jam or dunk in soup and enjoy!


Recommended Reading:


This photo has been featured on LensCulture Portrait Awards 2019. LensCulture reviews competitions and resources for photographers and recommend the best ones. 

Awards include an exhibition at Aperture Gallery in New York, International Photo Festival Projections, massive exposure to International Press and their global online audience of three million, publication in The Best of LensCulture - Volume 4, and much more!
Thursday, 15 February 2018

Masala Oatmeal (Oatmeal with Indian spices)


Photo Courtesy: Dr. Debarshi Chatterji

It is said breakfast is the most important meal of the day and whether you believe it or not, it feels really good to start your day with something filling. I think breakfast is a wonderful time to sit together with your family members and start the day with a smile. When I was in school, my dad always used the breakfast time to ask me and my sister about our exam preparations. He would also discuss with my mom the regular household subjects or if she is planning to go to the market. As per my mom, it is never good to leave the home on an empty stomach and I follow the same rule. By skipping our breakfast at home, we starve ourselves of a nutritious meal and once we reach our work or school we tend to eat whatever is at hand which is often not very healthy. However, I completely understand why some people feel the need to skip breakfast and more often than not it is because of the lack of time and options. 

Variety is always appealing but preparing different foods within a short time is a challenge. Eggs, toast, juice or pancakes and sausages although seem like a good option take a lot of time to prepare and soon lead to skipping breakfast altogether. In our home, Debarshi and I start our day with a bowl of hot oatmeal. Although it may sound like a monotonous option, it isn’t. You can pair the oatmeal with almost anything. I love it with banana and nuts and now-a-days we are eating it with nuts and dark chocolate chips. Believe me if you keep changing the toppings even a simple bland oatmeal tastes like heaven. I usually rotate the type of nuts (Pecan, Walnut, Raisins) but my favorite is a trail mix of Cranberry, sweet Pepitas, golden raisins, sunflower kernels and almonds. It is easily available at Target (grocery shop) and is very flavorful. I think it is an excellent match for the plain oatmeal. 


Having oatmeal for breakfast has several health benefits as well. Oatmeal being rich in fiber is very good for digestion. It helps lower the bad cholesterol and helps prevent dryness or wrinkles on your skin. Oatmeal helps keep your weight in check. Remember when you are skipping breakfast at home, you are more inclined to go for fried foods like burger or donut at office. Oatmeal makes you feel full thus curbing your appetite and bad eating habits. Also, it is really easy and quick to prepare a bowl of oatmeal, simply add one or two tablespoons of your favorite toppings, half a cup of oatmeal with a cup of milk and warm it in the microwave. Yes! it is that easy to prepare. 

Now whenever we get bored of this usual sweet option, we switch to something savory which is what I am going to share with you today. Believe me, prepared with vegetables and spices this savory oatmeal is not going to be your usual breakfast. To save time, I usually chop the vegetables before hand (usually the previous night with the dinner preparations). In the morning, I simply dry roast the oatmeal and fry the vegetables with the spices, add water, combine everything and voila! It’s ready. Of course, the quick 1-minute oatmeal which I use is also a time saver and helps me to get this yummy breakfast ready in just 10 minutes. 

Try this hot spicy oatmeal and I am sure you will love it.


Ingredients:
  • Mixed Vegetables like Carrots, Peas, Beans -  ¾ cup 
  • Tomato – ½, medium
  • Onion – ½, medium
  • Oats – ½ cup (preferably quick 1 minute oats)
  • Water – 1 ½ cup (adjust as needed) 
  • Salt – to taste (about ¼ teaspoon)
  • Turmeric - a pinch
  • Oil – about 1 tablespoon
  • Ginger – ¼ teaspoon
  • Garlic – ½ teaspoon
  • Cumin Seeds – ½ teaspoon
  • Green Chili - 1
  • Garam Masala – ¼ teaspoon
  • Coriander Powder – ¼ teaspoon 
  • Cilantro – a handful


Let’s do some preparations:
  • You can do this step the previous night, take all the vegetables (Carrots, Beans etc.) and chop them one by one. 
  • If you have a chopper, use it for this step: chop the Onion with the Ginger, Garlic and Green chilies. Next chop the Tomato then the Cilantro.


Directions:
  • Heat a skillet on medium heat. 
  • Dry roast the Oats until they turn golden or begin to smell good. Set aside.
  • Heat a pan or wok over medium high heat.
  • Add the Oil. 
  • Add the Cumin seeds and let them crackle.
  • Add the Onion with the Ginger, Garlic and Green chilies and fry until the raw smell goes off and the Onions turn slightly golden or pink.
  • Add the Vegetables (Carrots, Peas, Beans) and fry them for 2 to 3 minutes. 
  • Add the Tomatoes, mix well.
  • Add the Salt, Turmeric, Garam Masala and Coriander Powder and mix well.
  • Cook until the tomatoes turn completely mushy.
  • Add the Water and bring it to a boil.
  • Add the roasted Oats and stir well.
  • Cover and cook for a few minutes.
  • Add the Cilantro and mix well.
  • Serve hot.


Tips:
  • Use the chopper to quickly chop all the vegetables and herbs.
  • Instead of Cumin seeds, use Roasted Cumin powder for extra flavor.
  • Use powders of Onion, Ginger and Garlic.
  • Skip the Green Chili if you don’t like it hot.


Recommended Reading:

Thursday, 5 October 2017

Savory Crispy French Toasts (Indian Recipe)


Last week I posted an American recipe of Sweet French Toast which is prepared with sweet ingredients like milk, vanilla extract and cinnamon and is served with fruits, butter/ honey/ cream and maple syrup. My Indian friends know that this tastes very different than our Savory Crispy Indian French toasts which are prepared with onion, green chilies and cilantro. Now since I have already posted the sweet version, it is only appropriate to post the savory version as well so that you can have two delicious recipes to choose from while preparing a yummy brunch.

When serving these savory French Toasts to kids, make sure to skip the red chili powder/ green chili and black pepper. Serve the toasts with a little honey or jam so that they can enjoy a sweet savory flavor. For the adults, serve them hot with a cup of coffee and a side of fruits.

Happy brunching!


Ingredients:
  • Milk – ½ cup 
  • Onion – ¼ small onion chopped finely or 2 teaspoons Onion Powder
  • Red Chili Powder – ¼ teaspoon or Green Chilies – 2, chopped finely
  • Black Pepper - ¼ teaspoon
  • Salt – to taste (about ½ teaspoon)
  • Eggs - 2
  • Cumin Powder - ¼ teaspoon 
  • Garam Masala - 1/8 teaspoon 
  • Bread – 4-5 thick slices, preferably white
  • Oil - 6 teaspoons 
  • Fresh Cilantro – a handful, finely chopped 


Directions: 
  • Take a shallow dish and beat the Eggs, Red Chili Powder, Black Pepper, Salt, Cumin Powder and Garam Masala together. 
  • Stir in the Milk and add the Onion and Cilantro. Mix well.
  • Heat a big skillet over medium high heat.
  • Add about 3 teaspoons of Oil on it.
  • Dip the Bread in the Egg mixture and turn to coat both the sides evenly.
  • After a minute lift a corner of the bread to check if the other side has cooked. If it lifts easily then flip to cook the other side. Cook both the sides till they are golden brown and crisp. Repeat with the other Bread slices adding Oil whenever required.
  • Serve hot with tomato ketchup or hot Chilli sauce.


Tips: 
  • Make sure to heat the skillet before this step. Our goal is to simply dip the bread slices into the egg mixture. If we leave the bread in the mixture for an extended amount of time, it will absorb more liquid and take longer to cook through.
  • The onion usually slides off the bread, so move a few pieces of onion and Cilantro over the bread using a spoon.
  • Use Food Chopper to finely chop the Onion, Green Chilies and Cilantro
  • Use homemade Cumin Powder and Garam Masala for more flavor.


Recommended Reading:

Wednesday, 27 September 2017

Sweet French Toast (American recipe)


I know I haven’t been able to post anything lately and you must be waiting for a delicious recipe. I was busy celebrating Durga Puja with Debarshi and friends and now I am back! Today I am going to share a quick and easy breakfast/ brunch recipe with you - Sweet French Toast. Now this is very different than our Indian Savory French toast which is prepared with onion, green chilies and cilantro. American French toasts are prepared with sweet ingredients like milk, vanilla extract and cinnamon and are served with fruits, butter/ honey/ cream and maple syrup. 

Don’t forget to enjoy these scrumptious French toasts hot with a cup of coffee. For the kids, sprinkle the toasts with some powdered sugar along with chocolates or spread butter, jam or their favorite cheese on them. I am sure this easy recipe will make everyone happy and content.


Ingredients:
  • Eggs – 2, large
  • Vanilla Extract - 1 teaspoon
  • Ground Cinnamon/ freshly grated Nutmeg – ¼ teaspoon 
  • Icing Sugar - 2 tablespoons
  • Milk – ½ cup 
  • Bread - 4 slices (preferably white)
  • Unsalted Butter -  4 tablespoons 
  • Maple Syrup – ½ cup, warmed


Directions: 
  • Take a shallow dish and beat the Eggs, Vanilla Extract, Icing Sugar and Ground Cinnamon/ Nutmeg together. 
  • Stir in the Milk. 
  • Heat a big skillet over medium heat.
  • Melt about half tablespoon of Butter on it.
  • Dip the Bread in the Egg mixture and turn to coat both the sides evenly. (Note: Make sure to heat the skillet before this step. Our goal is to simply dip the bread slices into the egg mixture. If we leave the bread in the mixture for an extended amount of time, it will absorb more liquid and take longer to cook through)
  • Cook the Bread until golden brown, then flip to cook the other side. Repeat with the other Bread slices adding butter whenever required.
  • Top the toast with your favorite fruits (raspberries, blueberries or strawberries) and serve hot with maple syrup.


Recommended Reading:

Wednesday, 11 January 2017

Pancakes


It's time to make some Pancakes! Yes, today I am going to share the recipe for making yummy delicious soft Pancakes. This is undoubtedly one of my favorite American breakfasts and my stand mixer makes the batter in literally two minutes. 


We have our own version of Pancakes in India which we call Cheela or Dosa. The only difference is, Pancakes are sweet, soft and thick whereas a Cheela/ Dosa is always savory, crisp and thin. We often pair the Cheela/ Dosa with a chutney or soup (Sambar) whereas Pancakes go very well with some scrambled eggs, fruits and coffee/ juice. Another difference which will be interesting to point here is, we do not use eggs while preparing Cheela/ Dosa which does not apply on Pancakes.


Talking of eggs, I always prefer to bring the eggs and butter to the room temperature before adding them in any batter or dough. This makes them easier to mix with the other ingredients. I also like multitasking while making Pancakes so I keep working on the side dishes (scrambled eggs, fruits) and beverages while the Pancakes are happily cooking on the skillet. 


Although you can easily find a ready made Pancake mix from any grocery shop, making this from scratch is really easy. Of course having a mixer helps in making the batter easily and quickly but I have prepared this many times using just the whisk and since the batter is really thin, it mixes easily and quickly. 


The amount of the ingredients given in this recipe will serve two people, so if you are making for more, I would suggest to write down the new amounts of ingredients on a rough draft just to avoid any confusion.

I think Pancakes are a cool substitute for breads and since they are sweet kids love them. Here’s an idea, keep the kids busy while you are serving others by asking them to decorate their Pancakes with fruits, cool whip or chocolate chips. This can be a cute little fun activity which everyone will enjoy and since the kids will be devoting so much time in decorating their Pancakes they will surely eat their fruits. Mission accomplished for the mommies!


Ingredients:

  • All Purpose Flour – ½ and ¼ cups
  • Sugar – 1 ½ tablespoons
  • Baking Powder – ½ tablespoon
  • Salt – a pinch
  • Egg - 1 Large (at room temperature)
  • Milk – ½ cup and 2 tablespoons (at room temperature)
  • Vanilla Extract – ¼ teaspoon
  • Unsalted Butter – 1 ½ tablespoons + about 2 tablespoons for greasing the skillet (at room temperature)

Directions:
  • In a large bowl, sift and whisk together the All Purpose Flour, Sugar, Baking Powder and Salt.
  • In another bowl, beat the Egg and then whisk in the Milk and Vanilla.
  • Melt the Butter in the skillet over medium heat (you may turn off the heat).
  • Whisk the Butter into the Milk mixture. Add the wet ingredients to the flour mixture and whisk until a thick batter forms.
  • Heat the skillet (over medium heat), add a little butter and using a spatula spread it on the skillet.
  • Using a ladle or a small measuring cup (¼ or 1/3 cup size), drop the batter on the skillet to make a Pancake. 
  • After about a minute you will start seeing bubbles breaking the surface of the Pancake. Lift a side carefully with the spatula, the underside will be golden brown.
  • Flip with a flat spatula and cook for another minute.
  • Serve immediately or transfer to a platter lined with a paper towel. You can cover it loosely with a foil to keep it warm. 
  • Repeat the procedure with the remaining batter, adding about a teaspoon of butter to the skillet between batches.
  • Serve with maple syrup, fresh fruits and scrambled eggs.   

Tips:
  • Use a non stick skillet to prepare the Pancakes.
  • Use two skillets to cook Pancakes at the same time.
  • Keeping the butter and egg about half an hour outside the fridge is enough to bring them at room temperature. For milk, 15 minutes should be good.


Pancakes for brunch with Scrambled Eggs, Bacon and French fries.


Recommended Reading: