Featuring over 350 tried and tested recipes that can be prepared at home. From comfort food to restaurant style. Plus 110+ articles on Kitchen and Cooking Tips, Restaurant Reviews and more.
Showing posts with label Indian Salad. Show all posts

Monday, 10 September 2018

Kopi Alur Chochchori (Bengali recipe: Stir fried Cauliflower with Potatoes)


Recipe Courtesy: Mamma

Kopi Alur Chochchori is one of the easiest and delicious stir fries you will ever learn. My mom has tons of vegetarian recipes which she prepares during Durga puja and other fasting days. A simple cauliflower and potato stir fry may sound like nothing special, but it is sheer divine for vegetable lovers. If you have never had a complete Bengali vegetarian menu before you wont know what all you are missing. These veg dishes are prepared with very less oil and spices and they go very well with Luchi or Paratha. You can also serve the Kopi Alur Chochchori with hot steamed rice and Dal. Plus, I think it is always good to know some quick vegetarian dishes because you don’t always have the time or the desire to cook heavy non vegetarian curries. The good thing is, since cauliflower is low on carbs, you can also enjoy this on Keto diet. Just skip the potatoes and enjoy the Chochchori with a cheese naan.

Growing up, this Chochchori was one of my favorites during winter months. These days of course you can enjoy anything at any time but it wasn’t like this when we were kids. Cauliflower used to be a winter vegetable and you can always tell its fresh taste and fragrance in the dish. After winters, we used to wait for several months till we can enjoy this dish again. A ladle full of this Chochchori with a hot crispy Paratha and a slice of my favorite pickle still brings a big smile on my face. 

This dish is very different from our North Indian Alu Gobhi (Curried Potatoes with Cauliflower) because of the addition of Panch Fhoron which is a combination of five whole spices (Fenugreek Seed, Nigella Seed, Cumin Seed, Black Mustard Seed and Fennel Seed). I think what I love most about this dish is its pure simplicity. You can obviously create a delicious dish using tons of ingredients but if you can create something heavenly using a handful then that’s pure talent.

Try to find fresh cauliflower and green chilies for this Chochchori because they will bring the best flavors. I have seen my mom cut potatoes in different ways for different dishes but alas I do not have that skill set. However, it does not affect my enthusiasm to cook and share my favorite dishes and they do taste terrific irrespective of the shape of the potatoes. Believe me there is nothing more satisfying than a homemade hand me down dish so do give this a try.


Ingredients: 
  • Cauliflower- ½ of medium sized cauliflower, cut into 1 inch thin florets 
  • Potato – 2, medium 
  • Panch Fhoron – 1 teaspoon
  • Green chilies – 2, split in halves
  • Turmeric powder: ½ teaspoon
  • Mustard Oil -  2 tablespoons
  • Salt - ½ teaspoon

Directions: 
  • Cut the Potatoes in half lengthwise and then cut them in thin long pieces shaped like the alphabet ‘D’. Alternatively, you can cut them in cubes or whatever shape you feel easy.
  • Wash them and pat them dry with a paper towel
  • Heat a wok on high heat.
  • Add the Oil in it and wait for a few seconds.
  • When the oil begins to smoke, turn down the heat to medium and temper the Oil with Panch Fhoron and Green Chilis.
  • After a few seconds, add the Potatoes in it. 
  • Fry till the potatoes are golden in color. Then add the Cauliflower florets.
  • Fry the cauliflower for a few minutes when they start looking a bit fried and develop a golden color, add the Turmeric Powder and Salt and mix well.
  • Turn down the heat to low and cover and cook for ten minutes. 
  • Mash a piece of potato with your spatula and break a cauliflower floret in half, if they are cooked then turn off the heat. Kopi Alur Chochchori is ready to be served. If not continue to cook for another 5-10 minutes.
  • Serve hot with Luchi or Paratha or Rice, Dal, onion rings and pickles.


Recommended Reading:

Tuesday, 4 September 2018

Dahi Chicken (Seared Chicken in Yogurt Gravy)


Photo Courtesy: Dr. Debarshi Chatterji

If you are looking for a low calorie Indian non vegetarian dish, then this is perfect for you. Dahi Chicken also known as Dahi Murgh is a mouthwatering chicken gravy cooked in yogurt and a handful of spices. Yes, you will need some spices for this dish but let me assure you that these spices can be used in a variety of dishes so if you love Indian food it is high time you buy some spices and prepare a dish yourself. 


Now I am sure you have also faced this situation where you buy yogurt, use it for something and then forget about it. It will sit on the bottom shelf of your fridge and everyday you will look at it and think this is going to expire soon, got to do something with it. Same with the fresh herbs! It is very difficult to use them up quickly and they start going bad within a few days. Well, this recipe is the answer to both these problems. Dahi Chicken is a quick and appetizing dish and a fantastic way to use up all the yogurt and cilantro. 

Dahi Chicken is one of the most flavorful chicken dishes I know and all this flavor comes at a very less effort. You can either keep the gravy or reduce it completely and serve it as an appetizer. We will be using little butter to sear the chicken but that’s it! nothing else is high on calories which makes this dish ideal for all diet plans. The spices bring a beautiful aroma in the chicken and the cilantro completes it. Now there are three types of peppers added in the dish but the sweetness of the yogurt subdues a lot of the heat. If your kid loves chicken, make sure to adjust the amount of heat or skip it altogether so that they can enjoy as well.

Serve this appetizing dish with Naan or Tandoori Roti and red onion slices although it tastes great with plain roti as well.


Ingredients (Serves 2):
  • Garlic – 3-4 cloves, grated or minced
  • Ginger - 1 inch, peeled, grated or minced
  • Garam Masala - 1 teaspoon 
  • Salt – to taste (about ½ teaspoon)
  • Black Pepper Powder – ½ teaspoon 
  • Red Chili Powder – ½ teaspoon 
  • Green Chili – 2, slit in half
  • Chicken - 1 pound (skinless, any type of pieces you like, cut into bite size cubes or big pieces according to your preference)
  • Butter – 2-3 tablespoons 
  • Bay Leaf – 2
  • Cinnamon – 1 stick, broken in half
  • Cloves - 3
  • Green Cardamoms - 3 
  • Plain Yogurt – 1 cup, whisked
  • Cilantro – a handful, washed and chopped


Marinate the Chicken:
  • Start by marinating the Chicken with the Garlic, Ginger, Garam Masala, Salt, 
  • Black Pepper Powder, Red Chili Powder and Green Chili.
  • Keep it aside for an hour.

(Photo shows from left: Rice, Dahi Chicken, Pulao, Dal fry and Alu Dam. I prepared them for a game viewing party at our home)

Directions:
  • Heat a pan on medium high heat.
  • After a few seconds add the Butter in it.
  • As soon as the Butter melts, add the whole spices (Bay Leaf, Cinnamon, Cloves and Cardamoms). 
  • Wait for a few seconds then add the Chicken pieces.
  • Fry the Chicken pieces till they are reddish brown in color. This technique is called Searing. This is a widely used method used in grilling, baking, braising, roasting, and sautéing.  In searing, a surface of the food (usually meat, poultry or fish) is cooked at a high temperature until a caramelized crust forms.
  • Now we have developed a nice color and texture on the chicken, the only thing left is to cook it through. Add the Yogurt in the pan.
  • Reduce the heat to low and stir to mix. 
  • Cover and cook for 10 minutes or until the Chicken is well cooked. The cooking time depends on the size of chicken pieces so make sure to let it cook for another 10 minutes or so if you have big pieces.
  • If the sauce looks too runny, increase the heat and let it reduce till you get your desired consistency. 
  • Add the Cilantro and mix well.
  • Serve with Naan or Tandoori Roti and salad.


Recommend Reading:

Tuesday, 24 July 2018

Mushroom Salad with Fried Eggs


Photo Courtesy: Dr. Debarshi Chatterji

Happy Monday! How was your weekend? 

Debarshi and I started our weekend with our regular grocery shopping. Normally I love doing this on my own, however, since nowadays we shop from Costco, buying grocery has become a two person’s job. Don’t get me wrong, I love Costco, only problem is, we have to buy everything in bulk which makes hauling everything home alone a bit difficult for me. This time we got a box of butter lettuce and white mushrooms and although we were really excited to buy it, we knew that it will be a lot to consume between the two of us. So, I started looking for different recipes which can help me use all the lettuce and mushrooms. I came upon this simple and easy way to prepare salad and let me tell you, a fried egg makes all the difference in the flavor. This is not a fancy recipe but the flavor combination is simply wonderful. This is perfect for lunch or as a side salad. The sautéed mushrooms bring a ton of flavor and the tomatoes and onion on the bed of butter lettuce make everything so bright. This is one of the easiest and delicious salads I have ever made. Try it!

If you love fried eggs and mushrooms, then this is the perfect recipe for you. Trust me when I say that you don’t have to go for regular boring salads everyday. Mix and match the different ingredients or assign a different salad recipe for different days and prepare in small quantities. Try to go for different combination of flavors so that you don’t feel like ‘Why am I eating the same salad everyday!’.


Ingredients (serves 2):
  • Butter – sweet cream unsalted, 1 ½ tablespoons (for the mushrooms) + 2 tablespoons (for frying the eggs)
  • White Mushrooms - 4 big, washed and cut in cubes
  • Salt – to taste (about ½ teaspoon)
  • Black Pepper – freshly ground, to taste (about ½ teaspoon)
  • Onion - 1 tablespoon, finely chopped 
  • Butter Lettuce Leaves – 6, washed 
  • Eggs – 2, large 
  • Tomato – 1 tablespoon, chopped


Directions:
  • Heat a non stick pan over medium heat.
  • Add the Butter (1 ½ tablespoons) in it.
  • As soon as the butter melts, add the Mushrooms and season with Salt and Pepper.
  • Cook until the mushrooms are lightly browned, about 4 minutes.
  • On another burner, heat a small non stick pan over medium high heat.
  • Add a tablespoon of Butter on it.
  • When the butter starts melting, crack an Egg into the pan. Season with Salt and Pepper and cook until the whites are set, about 3 minutes. 
  • Turn off the heat. If you peek underneath, the egg should be crispy and golden brown.
  • Repeat the steps for the second egg.
  • Now arrange the Butter lettuce leaves on salad plates. Form a bowl like shape with them. 
  • Sprinkle the Tomato and Onion on them and season lightly (if desired).
  • Top each with half of the fried Mushrooms.
  • Top each salad with a fried egg and serve immediately.


Recommended Reading:


Recommended Reading (Keto recipes):

Tuesday, 6 March 2018

Chicken Masala


If you want a quick and delicious Chicken recipe, then this is perfect for you. All you need is a good blender and homemade Garam Masala. I have prepared this quite a few times and it tastes really good. Cook this in a wok to get the best texture and flavor and serve it with rice or roti.

Enjoy!

Ingredients:
  • Garlic – 3 cloves, peeled
  • Ginger - 1 inch, peeled 
  • Turmeric Powder – ½ teaspoon
  • Green Chilies - 2
  • Garam Masala – ½ teaspoon 
  • Coriander powder – ½ teaspoon
  • Salt – to taste (about ½ teaspoon)
  • Chicken - 1 pound (skinless, boneless breasts or any type of pieces you like), washed and drained properly
  • Oil – 2 tablespoons 
  • Yellow Onion – ½ of a big onion
  • Cardamom Pods – 3-4
  • Tomato – 2, medium 
  • Whole Black Pepper – 4-5
  • Cloves – 3-4 
  • Cinnamon Stick – 1 inch
  • Bay Leaf - 1


Let’s do some preparations first:
  • Make a paste of Garlic, Ginger, Green Chilies and Yellow Onion. You can use your Nutri Bullet (extractor blade).
  • Marinate the Chicken pieces with the above paste, Turmeric Powder and Salt. Use a plastic or glass bowl for marination. Keep it aside for at least 30 minutes.
  • Make a puree of Tomato. Keep it aside.


Directions:
  • Heat a wok over high heat. 
  • Add Oil in it, wait a few seconds then temper it with the whole spices (Cardamom Pods, Whole Black Pepper, Cloves, Cinnamon Stick and Bay Leaf).
  • After a few seconds add the Chicken with all the marinade in it (be careful).
  • Cook for 5-10 minutes stirring occasionally. You will see that the marinade will start cooking and it will no longer smell raw. 
  • Reduce the heat to medium high then add the Tomato puree, Garam Masala and 
  • Coriander powder. Stir to mix.
  • When it starts to boil, reduce the heat to low. Cover and cook for 10 minutes. You will see the Oil separating.
  • Stir. Cover and cook for 30 minutes. 
  • Serve with rice or roti and a side salad.


Recommended reading:

Wednesday, 31 January 2018

Boondi Raita


Boondi raita is one of my favorite condiments. Whenever I am preparing Kachoris with Kaddu Sabji I have to prepare this yummy raita but before I jump on to the recipe, let me tell you what Boondi and Raita means:

What is Boondi?
Boond means a single water droplet. Boondi is prepared with a batter of Besan (Gram Flour) and spices. Once the batter is ready, we hold a perforated spoon (a round spoon with multiple round holes) 3-4 inches above the oil and drop the batter on it slowly and steadily. The batter drops from those small round holes into the hot oil and immediately form a round shape, of the size of water droplets. They are then fried till golden and removed from the oil. I know the process seems quite easy, however you will be surprised to know that I have never attempted this myself. I always buy readymade Boondi from my local Indian store. It’s convenient and since we use only a small amount of Boondi for the raita, it lasts for several months. 


Photo shows a Perforated spoon


Photo shows a type of Boondi packet found in the Indian stores

What is Raita?
Raita is a yogurt based condiment served usually with lunch or dinner. In Northern India, Raita is often prepared with vegetables which can be raw (cucumber, onion, tomato) or cooked (Alu raita, prepared by boiling the potatoes first). Besides serving as an accompaniment to the main course, just like the Indian salad, a raita is quite a dish in itself and can be paired with fried breads (Kachoris) or rice dishes (Biryanis) for an added flavor. Now you can easily find a readymade raita masala in the Indian store and it tastes pretty good, however, you will see that this raita uses only a handful of ingredients which you can easily find in your pantry. I will therefore recommend not to spend money on the readymade masala.

Why Boondi Raita?
Boondi raita is my favorite because it is quick to prepare and delicious to eat. You don’t have to chop vegetables (cucumber, onion, tomato) or boil potatoes to prepare this raita and hence it can be prepared at the very last minute. I specially prepare it for our get together parties because it tastes great with everything. Also the yogurt works miracles for your digestion. Although I personally like a hot version of this raita, you can always skip the red chili so that the yogurt can immediately cool your taste buds and cleanse your palate for another bite. I never have any yogurt sitting in my fridge because I always find a way to use it. 

I love the crunchiness of Boondi and hence I always add it right before serving so that they retain their crunch. However, if you want, you can mix them a bit early so that they soak up the yogurt. Keep it refrigerated till you are ready to serve. Now, without further ado let’s move on to the recipe:

Ingredients:
  • Boondi – ½ cup, plain salted 

  • Yogurt - 1 cup, plain nonfat
  • Water – ½ cup
  • Chaat Masala - ½ teaspoon 
  • Fennel Powder – ½ teaspoon
  • Cumin Powder – ½ teaspoon 
  • Red Chili Powder – ¼ teaspoon
  • Black Pepper Powder – ¼ teaspoon 
  • Black Salt – to taste (about ¼ teaspoon)


Directions:
  • Take a medium size bowl and add the Yogurt in it.
  • Add all the spices (Chaat Masala, Fennel Powder, Cumin Powder, Red Chili Powder, 
  • Black Pepper Powder and Black Salt) along with the water and whisk to mix everything together well. 
  • Add the Boondi, mix, cover and refrigerate till ready to serve or just cover and refrigerate the yogurt and mix the Boondi right before serving.


Tips: 


Recommended Reading:

Monday, 4 December 2017

Indian Salad


Photo and recipe courtesy: Dr. Debarshi Chatterji

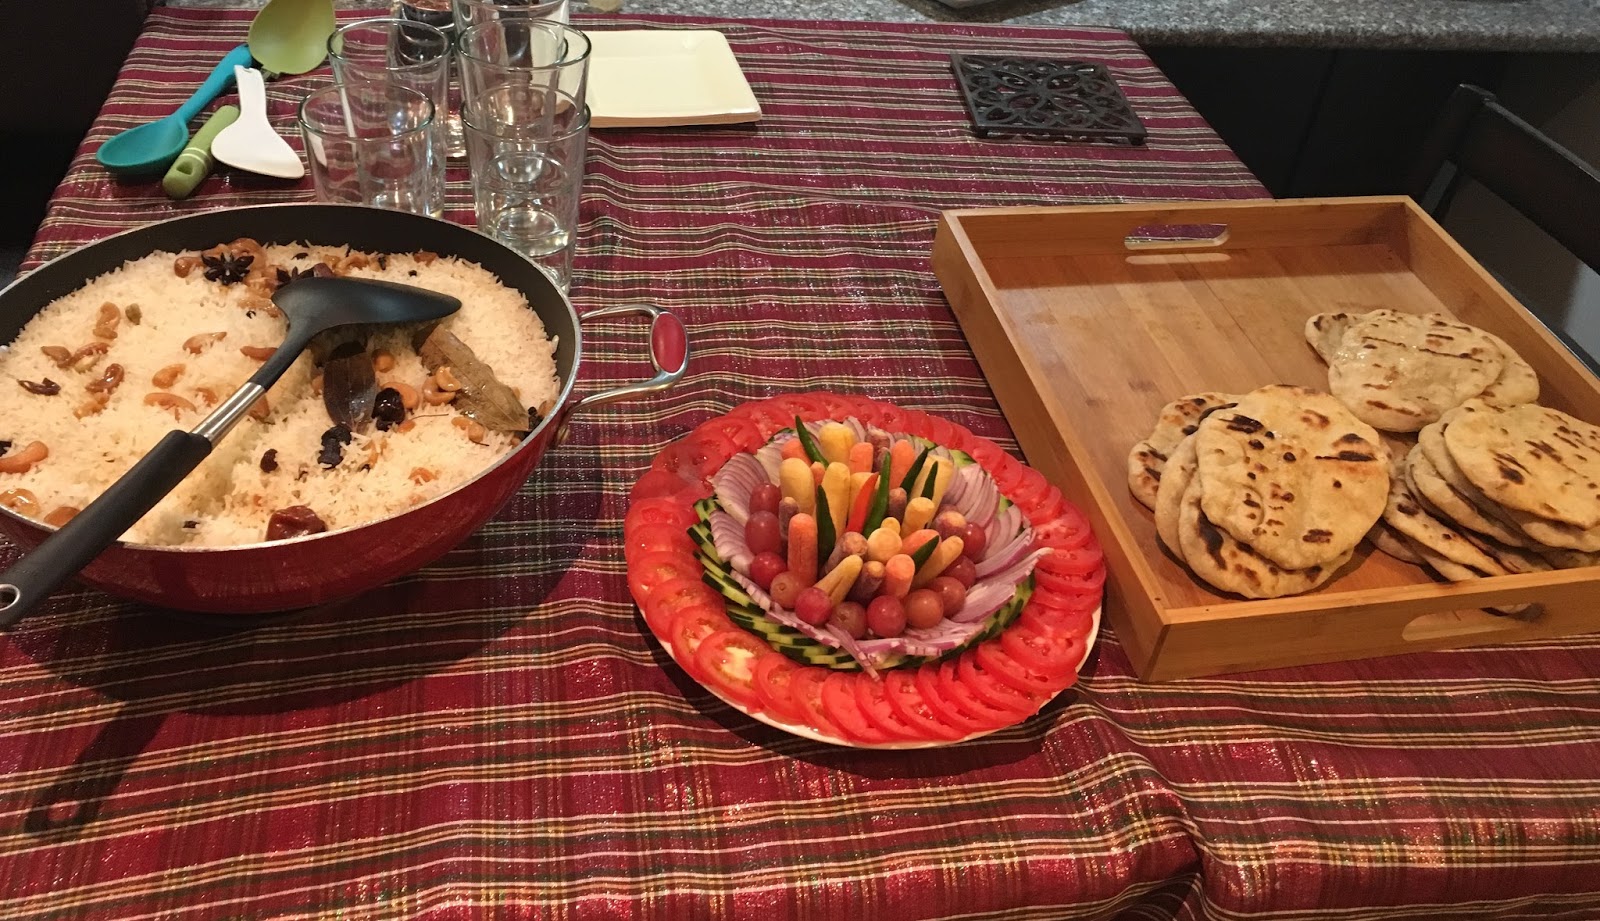
In India, we usually serve Salad as a side dish. They are not the usual appetizer or main course salads, rather they are served as an accompaniment to the main course. Indian main course varies from region to region, but mainly it consists of a soup (dal), a portion of sautéed vegetables (Sabji), a curry prepared with a protein (fish or mutton curry) with rice or flatbreads (roti). This is served with a side dish of freshly available sliced vegetables like tomato, cucumber, onion, carrot etc. Depending on personal preference, you may want to include some fruits or even sprinkle a few drops of lemon or lime on this salad. Although this salad goes great with any Indian main course, I love to serve this with mutton or chicken curries and crispy hot Parathas.


Ingredients:
  • Tomatoes – 3, medium
  • Cucumber – 1, firm
  • Onion – 1, medium, red 
  • Grapes or Olives – a handful (optional)
  • Carrots – baby carrots, a handful
  • Green Chilies – 6-7
  • Plate/ Platter to arrange the salad


Directions:
  • Always choose fresh vegetables. Wash them and let them dry a bit (or wipe them with a paper towel).
  • Choose a sharp knife and carefully start slicing the vegetables. For cucumber, you may choose to peel or leave the skin on. Make sure the slices are thin and even.
  • Start plating, arrange the tomato slices on the outer edge of the plate. Fill the inner circles with slices of cucumber, onion, carrots, grapes and green chilies.
  • Serve the salad with your main course and enjoy.


Recommended Reading: