Featuring over 350 tried and tested recipes that can be prepared at home. From comfort food to restaurant style. Plus 110+ articles on Kitchen and Cooking Tips, Restaurant Reviews and more.
Showing posts with label Breadsticks. Show all posts

Tuesday, 16 July 2019

Culinary Herbs


Thyme

Thyme is a member of the mint family. It is widely used in many cuisines and is used both in fresh and dried forms.  It has a lovely gentle flavor which easily blends with the other seasonings. It is for this reason that Thyme is often used as a substitute to rosemary. If you taste it, you will get hints of lemon and mint with a little warmth and peppery undertone. It is used frequently in Italian cuisine, soups and stews, chili, traditional holiday foods (to season the Thanksgiving Turkey stuffing).  

Used in recipes:


Oregano

This is also a member of the mint family. It is also used both dried and fresh although the dried leaves have more flavor than the fresh ones. If you taste it, you will get a warm, aromatic and slightly bitter taste. you may also get earthy/musty, green, hay and minty notes from it.  Oregano is used widely in Italian cuisine: pizza, spaghetti sauces, and other tomato-based sauces. This is not one of Debarshi’s favorite spices and hence I use it only in moderation in my recipes. Oregano goes best with other strong flavors hence garlic pairs beautifully with it. Just like rosemary, oregano is also very pungent and should be used carefully in any dish.

Used in recipes: 


Parsley

Of all the herbs this one is my favorite. This looks very much like cilantro but tastes slightly bitter. It is used in many different cuisines (like European, middle eastern, American). It is used both in its dried and fresh forms to cook and garnish soups, stews and casseroles. Just like lemon, parsley can instantly add flavor in savory dishes. Earlier I used to cook a lot with dried parsley, however, these days I prefer getting it fresh and add it like a garnish. It not only adds a bold flavor to the dishes but also makes the dish look amazingly pretty.

Used in recipes: 

Basil

Before coming to the US, the only Basil I knew was the Holy Basil also known as Tulsi. It is an aromatic plant planted in almost all hindu houses for religious and traditional medicinal purposes. Growing up I have had herbal teas prepared with Tulsi almost every winter. It is prepared with Ginger, Jaggery and Black Pepper and is said to be a wonderful cure against the common cold. It tastes very different than the Basil we use here in US. If you have ever had Pesto or marinara sauce, you know the taste of Basil. I love that we have Basil in our herb garden along with Parsley because it helps me explore more dishes with this aromatic herb.


Used in recipes: 


            Rosemary

            This is also a member of the mint family. If you smell rosemary you will get hints of lemon and pine. It is pungent and slightly bitter in taste and personally I am not a big fan of rosemary. Rosemary easily overpowers the entire dish if used in wrong quantities. It also has a slight warmth and peppery undertone in flavor. Being a forceful herb with a very distinct sharp flavor, rosemary is never used as a substitute to thyme. It is used as a prime seasoning to cook potatoes, pork, shellfish and even rabbit. 

            Used in recipes: 

            Mint

            Mint is widely used in Indian cuisine in biryani, chutney, curry and beverages. It has a cooling flavor which is very different than the other herbs. Because of its aroma Mint instantly brightens the flavor of the dish and is also used in many beverages and desserts. 

            I never use dried mint for my dishes (unless the recipe specifically calls for it) because it doesn’t come close to the aroma and flavor of a fresh bunch. Mint is actually really easy to grow at home too. At our last apartment, Debarshi planted a few varieties of Mint in several pots (Chocolate mint, Peppermint, Spearmint etc.). They grew beautifully without much need for care or fuss and of course were very handy whenever we wanted to add them in anything. When choosing mint, look for green leaves, free from dark spots or yellowing.

            If I have Mint leaves I would instantly make a yummy green chutney with some cilantro and green chili.

            Monday, 21 May 2018

            Cute Round Loaf of Bread


            When you have deli and cheese sitting in the fridge, bake this hearty bread and make a delicious sandwich! Well, that is what I did. I wanted to have some homemade bread before starting the Keto (Low-carb) diet so I decided to bake this bread. You can also enjoy this with a bowl of soup or stew. We were so excited to see the hot bread straight from the oven that we couldn’t stop ourselves from having a nice thick slice with loads of butter.

            If you love baking but don’t know how to do it, let me be your guide. As a self taught baker there have been many hits and misses in my experiments but in that process I have discovered a few recipes which work for me every time. 

            If you do try this bread, please let me know. 

            Good luck and happy baking!


            Ingredients:
            • Active Dry Yeast - 2 teaspoons 
            • All-Purpose Flour - 2 cups, plus more for dusting
            • Salt – ½ teaspoon 
            • Sugar - 4 tablespoons 
            • Unsalted Butter - 4 tablespoons, softened


            Directions:
            • In an oven safe dish, pour ½ cup lukewarm water (the water should not be too hot or cold, it should just feel lukewarm on the inner side of your wrist), sprinkle in the Yeast, cover and set aside until foamy.


            (See the measuring cup? It’s the Yeast all foamy and ready to work its magic on the flour)

            • After 7-8 minutes add the All-Purpose Flour, Salt, Sugar and Unsalted Butter. Attach the dough hook and run for a few seconds or if kneading by hand, mix for about 30 seconds. 
            • Add the Yeast water and knead into a smooth and soft dough. 
            • Transfer to an oven safe dish and cover it.
            • Set the oven temperature to Warm (or the lowest you can find on the temperature knob, example: 170 degrees)
            • Place the dish in the oven (The dough should feel warm and cozy inside). Switch off the oven.
            • After an hour, take out the dough it should have doubled. 


            • Again set the oven temperature to Warm (or lowest) and punch down the dough.
            • To form a cute round loaf, I used a round baking pan of 6 inches. I greased it with butter and kept it aside.
            • Now clean a surface on your kitchen counter and dust it lightly with the All Purpose Flour. 
            • Turn all the dough onto this floured surface and knead 50 turns. Pull a part of the dough and fold it inside, press and push the dough a little with your palm, flattening it, then repeat the steps.
            • Shape the dough into a round loaf and place it in the greased baking pan.
            • Score the dough – Now this is a very important step and I should tell you I don’t have a proper scoring knife at home. Thankfully you can just use a sharp knife or a serrated bread knife to make cuts in your dough. Why we are doing this step? So that the dough can rise properly and through these cuts. If you choose not to do this, then the bread will just crack from wherever it pleases. To score, hold the knife firmly and make single slashes on the dough in a design you want.
            • Loosely cover it and let it rise in the warm oven for an hour until almost doubled. I usually place the baking pan in a big container and loosely cover it with a kitchen towel. It helps to give it a beautiful rise without any obstructions. Remember if you don’t cover your dough, it will develop a hard top layer.
            • Preheat the oven to 400 degrees. 
            • Bake till it is light golden in color, about 10 minutes. 
            • Once the baking part is complete, transfer the hot bread to a cooling rack.
            • After 5 minutes, run a sharp knife around the edge of the baking pan and using a kitchen towel carefully transfer it on the cooling rack.
            • Enjoy with butter or with soup/ stew or make a sandwich!


            Recommended Reading:

            Tuesday, 28 November 2017

            Easy Pecan Pie


            Photo courtesy: Dr. Debarshi Chatterji


            Thanksgiving for us means Pecan Pie and lots of good food. As I have mentioned before, it is a thanksgiving tradition for us to go to Vicki and Calvin’s place and enjoy a delicious homemade meal with them. Vicki would prepare a ton of mouth watering southern dishes with the turkey, mashed potatoes and green beans. Victoria would bring homemade bread with cranberry sauce and we usually take an Indian side dish with us. For dessert, Vicki would bake her delicious Pecan Pie and even though we would be totally full by that time, we would enjoy it with them and stuff us till we groan! Yes, that is how we celebrate Thanksgiving with them. They are our family away from home. 

            This year since we moved to Kansas City, we couldn’t visit them during thanksgiving and it was definitely a downer for us. Specially for Debarshi, since he had been visiting them for 7 years! So, to cheer up both of us, I decided to bake a Pecan Pie. Now, normally I would go all the way and start from scratch, right from preparing the pie dough. However, this time I decided to go for a shortcut and I should say, it turned out really good. Well, a picture is worth a thousand words so what do you think?


            Now this recipe is pretty simple and straight forward. Make the filling, bake the pie, cool it, refrigerate then serve and enjoy! I was a bit uncertain about the result (as I am always with the new recipes) but when we finally ate it, it was delicious! We loved the Pecans and the corn syrup and since the recipe is so easy I am going to bake this again for one of our get together parties. 

            If you are a Pecan Pie lover, don’t wait, this delectable pie uses only seven ingredients so try this today!


            Ingredients:

            • Granulated Sugar - 1 cup 
            • Light Corn Syrup - 1 cup 
            • Butter - 2 tablespoons, sweet, unsalted, melted 
            • Vanilla Extract - 1 teaspoon
            • Eggs – 3, large
            • Pecans - 1 ½ cups, halves
            • Deep Dish Pie Shell - 1 (unbaked and frozen)


            Let’s make the filling: 

            • Mix the Granulated Sugar, Light Corn Syrup, Butter, Vanilla Extract and Eggs together in a bowl. The mixture will be thick so make sure the sugar is mixing well with everything.


            Directions to Bake the Pie:
            • Preheat the oven to 350 degrees F. 
            • Pour the pecans in the bottom of the unbaked pie shell. 
            • Pour the syrup mixture over the top.


            • Place the Pie plate on a cookie/ baking sheet. 
            • Bake for about 60 minutes, then gently shake the pie to check if the filling jiggles slightly in the center.
            • Take it out of the oven and place on a cooling rack to cool completely (approximately 2 hours) then refrigerate. 
            • Serve with whipped cream (optional).


            Tips: 
            • Spray or grease the cookie pan before placing the pie crust on it. This will help an easier clean up in case the syrup overflows.


            Recommended Reading:

            Monday, 10 July 2017

            Salad - Roasted Asparagus with Feta Cheese


            Today I thought how about a crisp salad recipe? There is nothing more delicious like some roasted Asparagus. Top it with some Feta cheese and you got yourselves a treat! I tried this salad last night and it was so good I decided to post it on the blog straightaway. 

            Bon Appetit!


            Ingredients:
            • Asparagus – ½ bunch fresh, washed, trimmed and cut into bite-size pieces 
            • Olive Oil - 1 tablespoon
            • Garlic Powder - 2 pinches, or Garlic – 1 clove, minced
            • Iceberg Lettuce Leaves - 2 cups, cut into bite-size pieces 
            • Grape Tomatoes – ½ cup, halved 
            • Feta Cheese – ½ cup crumbled (try some flavored Feta cheese like Jalapeños, Peppercorn or Tomato and Basil)


            Directions:
            • Preheat oven to 400 degrees F.
            • Place asparagus in a large bowl. 
            • Drizzle olive oil over asparagus and season with garlic powder; toss well.
            • Transfer asparagus to a baking sheet in a single layer.
            • Bake in the preheated oven until asparagus are tender, about 10-12 minutes.
            • Place lettuce in the same bowl used for asparagus; top with tomatoes, feta cheese, and asparagus. Serve.


            Monday, 31 October 2016

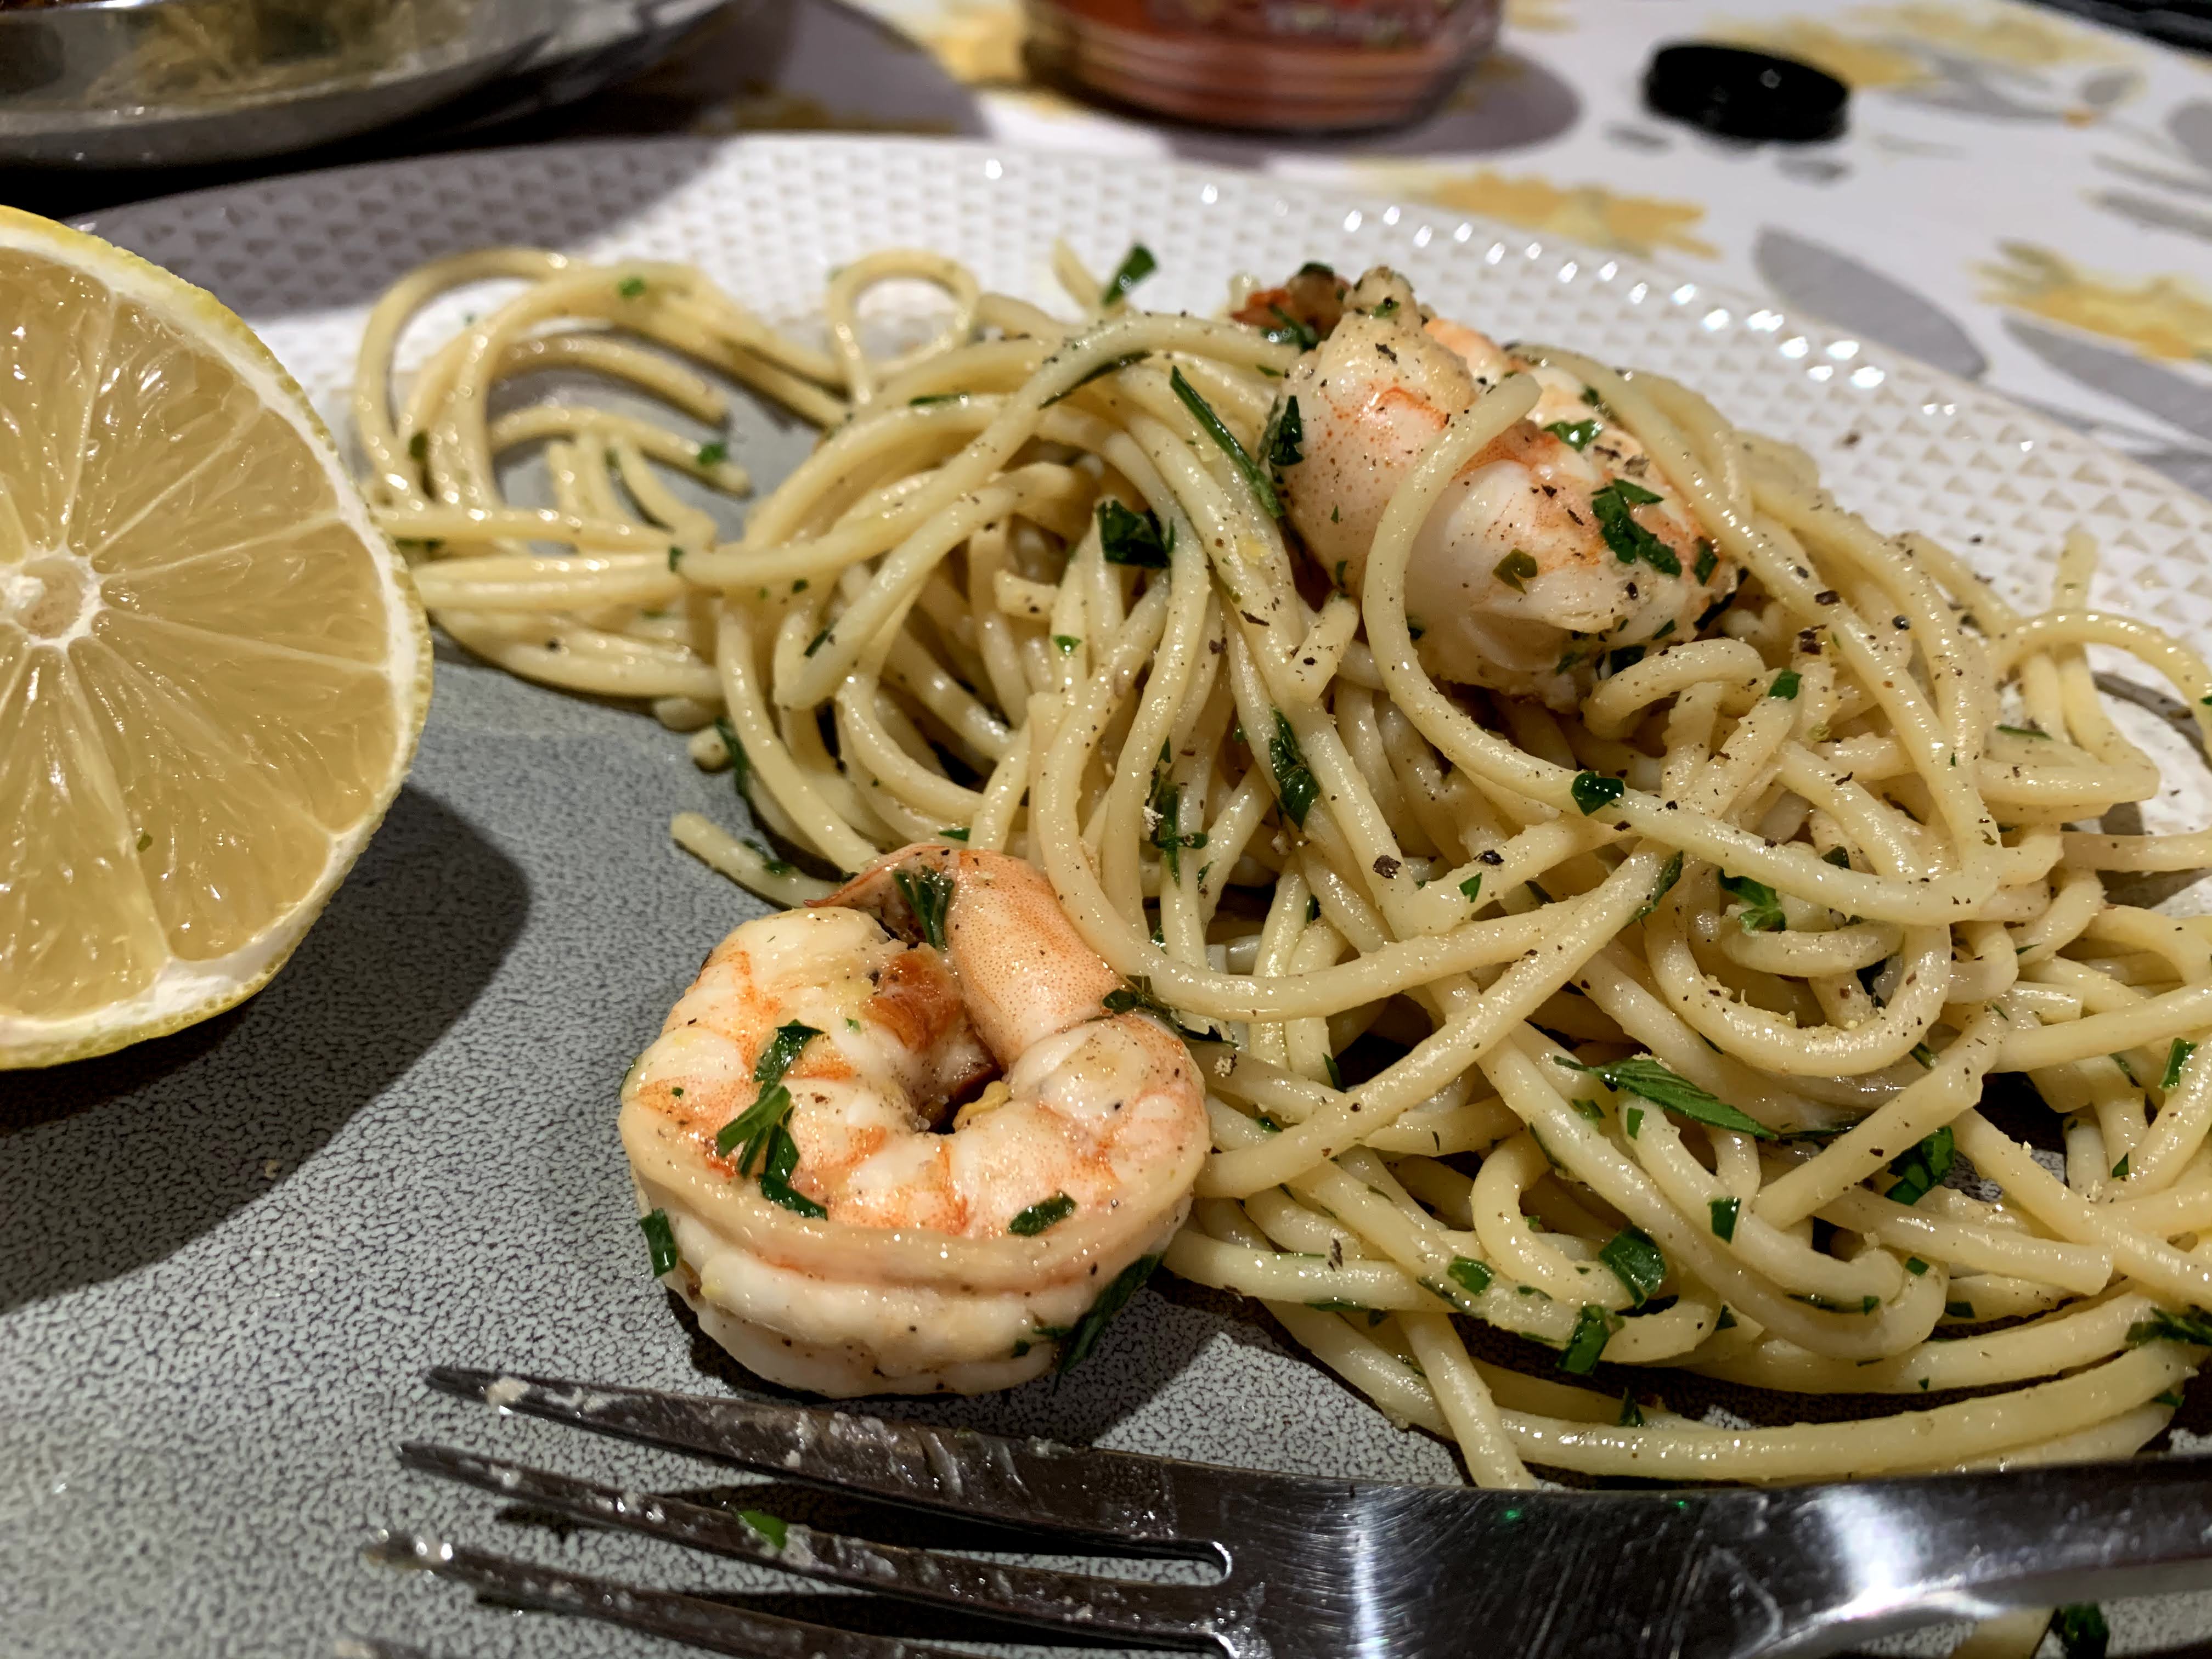
            Buttery Lemony Garlicky Shrimp Scampi Pasta


            A couple days ago I was going through my cook book and I found an amazing recipe which I haven’t prepared in a long time and I thought, this recipe should be on my blog because this creamy garlicky pasta is an amazing date night treat. So foodies, I present to you - Buttery Lemony Garlicky Shrimp Scampi Pasta.

            Now let me tell you that this flavorful pasta is a very popular dish often served in restaurants and if you like to cook this can be a very good opportunity to impress your loved one. While trying a new recipe or dish always remember to check for ingredients which you may be allergic to. Certain seafood’s like Crab meat or Shrimp are not for everyone so, I always advise to ask your guests/ family members for any allergies they may have. For those who love Shrimp but have never had an Italian pasta before, this can be a very good meal to start with. Plus, your Date may be reluctant for a big piece of steak but a leaner protein will certainly be more acceptable. I have prepared this pasta quite a few times as a Date Night dinner for Debarshi and it always turns out pretty good. All you need to do is prepare the pasta and serve it with a piece of French bread or a bowl of salad, fill up two glasses with your favorite drink and enjoy a candlelight dinner with your date.


            I love that this pasta recipe is so different than my Chow Mein recipe in which we used a lot of vegetables, meat and sauces and we prepared the pasta by stir-frying it with different ingredients. Now this pasta is prepared in a totally different way. We will use Parsley and Lemon which will create a fresh and citrusy flavor while the Shrimps and Garlic will bring a unique sea food aroma in the entire dish. We will begin by first cooking the Shrimp in the spices and then prepare a creamy sauce of Butter, Olive Oil, Shrimp Shells’ water, Garlic, Parsley and Lemon. The Shrimps will be then mixed with the thin Linguine Pasta and cooked in this scrumptious sauce. 

            This recipe also introduced me to a new herb – Parsley, which I have never used in India. Indian cuisine uses a variety of herbs, Cilantro and Mint being the two most common of them. When I saw Parsley the first time I actually confused it with Cilantro as the two look so much alike. However, Parsley has a very different taste than Cilantro. Now, if you are unable to get any fresh Parsley you can use the dried one which is easily available in any grocery shop in the spice aisle. This brings us to my favorite part of the recipe - Spice Mix.

            I found that there are readymade spice mix packages of this pasta readily available in the market. I have used this a couple of times and it works great. The spice package is usually labelled as ‘Shrimp Scampi seasoning mix’ and I always use the brand ‘McCormick’. If you cannot find this particular brand, you can still use any other brand you may find with just a small additional step which is, cross check the ingredients included in the mix. Sometimes the spice mix may not have all the ingredients in it so always check and buy any ingredients which we need for the recipe at the same time. Also, for a new cook peeling and deveining the Shrimp can be overwhelming. Many stores have people assigned in the meat section to do this task for you. You will need the shells for the Pasta so don’t forget to take them back.

            This Pasta can be easily prepared in 15- 20 minutes so you may want to arrange the table, candles etc. before you start cooking. While preparing this dish for the first time, I would recommend you to follow the recipe as it is because the Butter and All Purpose Flour Linguine Pasta gives it the actual restaurant flavor. Once you get familiar with the taste and cooking method don’t be afraid to improvise. You may use any other type of pasta available in your pantry and if you are cutting on calories you can even choose Wheat Pasta and cook with Olive Oil instead of Butter. For your convenience I have also added a guide on ‘How to Cook Perfect Pasta’.

            Try it and let me know how it turns out. Bon Appetit!


            Ingredients:
            • Linguine (Angel Hair or other pasta) - 8 Ounces 
            • Olive Oil - ¼ Cup
            • Butter - ¼ Cup (½ stick) 
            • Large Shrimp - 1 Pound, peeled and deveined, reserve the shells
            • Garlic Cloves - 6, grated
            • Onion - ¼ cut in cubes 
            • Red Pepper Flakes - 1 Teaspoon
            • Salt - ½ Teaspoon
            • Freshly Ground Black Pepper - ½ Teaspoon 
            • Parsley - 1 Small Bunch, leaves chopped
            • Lemon - 2, juice + zest or 2 Tablespoons White Wine


            Let’s Prep:
            • In a bowl, combine the Garlic, Lemon Zest and Juice (of 1 Lemon), Olive Oil, Red Pepper Flakes, Salt, Pepper and the Shrimp. 
            • Set aside to marinate.


            Let’s make the Shrimp stock: 
            • Heat a small pot, over medium heat
            • Add the Shrimp shells and Onion. 
            • Cover with water and bring to a boil. 
            • Reduce the heat and simmer for 20 minutes. 
            • Strain into a bowl and discard the shells and the onion.
            Tip: If you forget to reserve the shells or don't want to do this step, add ½ teaspoon Onion Powder in the Shrimp marinade.


            Let’s cook the Pasta:
            • Bring a large pot of water to a boil over high heat and add a generous amount of salt. 
            • Add the Linguini and cook until just tender, 2 minutes less than instructed on the package. 
            • Drain and reserve ½ cup of cooking water. 
            • See the tips on ‘How to Cook Perfect Pasta’.


            Directions for Shrimp Scampi:
            • Heat a big pot over high heat. 
            • Add the Butter.
            • Remove the Shrimp from the marinade (but reserve the marinade) and add the Shrimp to the pot. 
            • Cook until they turn pink and start to caramelize, about 3 minutes, stirring it occasionally.

            • Remove the Shrimp from the pot to a plate and add the reserved marinade. 
            • Let it cook for a few minutes then add about 1 cup of Shrimp Stock and about ½ cup pasta water. 
            • Continue to cook until this sauce reduces by half. 

            • Add half of the chopped Parsley and check the acidity. If you want more acid add the Zest and Juice of the second Lemon and stir to combine. 
            • Adjust the seasoning with Salt and Pepper. 
            • Add in the Shrimp, rest of the chopped Parsley with the Pasta and toss to combine with the sauce. 
            • Turn out into a serving bowl and serve immediately.


            Tips:
            • Use a package of Garlic Butter Shrimp Scampi Seasoning Mix. Check the ingredients of the package it should have the following: Garlic, Red Pepper Flakes, Salt, Butter and Parsley. If anything is missing, then buy those ingredients otherwise this package is sufficient to prepare the pasta. 
            • You can use 1 stick of Butter instead of Olive Oil for more taste.
            • If you want to cook ahead, fry the shrimp, reduce the marinade with the pasta and shell water and cook the paste before hand. Before serving, microwave the shrimp and pasta to warm them up, heat the sauce and add everything together. Fry for a few minutes so that everything mixes nicely. Sprinkle the leftover chopped parsley and serve.


            Make it Healthy:
            • Use only ½ cup of Olive Oil to prepare the pasta. 
            • Use a Wheat Pasta.


            How to Cook Perfect Pasta


            Recommend reading: